

Before You Begin
Virtual Deployment You will need only a single virtual NIC on your virtual appliance.
Step 1. Enter the License Code
You will need your Barracuda Vx license token. You should have received this via email or from the website when you downloaded the Barracuda Load Balancer Vx package. If not, you can request an evaluation on the Barracuda Networks website at http://www.barracuda.com. The license token looks similar to the following: 01234-56789-ACEFG.
- Start your virtual appliance, making sure to open the console.
- When the login prompt appears, log in as admin with a password of admin.
- Set the IP address and, under Licensing , enter your Barracuda License Token and default domain to complete provisioning. The virtual appliance will reboot at this time.
Step 2. Open Firewall Ports
If your Barracuda Load Balancer Vx is located behind a corporate firewall, open the following ports on your firewall to ensure proper operation:
| Port | Direction | TCP | UDP | Usage |
|---|---|---|---|---|
| 22 | Out | Yes | No | Technical Support Services |
| 53 | Out | Yes | Yes | Domain Name Service (DNS) |
| 80 | Out | Yes | No | IPS and firmware updates |
| 123 | Out | No | Yes | Network Time Protocol (NTP) |
| 80 | Out | Yes | No | Initial Provisioning * |
* The initial provisioning port can be disabled once the initial provisioning process is complete.
For any ports used by Services, configure 1:1 NATs as needed. Also configure any port required to access the VIP address of a load-balanced Service.
Step 3. Deployment Options
Before deploying the virtual appliance, take the following into consideration:
- The Barracuda Load Balancer Vx can be deployed only in Route-Path mode; Bridge-Path deployment is not supported.
- Once you have imported the image, verify the RAM and CPU Cores have been assigned based on the details in the article Sizing CPU, RAM and Disk for Your Barracuda Load Balancer Vx.
- You can assign a maximum of 3 network interface cards (NICs) to the Barracuda Load Balancer 340 and 440 based on the following priority list:
- First NIC Card: WAN Port
- Second NIC Card: LAN Port
- Third NIC Card: Management Port
Common deployment options include:
- Use a Service type of TCP Proxy in a one-armed Route Path deployment, where the WAN port of the Barracuda Load Balancer is used for all load-balanced traffic as shown in Figure 1.
Figure 1. One-armed Route-Path deployment.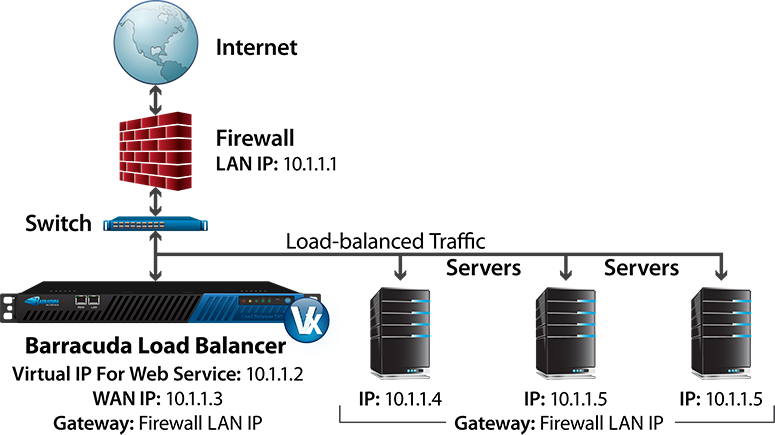
- Two-armed Route-Path deployment, where the Barracuda Load Balancer is deployed in-line, performing a NAT from the WAN network to the LAN. By default the VM is configured for one network interface card (NIC). If you add another NIC, the first installed NIC is the WAN and the second installed NIC is the LAN. A complete list of deployment options are described in the Barracuda Load Balancer Deployment Options article.
Figure 2: Two-armed Route-Path Deployment.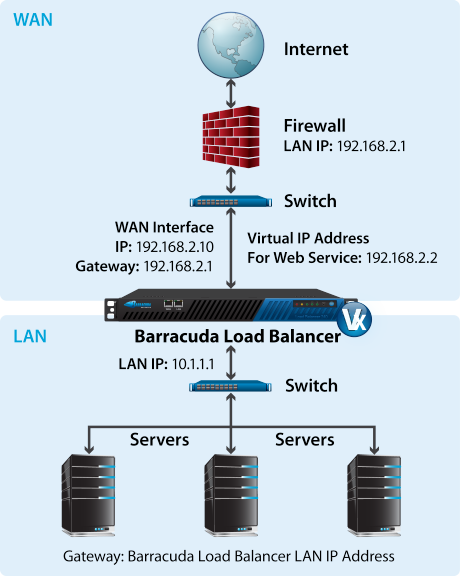
Step 4. Configure Network Settings
- Log into the Barracuda Load Balancer Vx web interface as the administrator.
Username: admin Password: admin - Go to the BASIC > IP Configuration page. If there is a LAN interface, enter the LAN IP address and subnet mask. In two-armed Route-Path mode, the LAN IP address acts as the default gateway for the Real Servers. In one-armed Route-Path mode, the LAN IP address may be used for management.
- Fill in values for the rest of the fields on the page and save your changes.
Step 5. Configure a Service
For a one-armed Route-Path deployment, connect the Real Servers to the switch plugged into the interface. Create the Service on the Barracuda Load Balancer Vx using the BASIC > Services page.
Step 6. Test connectivity
Verify network connectivity by using a system in your existing network to access the Service you just defined. Connect to the Virtual IP address in the same way you used to go to the single server.
Next Step
Follow the instructions in Step 3: How to Configure the Barracuda Load Balancer Web Interface to configure your virtual machine.