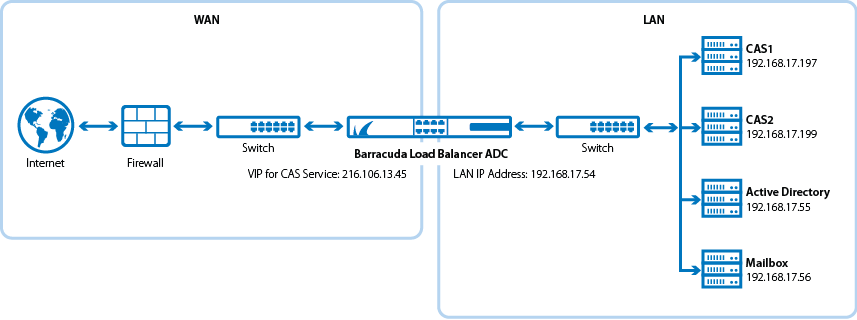
Barracuda Networks has conducted interoperability tests using the Barracuda Load Balancer ADC and Microsoft® Exchange Server 2013 and Microsoft Exchange Server 2016. Follow the steps in this guide to deploy the Barracuda Load Balancer ADC to increase the scalability and reliability of your Microsoft Exchange Server deployment. Using a Barracuda Load Balancer ADC allows load balancing of a Client Access Server (CAS).
Product Versions and Prerequisites
You must have:
- Barracuda Load Balancer ADC version 5.1 or above.
- Microsoft Exchange Server 2013 or Microsoft Exchange Server 2016.
- Installed your Barracuda Load Balancer ADC(s), connected to the web interface, and activated your subscription(s).
- If you want to deploy the Microsoft Exchange Server with high availability, clustered your Barracuda Load Balancer ADCs . For more information, see High Availability.
Terminology
| Term | Description |
|---|---|
| Microsoft Exchange Server | A Microsoft Exchange Server deployment consists of Client Access Servers (CAS) and Exchange Mailbox servers. |
Fully Qualified Domain Name (FQDN) | The unique name for a specific computer or host that can resolve to an IP address (e.g., www.example.com). |
| Virtual IP (VIP) Address | The IP address assigned to a service. Clients use the virtual IP address to connect to the load-balanced service. |
| Service | A combination of a virtual IP address and one or more TCP/UDP ports that the Barracuda Load Balancer ADC listens on. Traffic arriving on the specified port(s) is directed to one of the real servers associated with a service. |
| Instant SSL | Instant SSL provides SSL (HTTPS) access to content on servers without having to modify the servers or the content on the servers. The Barracuda Load Balancer ADC rewrites the "http" links in the response to "https". |
| Client Access Server (CAS) | Client Access Server supports various protocols used by end users to access their mailboxes. This includes services such as RPC Client Access, IMAP, POP3, OWA, and ActiveSync. |
| Real Server | A server associated with a service that handles the requests forwarded to it by the Barracuda Load Balancer ADC. |
| Outlook Web App (OWA) | Originally called Outlook Web Access, OWA is the Webmail component of Microsoft Exchange Server 2010. |
Deployment Topology for Microsoft Exchange Server 2013

Deployment Topology for Microsoft Exchange Server 2016

Deploying Exchange Services on the Barracuda Load Balancer ADC
To deploy the Exchange servers with the Barracuda Load Balancer ADC, complete the following steps:
Step 1. Create the Exchange Services
- Log into the Barracuda Load Balancer ADC as the administrator.
- Go to the BASIC > Certificates page, and create or upload a certificate for the service.
Go to the BASIC > Services page and add the following services. Click Add Service and enter the values in the corresponding fields (each service must be added separately).
Name
Type IP Address
Port HTTP Service Port Session Timeout SSL Settings
Certificate
Load Balancing Exchange_InstantSSL
Instant SSL VIP address for the FQDN
that clients use to access
the Outlook Web Access
(OWA) and Exchange
Admin Center.443 80 1200 Secure Site Domain – Enter the
domain name of your Exchange
server. If the internal and external
domain are different, you can
use wildcard characters.
For example: *.barracuda.comIf your Barracuda Load Balancer
ADC is running version 5.1.1 and
above, set the Rewrite Support
option to Off. For versions below
5.1.1, this option is named Instant SSL.Select the certificate that you uploaded for the service.
Persistence Type: Cookie Insert
Persistence Time (Barracuda
Load Balancer ADC 5.4 and earlier): 1200 seconds
Cookie Expiry (Barracuda
Load Balancer ADC 6.0
and later): 1200 seconds
Cookie Name – Choose a cookie name.Exchange_SMTP TCP Proxy VIP address for the FQDN
that Microsoft Exchange
server uses to receive mail.25 N/A 1200 N/A N/A Persistence Type: Source IP
Persistence Time: 1200
Click Create.
- If you have the Barracuda Load Balancer ADC 540 and above, you can enable Application Security for the service.
- For Application Security, select Enable.
- For Security Mode, select the Passive mode. It is recommended that you run the service in Passive mode before going active.
From the Security Policy list, select owa2013. This policy is predefined for all Exchange applications and applies to both Exchange Server 2013 and 2016.
You need to modify the default owa2013 policy. Go to the SECURITY > Security Policies page and select the owa2013 security policy. In the Cookie Security section, set Tamper Proof Mode to None.
Step 2. Add the Real Servers
Add each CAS to your service. For each server, enable SSL and configure health checks. Certificate validation can be ignored.
- On the BASIC > Services page, verify that the correct service for the server is displayed.
Click Add Server. Enter the values in the corresponding fields.
IP Address Port Server Monitor IP address of the CAS 443 - Testing Method: Simple HTTPS
- Port: 443
- Test Target: /owa/auth/logon.aspx (unless you modified the default path of logon.aspx)
- Test Match: Microsoft Corporation
- Additional Headers: User-Agent: Barracuda Load Balancer ADC Server Monitor
- Status Code: 200
- Test Delay: 30
- Click Create.
If SNI is enforced on the Microsoft Exchange server(s), click Edit for each affected server, expand Settings and set Enable SNI to Yes.
Step 3. Configure an HTTP Request Rewrite Rule
To simplify access to the Outlook Web Access site for your users, configure a rewrite rule to add /OWA to the end of the URL.
- Go to the TRAFFIC > Web Translations page.
- From the Service list, select the Exchange_InstantSSL service.
In the HTTP Request Rewrite section, add the following rule. Click Add Rule and enter the values in the corresponding fields.
Rule Name Sequence number Action Old Value Rewrite Value Rewrite Condition OWA 3 Redirect URL / /OWA * - Click Save.
Step 4. Configure DNS
Configure the VIP address on the CAS virtual directories. Configure the DNS for the following domain names to point to the VIP address that you created for the Exchange_InstantSSL service:
- mail.domain.local
- autodiscover.domain.local
- eas.domain.local
- outlook.domain.local
- oab.domain.local
- ecp.domain.local
Configure HTTPS namespace on the Exchange Admin Center:
- Log into your Microsoft Exchange Admin Center.
- Click Servers > Virtual Directories.
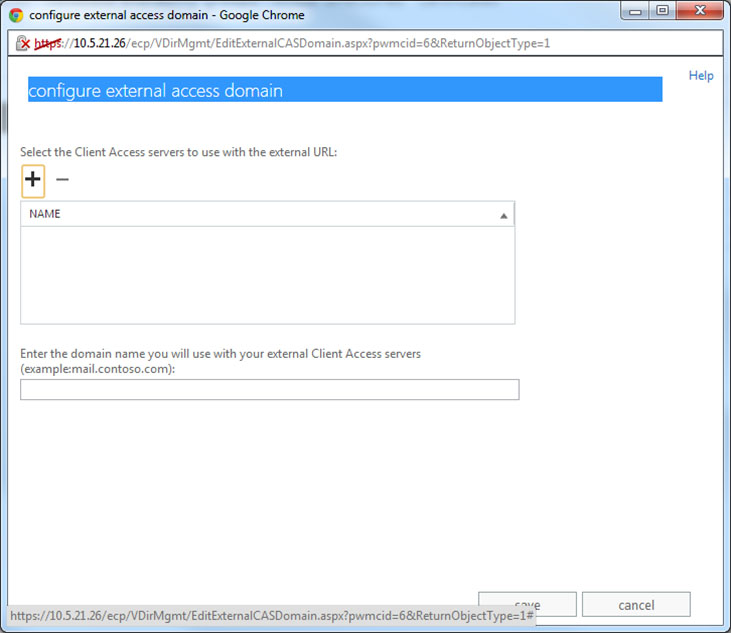
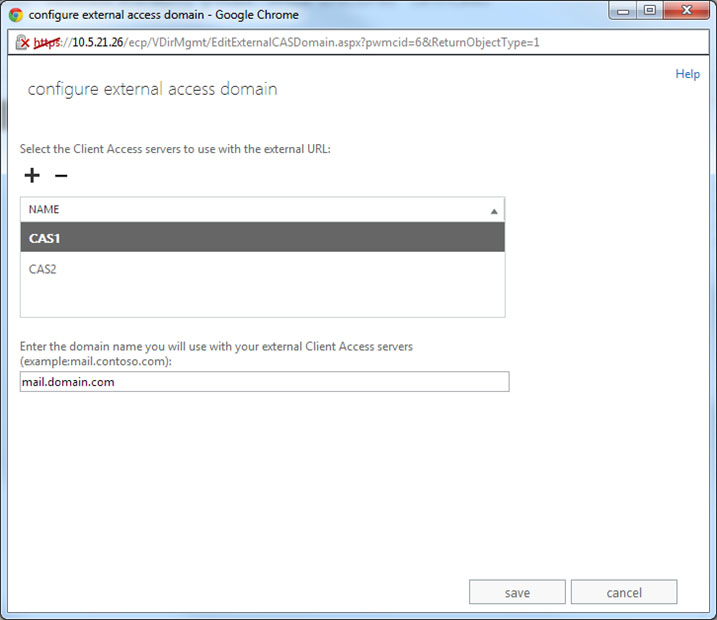
- Select CAS1, click Edit , and configure external access domain.

- Add both servers to the list and configure the external domain.

- Click Save.
Next Step
You can configure authentication and access control for your applications. For more information, see Access Control.
