

VMware Horizon View provides end users with access to their machines and applications through a unified workspace across multiple devices, locations, and connections. The Horizon View Connection Server authenticates and then directs incoming user requests to the appropriate View desktop.
The Barracuda Load Balancer ADC increases the performance, scalability, and reliability of VMware Horizon View. It distributes traffic among the Horizon View Connection Servers in your deployment for better load distribution and monitors the health of each server.
Product Versions and Prerequisites
You must have:
- Barracuda Load Balancer ADC version 5.4 and above.
- Personal Computer over Internet Protocol (PCoIP).
- VMware ® Horizon View™ version 7.x.
- Installed your Barracuda Load Balancer ADC(s), connected to the web interface, and activated your subscription(s).
- If you want VMware Horizon View Servers with high availability, deploy the Barracuda Load Balancer ADCs in a clustered environment. For more information, see High Availability.
- A signed certificate to deploy the Barracuda Load Balancer ADC in a VMware Horizon View environment. Barracuda Networks recommends that you have a signed certificate authority (CA) certificate. If you already have a signed CA certificate, you can continue with configuring the VMware Horizon View service on the Barracuda Load Balancer ADC. If you want to create a self-signed certificate, see Create a Self-Signed Certificate for instructions.
Deployment Scenario
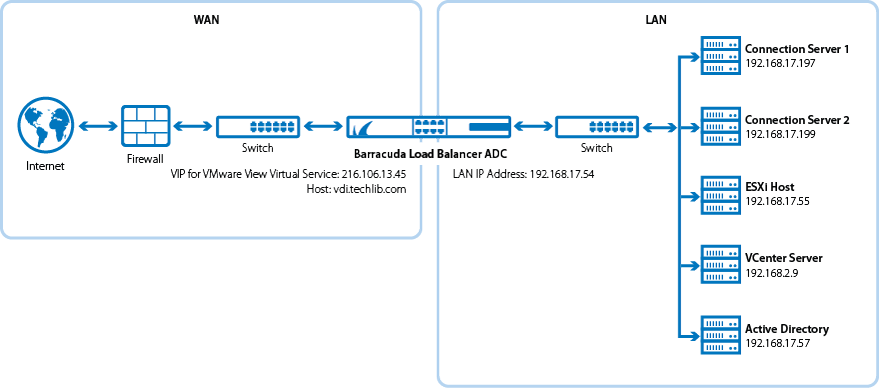
Deploying VMware Horizon View Services on the Barracuda Load Balancer ADC
Step 1. Import the Certificate to the Horizon View Connection Server
If you have not already installed the signed certificate on your Horizon View Connection servers, follow these steps to install the signed certificate on every server:
- Install the certificate on the Horizon View Connection Server.
- Set Friendly Name to vdm for the installed certificate.
- On the Horizon View Connection server, right-click My Computer and select Manage > Service and Applications > Services.
- Select VMware Horizon View Connection Server Service, and click Restart to restart the service. Wait a few minutes for the Horizon View Connection server to start listening.
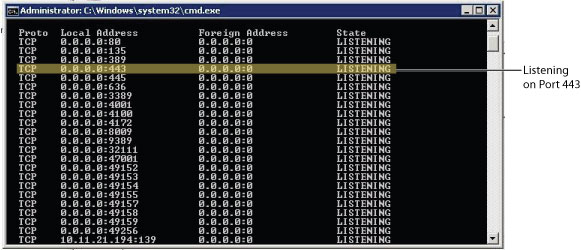
- On the Horizon View Connection Server, in the command window, type netstat -anp TCP and check the output to verify that the Horizon View Connection server is listening on port 443 for the Horizon View Connection service.
Reference: http://pubs.vmware.com/view-51/topic/com.vmware.view.installation.doc/GUID-80CC770D-327E-4A21-B382-786621B23C44.html in the VMware View 5.1 Documentation Center.
Step 2. Install the Certificate on the Barracuda Load Balancer ADC
Install a copy of the signed certificate on the Barracuda Load Balancer ADC.
- Create a copy of the signed certificate.
- Log into the Barracuda Load Balancer ADC.
- Go to the BASIC > Certificates page, and upload the certificate.
Step 3. Configure the VMware Horizon View Services on the Barracuda Load Balancer ADC
Configure the monitor group, the service group, and configure the services according to the type of traffic required by your VMware Horizon View servers.
- Go to the Traffic > Monitor Groups page and configure a new monitor group:
- Group Name: Specify the service group name.
- Monitor Name: Specify the name for the service monitor group.
- Testing Method: Specify the testing methods (you can specify more that one testing method for the monitor group). See the online help for documentation on how to configure these testing methods. See also the example shown in this article.
- Go to the BASIC > Services page, click Add Service and specify the group name in the Group field in the Service Configuration section.
For each service, enter the appropriate values in the corresponding fields of the Service Configuration section:
Services† Type
IP Address
Port
Session Timeout Certificates Server Monitor VDI_HTTPS†
HTTPS
IP address of the FQDN that clients use to access the View server.
For example: 216.106.13.45
443
1800 Select the certificate that you uploaded for the service. - Testing Method: Simple HTTPS
- HTTP Method: HEAD
- Test Target: /
- Additional Headers: User-Agent: Barracuda Load Balancer ADC Server Monitor
- Status Code: 200
- Test Delay: 30 Seconds
VDI_PCoIP (Optional, used for VDI over PCoIP † ) UDP Proxy IP address of the FQDN that clients use to access the View server.
For example: 216.106.13.45
4172 300 N/A - Testing Method: UDP Port Check
VDI_PCoIP_TCPProxy (Optional, used for VDI over PCoIP † ) TCP Proxy IP address of the FQDN that clients use to access the View server.
For example: 216.106.13.45
4172 1800 N/A - Testing Method: TCP Port Check
VDI_Blast (Optional) Secure TCP Proxy IP address of the FQDN that clients use to access the View server.
For example: 216.106.13.45
8443 1800 Select the certificate that you uploaded for the service. - Testing Method: TCP Port Check
† (For versions greater than 5.4) If you are configuring VDI over PCoIP, the HTTPS Service, TCP Proxy Service (on Port 4172), UDP Proxy Service (on Port 4172), and Blast Service (on port 8443) must all be under the same Service-Group. You must enable Source-IP Persistence at this Service-Group level.
- Under the Load Balancing section for the above services, configure the following:
- For Persistence Type, select Source IP.
- For Persistence Time, enter 1200.
- For Persistence Netmask, enter 255.255.255.255.
- Service Group Persistence ensures that a client's connection to a server is maintained even if the client switches to a difference service, so long as that service is included in the Service Group and the same server is configured for both services. After the Persistence Time has expired, the client can be switched to a different server the next time it attempts to switch to a different service.
- To enable Source IP Persistence for the Service Group, go to the BASIC > Services page and select the Service Group in the left pane.
On the Service Groups page, set the Persistence drop down menu to Source IP. Specify a Persistence Netmask and a Persistence Time in seconds.
- Go to the BASIC > Services page and scroll to the Server Monitor section. In the Testing Method drop down menu, scroll to the end of the list to view the Monitor Groups. Select the new monitor group from this list.
- For VDI_HTTPS service, under Other section, set the Enable VDI to Yes.
- Click Create.
- Click Add Server to add a back-end servers. In the server settings:
- Enter the IP address of the Horizon View Connection server. For example: 192.168.17.197
- Enter the corresponding ports for the servers, port 443 for VDI_HTTPS, port 4172 for VDI_PCoIP and VDI_PCoIP_TCPProxy and port 8443 for VDI_Blast services.
- In the SSL section for VDI_HTTPS and VDI_Blast services, set Server uses S SL to Yes.
- If the certificate for the service is a self-signed or a test certificate, set Validate Certificate to Off. If the service is using a CA-signed certificate, select On .
- Click Create.
- (in firmware release 5.4 and earlier) Go to Advanced > System Configuration page, under Advanced Settings section, set Show Advanced Settings to Yes and then go to Advanced section, set Enable Persistence for VDI to Yes.
The following example illustrates how to enable service group monitoring to ensure source IP persistence for the service group. It includes four services configured on the ADC, sharing the same two servers.
Create a service group for the following services.
Service Name Service Type IP Address Server Names Server IP Addresses S1 HTTPS 10.1.1.1:443 R1
R2
10.2.2.1:443
10.2.2.2:443
S2 TCP Proxy 10.1.1.2:4172 R1
R2
10.2.2.1:4172
10.2.2.2:4172
S3 UDP Proxy 10.1.1.3:4172 R1
R2
10.2.2.1:4172
10.2.2.2:4172
S4 Secure TCP Proxy 10.1.1.4:8443 R1
R2
10.2.2.1:8443
10.2.2.2:8443
- Go to the BASIC > Services page for each service and specify the group name as
GM_Servicein the Group field in the Service Configuration section. - Go to Traffic > Monitor Groups page and configure a new monitor group for the service group:
- Group Name: Specify the service group name as
GM_Service. - Monitor Name: Specify the name for the service monitor group as
GM_Example. Testing Method: Specify Simple HTTPS, TCP Port Check, and UDP Port Check as the testing methods as shown below:
Monitor Name Testing Method Port Test Target Test Match Additional Headers Status Code Test Delay M1 Simple HTTPS 443 / VMware User-Agent: Barracuda Load 200 30 M2 TCP Port Check 4172 - - - - 10 M3 UDP Port Check 4172 - - - - 10 M4 TCP Port Check 8443 - - - - 10
- Group Name: Specify the service group name as
- Go to the BASIC > Services page and scroll to the Server Monitor section. In the Testing Method drop down menu, scroll to the end of the list to view the Monitor Groups. Select the GM_Example monitor group.
- To enable Source IP Service Group Persistence, go to the BASIC > Services page and select the
GM_Serviceservice group in the left pane.- Set the Persistence drop down menu to Source IP.
- Specify the Persistence Netmask as
255.255.255.255 - Specify the Persistence Time as
1200. Click Save Changes.
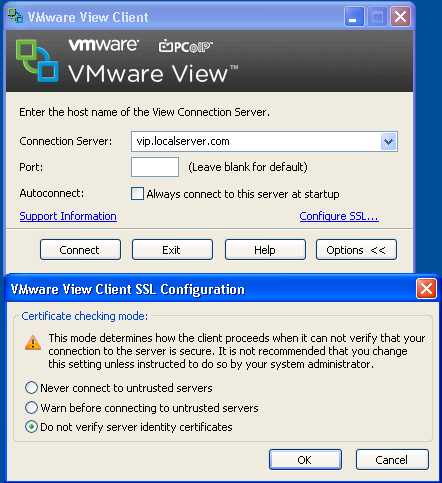
Step 4. Configure the DNS
Create an A record to point the VIP address that you set on the Barracuda Load Balancer ADC for the VMware Horizon View service.
For example, if you want to use the name vip and your domain is localserver.com, your A record would look something like this:
| Name | IP Address |
|---|---|
| vip.localserver.com | 216.106.13.45 |
If you have both internal and external clients accessing the VMware service through the Barracuda Load Balancer ADC, you can configure two different VIP addresses and two services—one service to direct the traffic to VMware Horizon View Security Servers, and another service to direct traffic to the VMware Horizon View Connection Servers.
Step 5. Set up the Horizon View Connection Server (Not for SSL offloading)
Configure the Horizon View Connection Server for HTTPS Secure Tunnel, PCoIP Secure Gateway and Blast Secure Gateway services:
- Log into the View Administrator Console, expand View Configuration, and click Servers.
- In the right pane, click the Connection Servers tab. All configured View Connection servers display in the table.
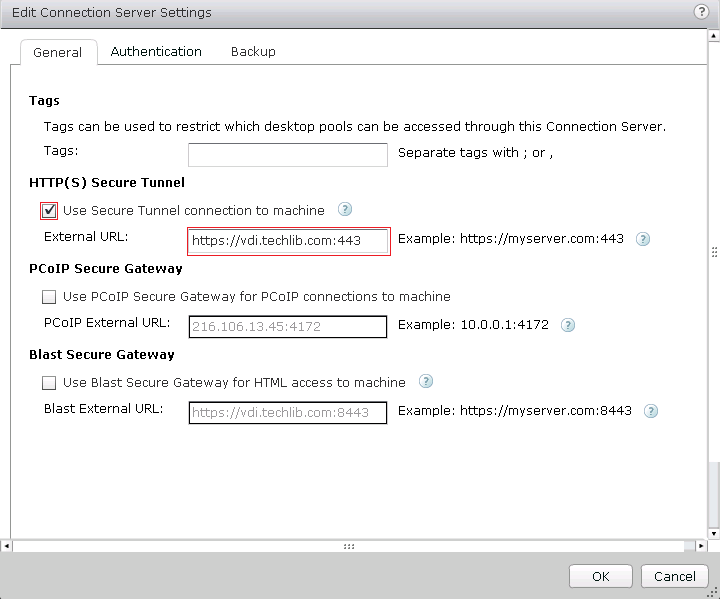
- Configure HTTPS only for the VMware Horizon View Connection server:
- Select the server, and click Edit. The Edit Connection Server Settings window appears.
- In the HTTP(S) Secure Tunnel section, select the Use Secure Tunnel connection to machine check box.
- In the External URL field, enter the a URL with FQDN of the VDI service. For example: https://<FQDN>:443
(Optional) Configure HTTPS and PCoIP for the VMware Horizon View Connection server. As described earlier, be sure to have the following services within the same Service-Group: Select the server, and click Edit . The Edit Connection Server Settings window appears.
- In the HTTP(S) Secure Tunnel section, select the Use Secure Tunnel connection to machine check box.
- In the External URL field, enter the a URL with FQDN of the VDI service. For example: https://<FQDN>:443
- In the PCoIP Secure Gateway section, select the Use PCoIP Secure Gateway for PCoIP connections to machine check box.
- In the PCoIP External URL field, enter the a PCoIP IP address and port 4172. For example: 216.106.13.45:4172
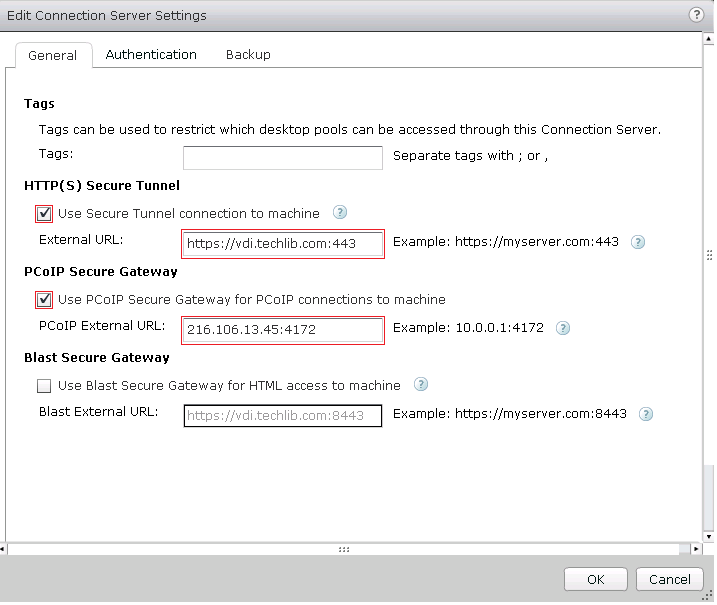
- (Optional) Configure HTTPS, PCoIP, and a Blast Secure Gateway for the VMware Horizon View Connection server.
As described earlier, you must have the following services in the same Service-Group, with Source-IP Persistence enabled at that group level: HTTPS Service, TCP Proxy Service (on Port 4172), UDP Proxy Service (on Port 4172).- Select the server, and click Edit. The Edit Connection Server Settings window appears.
- In the HTTP(S) Secure Tunnel section, select the Use Secure Tunnel connection to machine check box.
- In the External URL field, enter the a URL with FQDN of the VDI service. For example: https://vdi.tchlib.com:443
- In the PCoIP Secure Gateway section, select the Use PCoIP Secure Gateway for PCoIP connections to machine check box.
- In the PCoIP External URL field, enter the a PCoIP IP address and port 4172. For example: 216.106.13.45:4172
- In the Blast Secure Gateway section, select the Use Blast Secure Gateway for HTML access to machine check box.
- In the Blast External URL field, enter the a Blast external URL with port 8443. For example: https://vdi.techlib.com:8443
Note that clients coming from behind a NAT cannot use VDI Servers over PCoIP. These clients must use VDI Service over HTTPS.
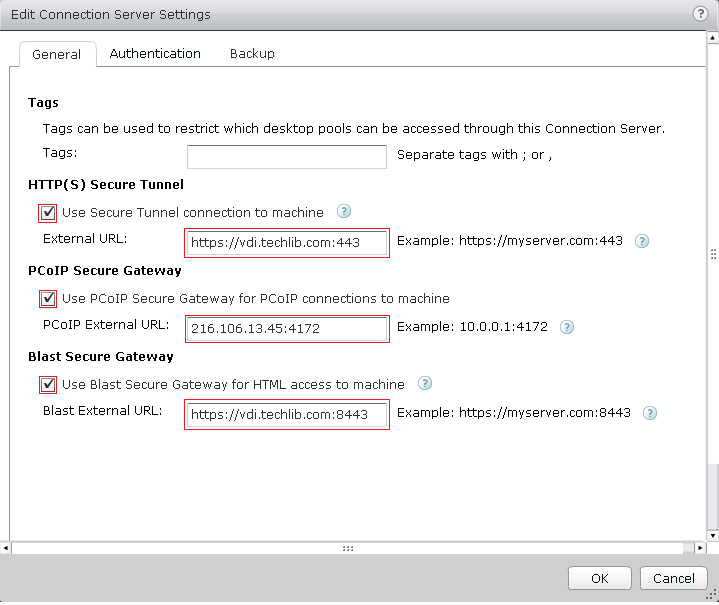
- Click OK to save your changes.
Step 6. Verify that the VMware Horizon View Connection Service is Reachable
Verify that you can access the VMware Horizon View Connection service through the VIP address. If you cannot access the service through the VIP address, see Troubleshooting.
Troubleshooting
| Issue | Solution |
|---|---|
| You received a server certificate warning. | The installed certificate is not from a Certification Authority. You can ignore the warning. |
| You received a warning or error message for server authentication and cannot launch the snapshot. | The certificate on the Barracuda Load Balancer ADC and the Horizon View Connection server do not match. A copy of the certificate from the View Horizon Connection server was not installed on the Barracuda Load Balancer ADC. As a workaround, on the VMware Horizon View Client:
|
You received a server authentication failed error, even though the same certificate is installed on the Barracuda Load Balancer ADC and the Horizon View Connection servers. | Verify that the CN parameter of the installed certificate matches the FQDN of the service. |
You received an error message that states, "Invalid Certificate received from server." | The issuing authority for the certificate installed for the service is not present under Trusted Root Certification Authorities on the client device. Install the same certificate under LOCAL Computer > Trusted Root Certification Authorities for the client device. |
You received a message that the user is not authenticated even though the username and password are correct. | You did not enable persistence for the VMware Horizon View service on the Barracuda Load Balancer ADC. |
| You want to restart the VMware Horizon View Connection Server service. |
|
(Optional) Create a Self-Signed Certificate
If you do not have a signed certificate, you can use the following steps to create a self-signed certificate.
- Log into the Barracuda Load Balancer ADC.
- Go to the BASIC > Certificates page.
- In the Certificate Generation section, click Create Certificate
- Enter the Certificate Name. For example: VMware View
- Enter the Organization Info details:
- In the Common Name field, enter the fully qualified domain name (FQDN) which resolves to the VIP address for the VMware Horizon View service. For example: viewvip.localserver.com
- Enter the Country Code, State or Province, Locality, Organization (Company) Name, and Organization (Departmental) Unit for your organization.
- From the Key Size list, select 2048.
- In the Expires In field, enter the number of days that you want the generated certificate to be valid.
- Set Allow Private Key Export to Yes.
- Click Generate Certificate at the top of the section. The certificate is added to the Saved Certificates table in the Created Certificates section.
- In the Download column, click Certificate. The Save Token page appears.
- Enter a password in the Encryption Password field.
- Click Save. The certificate, including the private key, is exported as a PKCS12 token in a file named <certificate name>.pfx.
- Click Close Window to return to the Certificates page.