

You can configure Layer 7 or Layer 4 services in the Barracuda Load Balancer ADC Vx on Amazon Web Services. For more information on the available service types, see Services.
Step 1. Get the EIP and Private IP Address of your Instance
- Log into the Amazon EC2 Management Console.
- From the EC2 dashboard, select Instances under INSTANCES.
- Select the Barracuda Load Balancer ADC Vx instance for which you want to configure a service and note the Elastic IP Address.
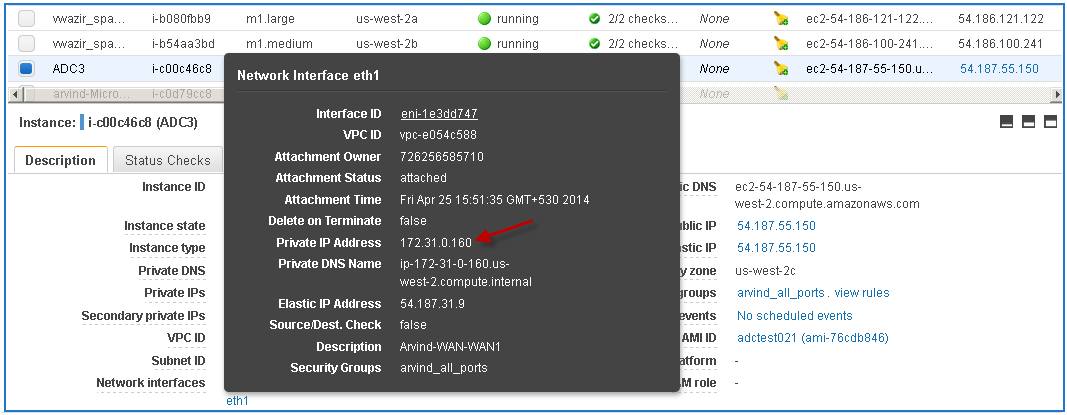
- Click the instance in the Instances table and then click the eth1 link next to Network Interfaces.
- Note the private IP address of eth1.
Step 2. Create the Service
- In a web browser, go to the Barracuda Load Balancer ADC web interface at the Elastic IP address that was assigned to eth0. Use port 8000 for HTTP. No port is required for HTTPS. For example:
- For HTTP: http://<EIP>:8000
- For HTTPS: https://<EIP>
- Go to the BASIC > Services page and create a service (Layer 7 or Layer 4) using the Private IP Address assigned to the eth1 network interface on Amazon Web Services (this is the ge-1-1 interface on the Barracuda Load Balancer ADC Vx).
- Add a server to the created service.
- Go to the NETWORK > Routes page and add a static route for the ge-1-1 interface to route all ge-1-1 traffic through the management gateway. The static route for ge-1-1 is:
- IP Protocol Version – IPv4
- IP Address - 0.0.0.0
- Netmask – 0.0.0.0
- Gateway Address – Enter the IP address specified in IPv4 Default Gateway on the BASIC > IP Configuration page.
- Network Interface – ge-1-1
Step 3. Allocate an Elastic IP Address for the Service IP Address
To assign and allocate an EIP for the service IP address:
- Log into the Amazon EC2 Management Console.
- From the EC2 dashboard, select Elastic IPs under NETWORK & SECURITY.
- Click Allocate New Address.
- Click Yes, Allocate to confirm and allocate a new IP address. A random public IP address is generated and displayed in the Allocate New Address table.
- In the Allocate New Address table, right-click the new IP address and select Associate.
- In the Associate Address window:
- Either select the Instance and the Private IP Address of the instance or select the Network Interface and the Private IP Address.
- Select the Allow Reassociation check box.
- Click Yes, Associate.
Step 4. (Layer 4 Services Only) Change the Default Gateway for Servers
For Layer 4 services, change the default gateway for the associated servers.
Log into your server using SSH.
- Remove the default gateway on the server.
- Add the IP address which is being used to create the Layer 4 service on the Barracuda Load Balancer ADC Vx as your default gateway.
If you want to configure your server in Direct Server Return mode, follow the instructions given in Direct Server Return Deployment.
Troubleshooting
If you need help troubleshooting any issues with your Barracuda Load Balancer ADC Vx, see Troubleshooting the Barracuda Load Balancer ADC Vx on Amazon Web Services.