

Required Product Model and Version
After you integrate an external authentication server, you can associate it with a service to authenticate end users of a web application. LDAP, RADIUS, and Kerberos authentication protocols are supported.
You can create authorization policies to allow or deny requests from authenticated users. In the policies, specify the URL, host, and other expressions which match the requests to be handled, as well as a list of allowed and restricted users.
General Steps on Configuring Access Control
If instructions on configuring access control specifically for your application are not available, follow the instructions in this section.
Before You Begin
Create an authentication service for the LDAP, RADIUS, or Kerberos authentication server that you want to integrate with the Barracuda Load Balancer ADC.
For instructions, see How to Integrate an External Authentication Server.
Step 1. Assign the Authentication Service to a Web Service
Assign the authentication service to the service for your website.
- Go to the ACCESS CONTROL > Authentication page.
- Next to the service, click Edit.
- In the Edit Authentication Policy section:
- Set the Status to On.
From the Authentication Service list, select the alias of the server for authenticating users of the service.
(Optional) Dual Authentication Required - Set to Yes to apply a dual authentication policy (requiring two separate authentication services where the primary authentication service should be LDAP and the secondary should be RADIUS) to authenticate the user. If you set this to Yes, you will also need to specify a RADIUS service as the Secondary Authentication Service (this list includes all of the RADIUS authentication services configured on the ACCESS CONTROL > Authentication Services page).
- (Optional) Enable Bruteforce Prevention - Set to Yes to prevent unauthorized users from making repeated attempts to guess a password. If you enable Bruteforce Prevention, you can also configure the following options:
- Count Window - The time (in seconds) for allowing the maximum number of requests as specified using the Max Failed Attempts Allowed Per IP option.
- Max Failed Attempts Allowed Per IP - The maximum number of attempts allowed to enter a password from the client tied to an IP address.
Specify the remaining settings.
- Click Save.
In the Authentication Policies section, the name of the authentication service is displayed in the row for the service.
Step 2. Configure an Authorization Policy for the Service
Configure an authorization policy to control the access of authenticated users to your website. You can configure access by user, group or by both. In the policy, specify the URL, host, and extended match patterns for requests that must be handled by the policy.
- Go to the ACCESS CONTROL > Authorization page.
- In the Add Authorization Policy section:
- From the Service list, select the service that you are configuring the authorization policy for.
- Enter a name for the policy.
Set the Status to On.
- Specify the URL, host, and other expressions that must match requests.
Specify the Login Method. If you want to create a custom login or challenge page, select HTML Form.
- Click Add. The authorization policy appears in the Existing Authorization Policies section.
- Next to the policy, click Edit.
In the Edit Authorization Policy window, specify if you want to allow or deny the request to all authenticated users or only to specific users and groups.
- Click Save .
Application-Specific Instructions for Configuring Access Control
Complete the instructions for your application on how to configure access control:
Step 1. Configure Kerberos Authentication on the Barracuda Load Balancer ADC
Ensure that you have already configured the Kerberos Authentication service. For instructions, see How to Integrate an External Authentication Server.
Step 2. Configure your SharePoint Servers
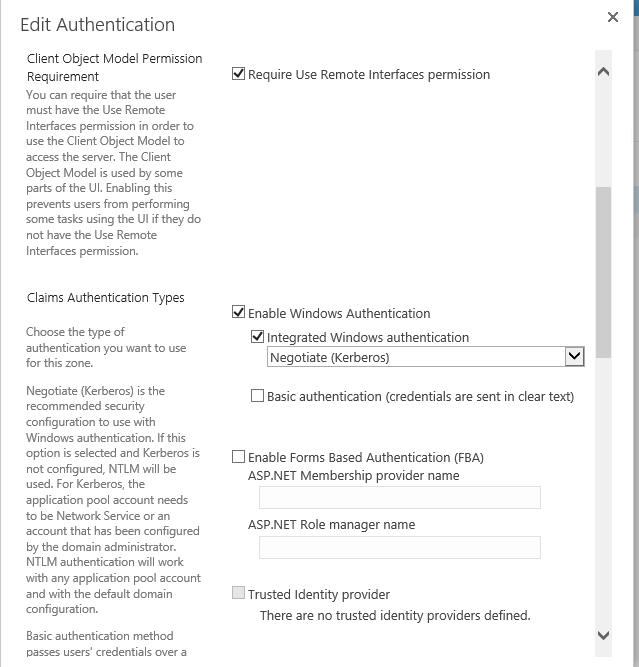
Navigate to your SharePoint Web Admin Site > Web Applications > Authentication Providers.
Select the Enable Windows Authentication check box.
Select the Integrated Windows authentication check box and then select Negotiate (Kerberos).
Step 3. Assign Kerberos Authentication Service to the SharePoint Service
Go to the ACCESS CONTROL > Authentication page.
Next to the service, click Edit.
In the Edit Authentication Policy section:
- Set the Status to On.
From the Authentication Service list, select the alias of the Kerberos service you created in Step 1.
Click Save.
Step 4. Configure an Authorization Policy for the SharePoint Service
Configure an authorization policy to control the access of authenticated users to your SharePoint Application. You can configure access by user, group, or both user and group. In the policy, specify the URL, host, and extended match patterns for requests that must be handled by the policy.
Go to the ACCESS CONTROL > Authorization page.
In the Add Authorization Policy section, click Add. The authorization policy appears in the Existing Authorization Policies section.
- From the Service list, select the SharePoint service.
- Enter a name for the policy.
- Set the Status to On.
- Specify the URL, host, and other expressions that must match requests.
Specify the Login Method. If you want to create a custom login or challenge page, select HTML Form.
Next to the policy, click Edit.
In the Edit Authorization Policy window, specify if you want to allow or deny the request to all authenticated users or only to specific users and groups.
Set Send Basic Authentication to On.
Click Save.
Step 5. Verify your Setup
Navigate to your SharePoint site via the FQDN of your VIP address.
After the Barracuda Load Balancer ADC authentication page loads, enter the user credentials of a user account that has access to the SharePoint Application.
Step 1. Configure LDAP Authentication on the Barracuda Load Balancer ADC
Ensure that you have already configured the LDAP authentication service. For instructions, see How to Integrate an External Authentication Server.
Step 2. Configure your Exchange 2013 Servers
Navigate to the Exchange Control Panel at https://<fqdn of CAS>/ecp.
Click Servers > Virtual Directories.
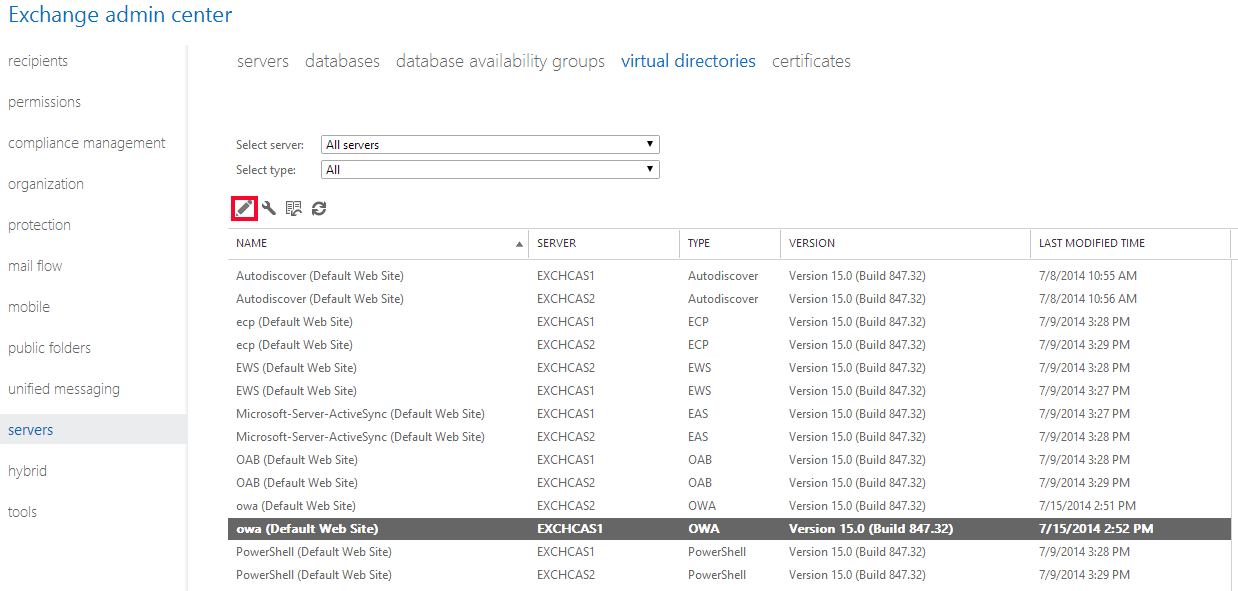
Click the first OWA page for one of the servers and click the edit icon.
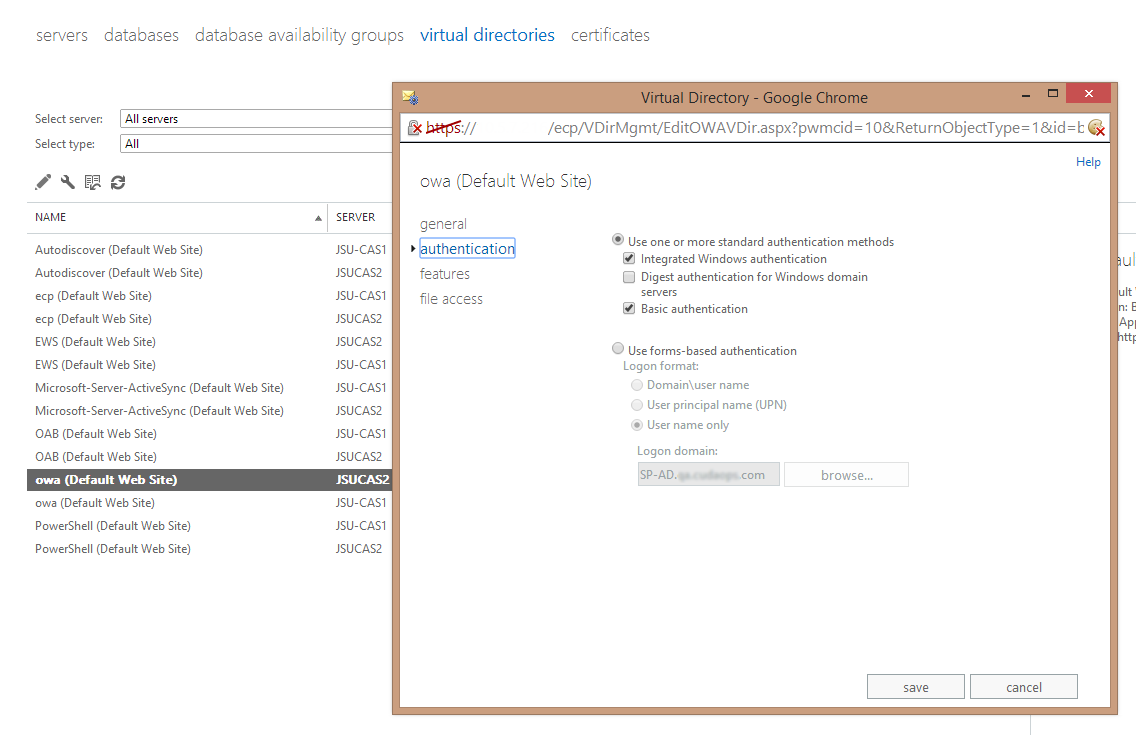
Click authentication.
Click Use one or more standard authentication methods, and then select the Integrated Windows Authentication and Basic Authentication check boxes.
Repeat steps 1 to 5 for the other OWA site on the other CAS as well as the ECP pages on your other CAS.
Go back to SERVERS > SERVERS, and edit one of the CAS.
Click Outlook Anywhere.
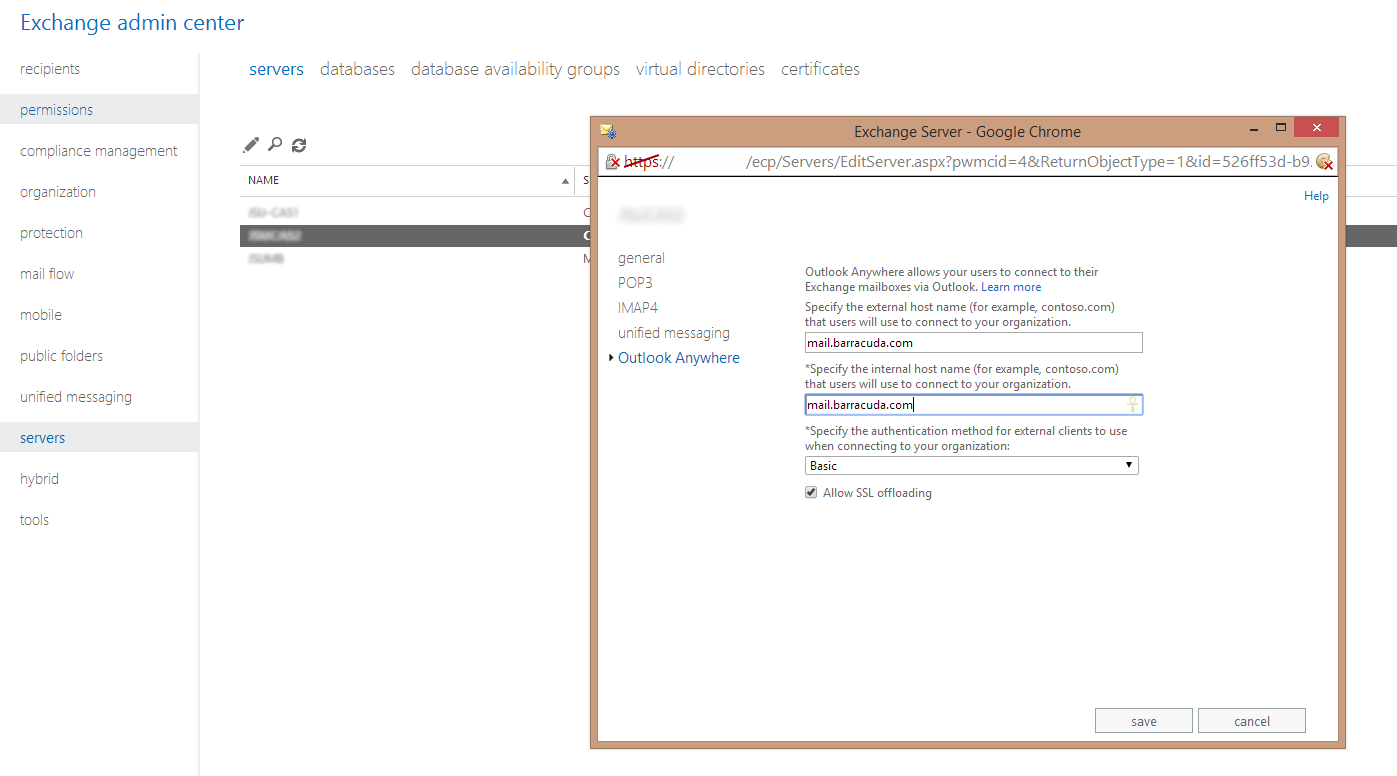
Verify the internal and external host name settings and then click Allow SSL Offloading.
Repeat for the other CAS.
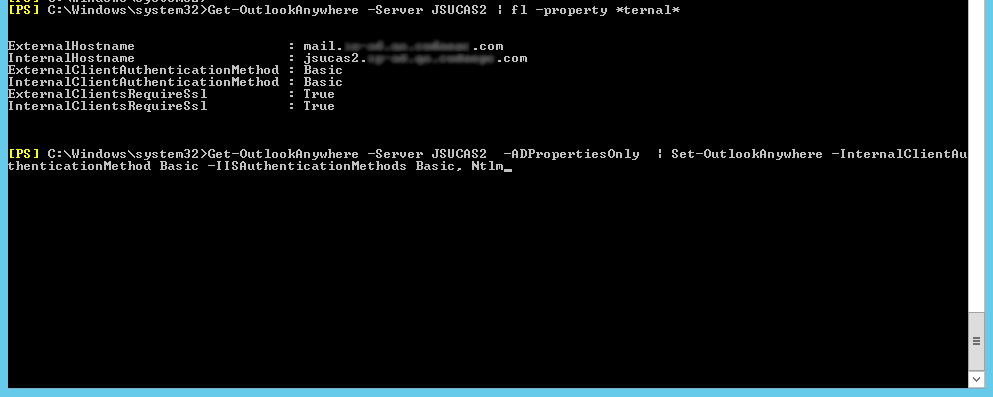
Next, open the Exchange Management Shell on your CAS and run the following commands.
Get-OutlookAnywhere -Server <ServerName> -ADPropertiesOnly | Set-OutlookAnywhere -InternalClientAuthenticationMethod Basic -IISAuthenticationMethods Basic, Ntlm
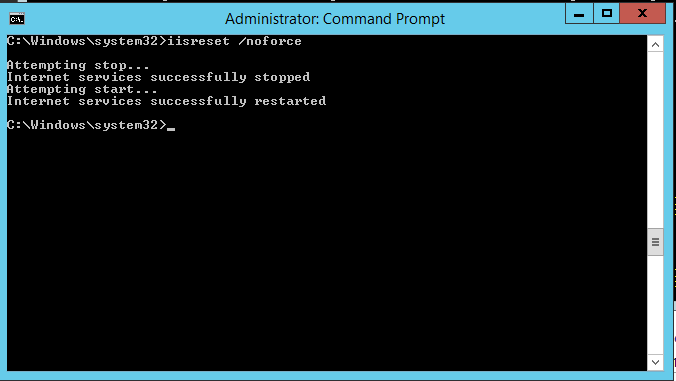
Reset the IIS to ensure that the changes are applied.
Step 3. Assign LDAP Authentication Service to the Exchange 2013 Service
Go to the ACCESS CONTROL > Authentication page.
Next to the service, click Edit.
In the Edit Authentication Policy section, click Save.
- Set the Status to On.
From the Authentication Service list, select the alias of the LDAP service you created in Step 1.
(Optional) S pecify the URL where users are redirected if their authentication fails because their passwords expired in the Auth Password Expired URL. Users are redirected to reset their passwords.
Step 4. Configure an Authorization Policy for the Exchange 2013 Service
Configure an authorization policy to control the access of authenticated users to your Exchange OWA. You can configure access by user and/or group. In the policy, specify the URL, host, and extended match patterns for requests that must be handled by the policy.
Go to the ACCESS CONTROL > Authorization page.
In the Add Authorization Policy section:Click Add. The authorization policy appears in the Existing Authorization Policies section.
- From the Service list, select the Exchange 2013 service.
- Enter a name for the policy.
- Set the Status to On.
Specify the URL, host, and other expressions that must match requests.
Specify the Login Method. If you want to create a custom login or challenge page, select HTML Form.
Next to the policy, click Edit.
In the Edit Authorization Policy window, specify if you want to allow or deny the request to all authenticated users or only to specific users and groups.
Set Send Basic Authentication to On.
Click Save .
Step 5. Verify your Setup
Go to: https://<FQDN of your Exchange 2013 VIP Address>/owa
After the Barracuda Load Balancer ADC authentication page loads, enter the user credentials of a user account that has access to OWA.
Step 1. Configure LDAP or Kerberos Authentication on the Barracuda Load Balancer ADC
Ensure that you have already configured the LDAP or Kerberos authentication service. For instructions, see How to Integrate an External Authentication Server.
Step 2. Configure your Exchange 2010 Servers
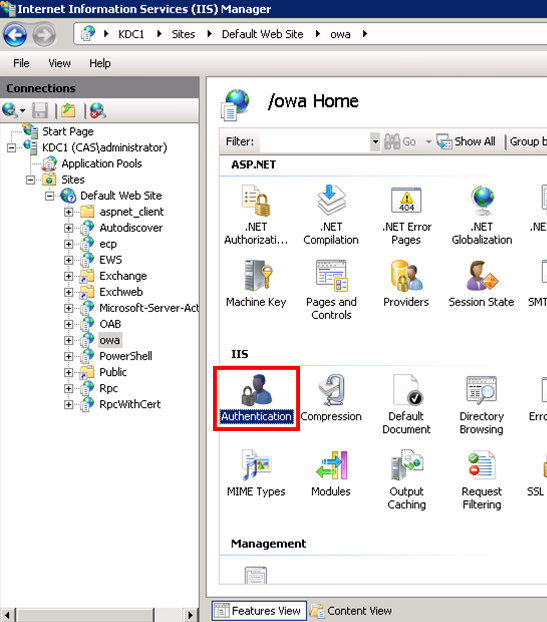
- Open the Internet Information Services (IIS) Manager.
- In the left pane, find and select the site that you are modifying.
- In Features View for the selected site, double-click Authentication.
- On the Authentications page, select Windows Authentication.
- In the Actions pane, click Enable to use Windows authentication. The status for Windows Authentication then changes to Enabled.

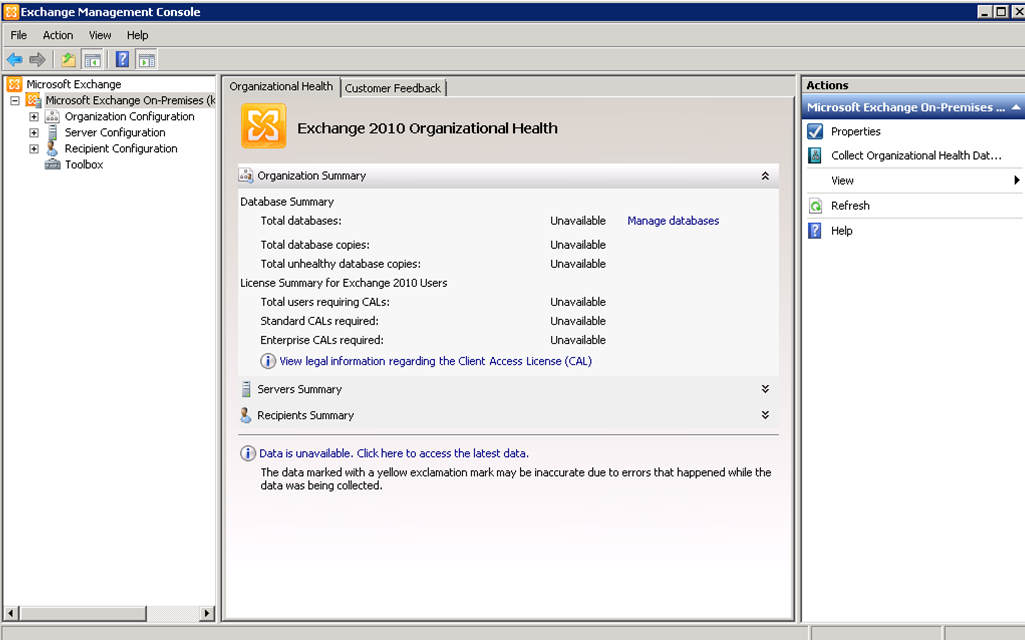
- Open the Exchange Management Console.
- In the console tree, locate the virtual directory that you want to use Integrated Windows authentication.
- Select Server Configuration and then select Client Access.
- For each server hosting the Outlook Web App virtual directory:
- Select the server and click the Outlook Web App tab.
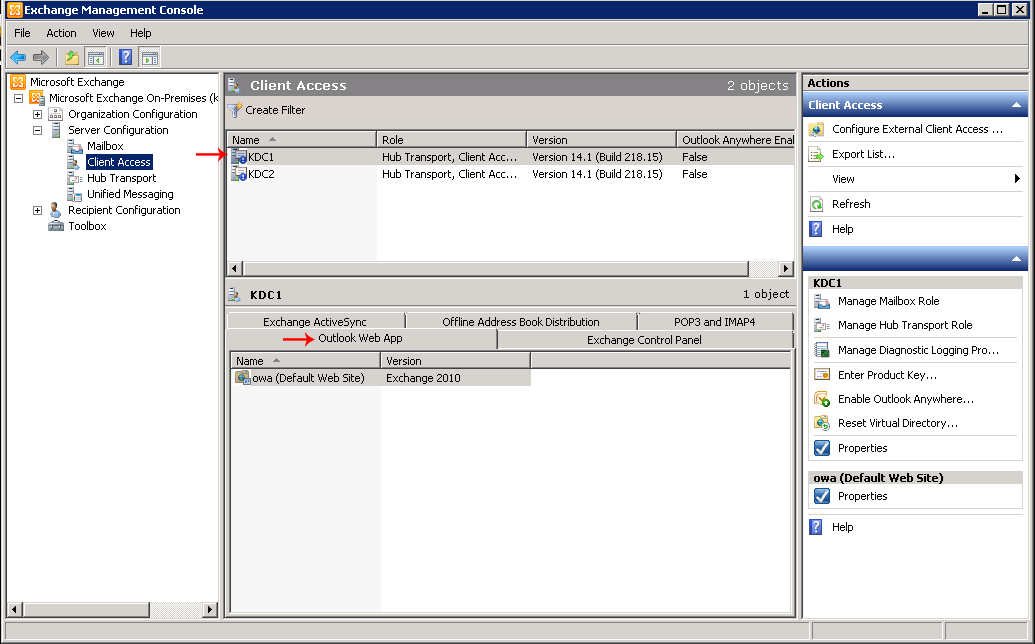
- In the work pane, select the virtual directory that you want to configure to use Integrated Windows authentication, and click Properties in the Actions pane.
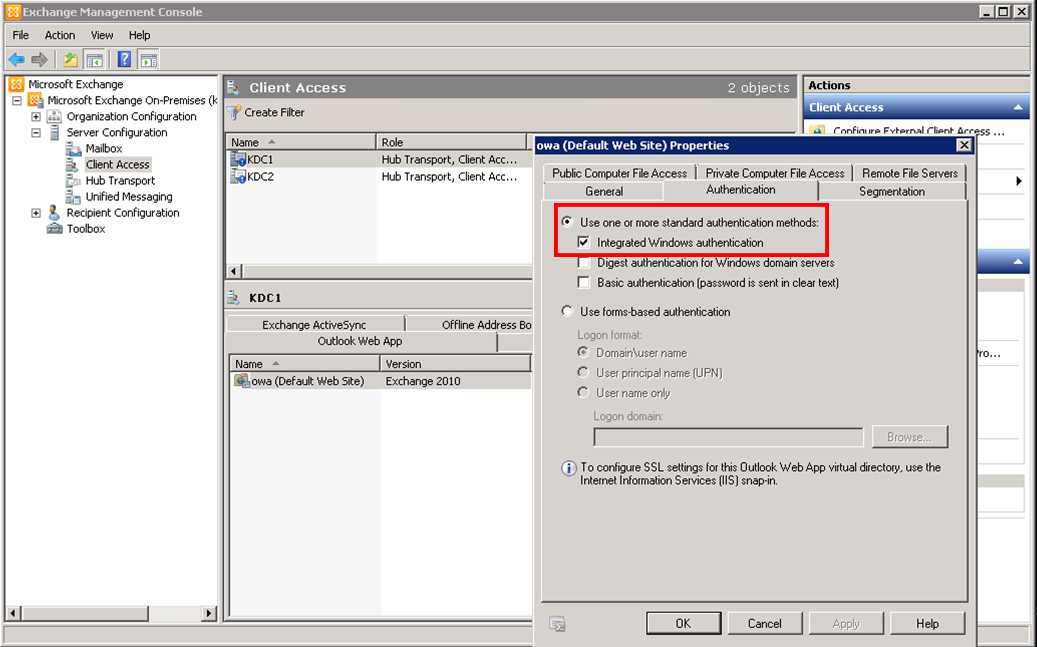
- In the Properties window, click the Authentication tab.
- Click Use one or more standard authentication methods, and select the Integrated Windows authentication check box.
- Select the server and click the Outlook Web App tab.
- Click OK.
- Restart the IIS for each server that you configured to use integrated Windows authentication.
Step 3. Assign LDAP Authentication Service to the Exchange 2010 Service
Go to the ACCESS CONTROL > Authentication page.
Next to the service, click Edit.
In the Edit Authentication Policy section, click Save.
- Set the Status to On.
From the Authentication Service list, select the alias of the LDAP service you created in Step 1.
(Optional) Specify the URL where users are redirected if their authentication fails because their passwords expired in the Auth Password Expired URL. Users are redirected to reset their passwords.
Step 4. Configure an Authorization Policy for the Exchange 2010 Service
Configure an authorization policy to control the access of authenticated users to your Exchange OWA. You can configure access by user, group, or both user and group. In the policy, specify the URL, host, and extended match patterns for requests that must be handled by the policy.
Go to the ACCESS CONTROL > Authorization page.
In the Add Authorization Policy section, click Add. The authorization policy appears in the Existing Authorization Policies section.
- From the Service list, select the Exchange 2010 Service
- Enter a name for the policy.
- Set the Status to On.
- Specify the URL, host, and other expressions that must match requests.
Specify the Login Method. If you want to create a custom login or challenge page, select HTML Form.
Next to the policy, click Edit.
In the Edit Authorization Policy window, specify if you want to allow or deny the request to all authenticated users or only to specific users and groups.
Click Save.
Step 5. Verify Your Setup
Go to: https://<FQDN of your Exchange 2010 VIP Address>/owa
After the Barracuda Load Balancer ADC authentication page loads, enter the user credentials of a user account that has access to OWA.
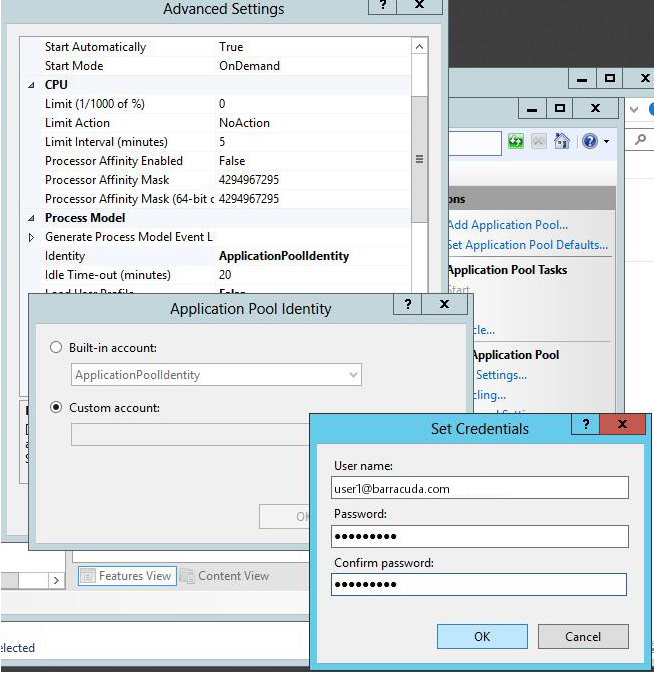
- In the IIS Manager, click Application Pools in the left pane. All running applications then appear in the right pane.
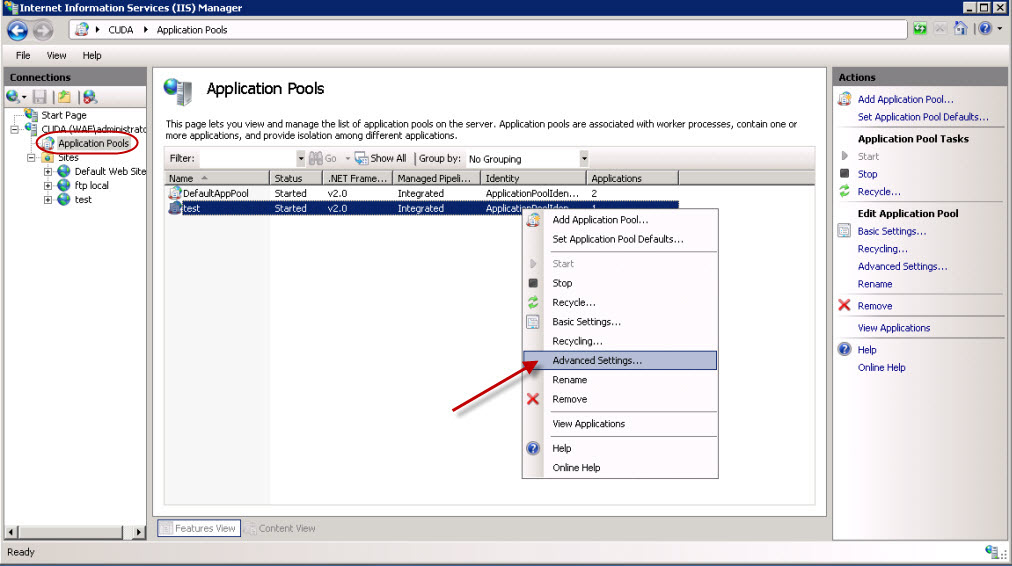
- Identify the application to associate with the user. Right-click the application, and select Advanced Settings.
- In the Advanced Settings window, click the button next to Identity.
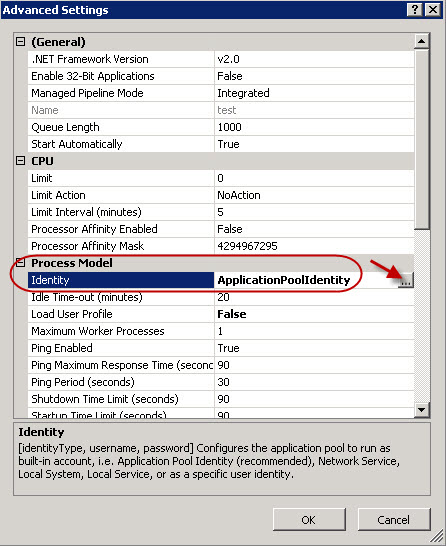
- In the Application Pool Identity window, select Custom account and click Set.
- Enter the username and password for the user that you created in Active Directory, and click OK.
In the IIS server's Applicationhost.config file, set useAppPoolCredential to true. The file is located at:
/windows/system32/inetsrv/config/Applicationhost.configFor example:
<location path="Default Web Site">
<system.webServer>
<security>
<authentication>
<anonymousAuthentication enabled="false" />
<windowsAuthentication enabled="true" useKernelMode="true" useAppPoolCredentials="true">
<extendedProtection tokenChecking="None" />
</windowsAuthentication>
</authentication>
</security>
</system.webServer>
</location>


Additional Authentication Options
If you also want to configure single-sign on or set up a custom login page, see these articles:
For RADIUS servers, you can also configure the SMS PASSCODE for two-factor client authentication with passcodes that are sent to users' mobile phones. See How to Configure SMS Passcode Authentication Service.