

Required Product Version
This article describes how to deploy your Barracuda Load Balancer ADC version 5.1 or 5.2 with the Barracuda Email Security Gateway.The Barracuda Email Security Gateway is used to protect your organization's email infrastructure whether it is Microsoft's Exchange, 365, or even Google Apps. This article will detail how to put an ADC in front of your two Spam Firewalls to balance the mail traffic in and out of the two Spam firewalls.
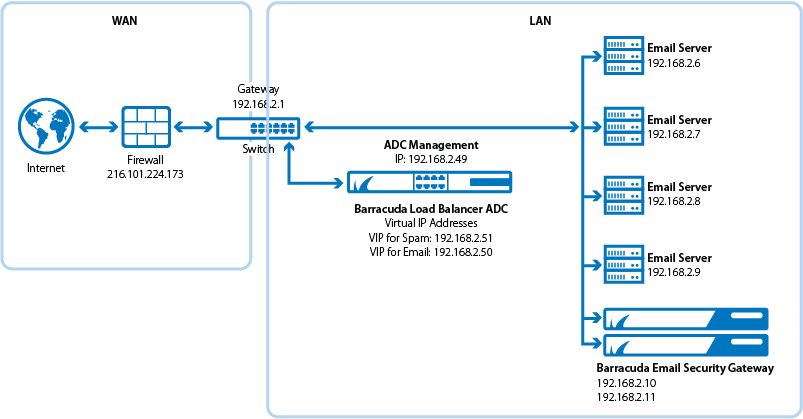
Setup Diagram for a One-Armed Setup
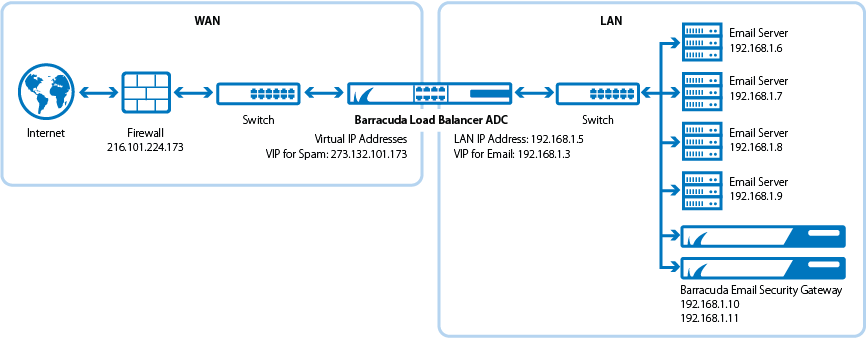
Setup Diagram for Two-Armed Setup
Terminology
| Term | Definition |
|---|---|
| DNS | Domain Name Server, typically hosted on the Domain Controller |
| VIP | Virtual Internet Protocol (VIP) address. In the ADC deployment, the VIP is added to the service on the Barracuda Load Balancer ADC. |
| Service | A combination of a virtual IP address and one or more TCP/UDP ports that the Barracuda Load Balancer ADC listens on. Traffic arriving on the specified port(s) is directed to one of the real servers associated with a service. |
| DSR | With Direct Server Return, connection requests and incoming traffic are passed from the Barracuda Load Balancer ADC to the real server but all outgoing traffic goes directly from the real server to the client. DSR is ideal for high-bandwidth requirements such as content delivery networks and lets you keep the existing IP addresses of your real servers. |
| Client Impersonation | Lets the Barracuda Load Balancer ADC use the client IP address as the source IP address to communicate to the real server. If client impersonation is disabled, the IP address of the Barracuda Load Balancer ADC used to communicate to the real server as the source IP address. |
Product Versions and Prerequisites
You must have the following:
- Barracuda Load Balancer ADC firmware version 5.1 or 5.2
- Barracuda Email Security Gateway 6.1 and above
You must have complete the following procedures:
- Installed your Barracuda Load Balancer ADC(s), connected to the web interface, and activated your subscription(s).
- Installed your Barracuda Email Security Gateways, connected to the web interface, and activated your subscriptions.
- If you want to deploy with high availability, cluster your Barracuda Load Balancer ADCs. For more information, see High Availability.
Barracuda Load Balancer ADC Service Options
On the Barracuda Load Balancer ADC, create the applicable service depending on what you want: One-Armed or Two-Armed.
| Scenario | Service Options |
|---|---|
| You want your Mail Servers, Barracuda Email Security Gateway, and the Barracuda Load Balancer ADC to be all on the same network (One-Armed) | Create the SPAM_Layer4 service with DSR enabled |
| You want your Mail Servers and Barracuda Email Security Gateway to be on the same network but the Barracuda Load Balancer ADC to be on the public external network (Two-Armed) | Create the SPAM_TCP service with Client Impersonation |
Step 1. Configure your email service with the Barracuda Email Security Gateway
- The Barracuda Email Security Gateway is compatible with multiple email services such as Microsoft's Exchange, 365, and Google Apps. See the Barracuda Email Security Gateway documentation for instructions on how to deploy with your specific email solution.
Step 2. Create the Spam Service on the Barracuda Load Balancer ADC
On the Barracuda Load Balancer ADC, create a service according to your deployment type:
- Log into the Barracuda Load Balancer ADC as administrator.
Go to the BASIC > Services page.
Click Add Service and enter the values for the service related to your selected deployment type in the corresponding fields. If you are doing a One-Armed Configuration, use the SPAM_Layer4 Service, otherwise for a two-armed configuration, use the SPAM_TCP service
NameTypeIP AddressPortNetmask Server Monitor SPAM_Layer4 Layer 4-TCP VIP Address for the Barracuda Email Security Gateway Service. For example, 10.5.7.193 25 Netmask for connection. For example, 255.255.255.0. Testing Method: TCP Port Check
- Test Delay: 10 seconds
SPAM_TCP TCP-Proxy VIP Address for the Barracuda Email Security Gateway Service. For example, 10.5.7.193 25 Netmask for connection. For example, 255.255.255.0. Testing Method: TCP Port Check
- Test Delay: 10 seconds
- In the Load Balancing section, set the Algorithm to Weighted Least Requests.
Step 3. Add the Barracuda Email Security Gateways
Add your Barracuda Email Security Gateways to your service. For each Barracuda Email Security Gateway:
- On the BASIC > Services page, verify that the correct service for the server is displayed.
- Click Add Server.
- Enter the IP address for the Barracuda Email Security Gateway and enter port 25
- If you are using a one armed setup, enable DSR (Set DSR to "ON" under the configure server settings) and configure a Loop Back Adapter on the Barracuda Email Security Gateway as follows:
- Log on to the Barracuda Email Security Gateway and go to the Advanced > Advanced Networking > Loop back Adapter page.
- Enter the VIP address you set for the SPAM_Layer4 service you created above.
- For a two armed SPAM_TCP service, turn on Client Impersonation in Advanced >Show > Client Impersonation.
- For the SPAM_TCP service, ensure that the gateway settings on both Barracuda Email Security Gateways are set to the Barracuda Load Balancer Interface IP Address (on the same network that your servers are on).
- Click Create.
Verify Your Configuration
Use Telnet or another email service that is not on located on your domain to send email to your domain's to verify that emails are flowing to both Barracuda Email Security Gateways.