

This article refers to Barracuda Message Archiver Legacy Release firmware or higher, and Microsoft Exchange Server 2007 and 2010.
This template is a based on a typical onsite deployment of the Barracuda Message Archiver with Microsoft Exchange Server 2007/2010 Standard or Enterprise version using envelope (SMTP) journaling. This template describes the initial Barracuda Message Archiver setup for this deployment.
Implementation Prerequisites
You will need configuration Access to the Exchange environment, and the ability to make firewall changes, if deemed necessary.
Physical Installation and Console Configuration
Physically install the Barracuda Message Archiver using the following steps:
- Fasten the Barracuda Message Archiver to a 19-inch rack or place it in a stable location.
- Connect an Ethernet cable from the network switch to the Ethernet port on the back of the Barracuda Message Archiver.
- Connect a standard VGA monitor, PS2 keyboard, and an AC power cord to the Barracuda Message Archiver. Press the Power button on the front panel to turn the unit on.
- Log into the console using admin for the username. For the password:
If your appliance serial number is higher than 1 311431, then the default administrator password is the numeric portion of the serial number. If your serial number is 1311431 or lower, then the default administrator password is admin. For help finding the serial number of your appliance, see Serial Number for Hardware and Virtual Appliances. For security purposes, you must change the default password of the administrator account. Set a new administrator password and click Update Password. Note that the new password cannot be admin or the serial number.
- Configure the IP Address, Subnet Mask, Default Gateway, Primary DNS Server, and Secondary DNS Server as appropriate for your network.
Firewall Ports
If the Barracuda Message Archiver is located behind a corporate firewall, open the following ports on the firewall to ensure proper operation:
Port | Direction | TCP | UDP | Usage |
22 | Out | Yes | No | Remote diagnostics and service recommended (1) |
25 | Out | Yes | No | Email and bounces (25 inbound may be necessary for some deployments) |
53 | Out | Yes | Yes | Domain Name Service (DNS) recommended |
80 and 443 | Out | Yes | No | Virus, Policy, and Document Definition updates |
123 | In/Out | No | Yes | Network Time Protocol (NTP) recommended |
(1) Access via Port 22 is required only if Barracuda Networks Technical Support is requested. | ||||
Activation
Complete the following steps to activate and configure the Barracuda Message Archiver:
- In the browser address bar enter http:// followed by the Barracuda Message Archiver IP address, followed by the default web interface HTTP Port
:8000.
For example:http://192.168.200.200:8000 - Login using admin for the username. For the password:
If your appliance serial number is higher than 1311431, then the default administrator password is the numeric portion of the serial number. If your serial number is 1311431 or lower, then the default administrator password is admin. For help finding the serial number of your appliance, see Serial Number for Hardware and Virtual Appliances. For security purposes, you must change the default password of the administrator account. Set a new administrator password and click Update Password. Note that the new password cannot be admin or the serial number.
- In the web interface, you will see the activation warning:

- Click on the link to open the Product Activation page, fill in the required fields, and click Activate. The activation process may take up to 15 minutes. A confirmation page displays the terms of your subscription, and the subscription status displays as Activated on the BASIC > Status page.
- Go to ADVANCED > Firmware Update page, and download and apply the latest General Release; allow the system to reboot.
Basic and Administration Setup
- Once the system reboots, log back into the web interface.
- Go to the Basic > IP Configuration tab, and enter the configuration settings including external access configuration and default hostname. In the External Access Configuration and Domain Configuration sections, complete the following steps; do not click Save Changes until you complete both of the following sub steps:
In the External Access Configuration section, specify the protocol, and enter the FQDN of your Barracuda Message Archiver for example, archiver.mydomain.com, and enter the port number.
- In the Domain Configuration section, enter the domains. Note that depending on your environment these may match the FQDN or may be internally registered names:
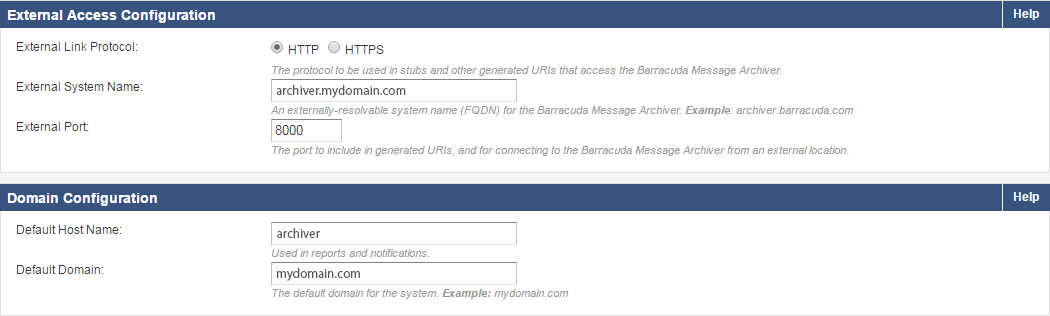
- Click Save Changes once you have completed both of the preceding bullet points.
In the Local Domains section, include all domains from which to accept mail for archive to identify internal and external email.
- Go the BASIC > Administration page, and configure access, management, and default display settings. For more information, refer to the article How to Configure Administrative Settings.
Enable SMTP Forwarding on the Barracuda Message Archiver
On the Barracuda Message Archiver, go to the Mail Sources > SMTP page, and use the following steps to enable SMTP forwarding:
- In the SMTP Forwarding Settings section, set SMTP Forwarding to Yes.
- In the Trusted SMTP Servers section, enter the IP address of each Microsoft Exchange 2007/2010 Server that is to journal directly to the Barracuda Message Archiver:
- Exchange 2007 – Add the IP address of your mailbox server roles
- Exchange 2010 – Add all IP addresses of the Hub Transport server role
Enable Journaling
To set up journaling, complete the steps described in the article Configuring Envelope (SMTP) Journaling for Microsoft Exchange 2007-2010.
Configure Exchange Integration Operations
- Log in to the Barracuda Message Archiver web interface, and go to the Mail Sources > Exchange Integration page.
- Click Start New Action to define the Exchange actions to execute:
- Email Import – Import all email from your Exchange Server into the Barracuda Message Archiver that meets the specified criteria. Select to import email for all users, or specify import by user name, email address, last name, public folders, or a distribution list.
- Non-Email Sync – Import only non-email Exchange items into the Barracuda Message Archiver from specified accounts including Appointments, Contacts, Tasks, and Notes.
- Email Stubbing – Locate messages on your Exchange Server that meet the specified criteria, copy the specified parts (just attachments, or the entire message with or without attachments) onto the Barracuda Message Archiver, and modify those messages on your Exchange Server so that appropriate parts of the messages are replaced with a stub (a link to where the actual contents reside on the Barracuda Message Archiver).
- Folder Sync – Import into the Barracuda Message Archiver the complete folder structure of the selected users' Mailboxes. This action imports the selected users' custom folders and subfolders.
Use the workflow to set up the Exchange action.
Next Step: Proceed to the article Configuring Envelope Journaling for Microsoft Exchange Server 2007 and 2010 to complete your deployment setup.