

This article refers to Barracuda Message Archiver Legacy Release firmware or higher, and a Microsoft Exchange Server 2013, 2016, and 2019.
Barracuda Networks recommends deploying your Barracuda Message Archiver with Microsoft Exchange Server 2013, 2016, or 2019 using the push method, alternately, you can set up IMAP or POP3 journal accounts as described in this article.
You can configure the Barracuda Message Archiver to automatically retrieve messages directly from your mail server using the IMAP4 or POP3 protocol.
Setting Up a POP3 Journal Account
Step 1. Enable POP3
Use the following steps to enable POP3 on your Exchange Server:
- Log into the Exchange Server as the Exchange Server Administrator, and navigate to the Exchange admin center (EAC):
https://<Exchange_server_name>/ecp - In the left pane click Servers, and then click Servers at the top of the page:
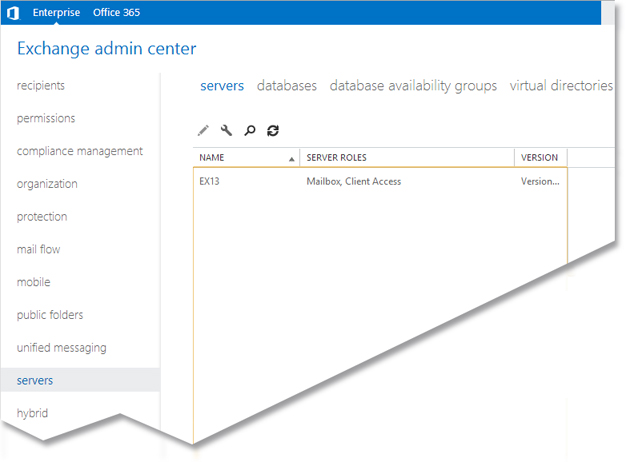
- Select the Client Access server, and then click Edit (
 ).
). - On the server properties page, click POP3:
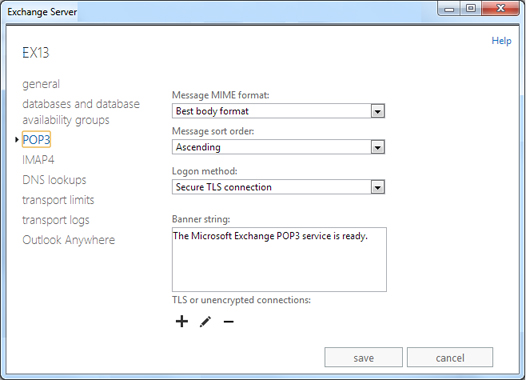
- Scroll down and click More options.
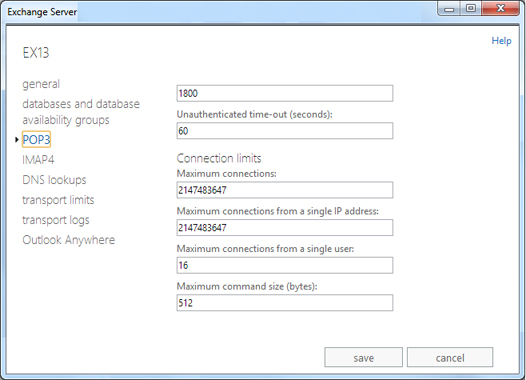
- Under Connection limits, use the following settings:
- In the Maximum connections field, specify the total number of authenticated and unauthenticated connections the specified server can accept. The default value is 2,147,483,647; enter a value between 1 and 2,147,483,647.
- In the Maximum connections from a single IP address field, specify the number of connections that the server can accept from a single IP address. The default value is 2,147,483,647; enter a value between 1 and 2,147,483,647.
- In the Maximum connections from a single user field, specify the maximum number of connections that the server can accept from a particular user. The default value is 16. Enter a value between 1 and 16.
- In the Maximum command size (bytes) field, specify the maximum size of a single command. The default size is 512. Enter a value between 40 and 1,024.
- Click save, and then click ok in the warning dialog to save your changes.
Step 2. Start the POP3 Services
Use the following steps to start the POP3 services; you must log in as the system administrator to complete these steps:
- Log into the system running the Client Access server role, and open Services (Start > Programs > Administrative Tools > Services). Right-click Microsoft Exchange POP3, and click Start.
- Log into the system running the Mailbox server role, and open Services (Start >Programs > Administrative Tools > Services). Right-click Microsoft Exchange POP3 Backend, and click Start.
Setting Up an IMAP Journal Account
By default, IMAP4 client connectivity is not enabled on Microsoft Exchange Server 2013. To enable IMAP4 client connectivity, you must start both of the following IMAP services:
- Microsoft Exchange IMAP4 Service
- Microsoft Exchange IMAP4 Backend Service
Once enabled, Exchange accepts unsecured IMAP4 client communications on port 143, and over port 993 using Secure Sockets Layer (SSL).
For configuration and testing details, refer to the following sections in the Microsoft TechNet article Enable IMAP4 in Exchange 2013:
- Use the Microsoft Management Console Services snap-in to enable IMAP4
- Use the Shell to enable IMAP4
- How do you know this worked?
Add a Journal Account to the Barracuda Message Archiver
Once you configure the Service on your Exchange Server, you can add the journal account to the Barracuda Message Archiver to begin retrieving new messages for archiving.
- Log into the Barracuda Message Archiver as the administrator, and go to Mail Sources > Journal Accounts.
- In the Journal Accounts section, enter the following details:
- Enable Journal Accounts – Select Yes to allow the Barracuda Message Archiver to poll the listed accounts for new messages for archiving.
- Enable Journal Testing – When set to Yes, all listed accounts are tested for connectivity with each page view.
- Polling Frequency – Specify how often to poll each journal account for new messages
- In the Journal Accounts Configuration section, specify the following details for each journal account:
- Status – Displays the connection status for each account.
- Server – Enter the hostname of the mail server where the account resides.
- Protocol – Select whether the account is POP3 or IMAP; once you select the protocol, the default port number automatically populates the Port field.
- Username – Enter the username or ID associated with this mailbox as defined by your server. This is usually the mailbox designated as the "journaling" email address on your mail server, and specified by the complete email address such as journal@example.com.
- Password – Enter the password associated with the username.
As a best practice, use a unique account for this integration point and grant it the least level of privileges required, coordinating with the system administrator. This journaling account requires write privileges for the associated mailbox on the mail server. For additional information, see Security for Integrating with Other Systems - Best Practices. - Encryption – Select the type of encryption used to connect to the mail server:
- TLS (if available)
TLS
SSL
- None
- Port – Select the associated port based on the selected protocol; the default value is port 143 for IMAP, and port 110 for POP3.
- Keep Items on Server:
- Select Off to allow the Barracuda Message Archiver to automatically clean up the content of the journal mailbox after each import.
Select On to prevent the Barracuda Message Archiver from removing the journaled messages from the mail server; only turn this option on if the contents of the journal account is required by other applications. In this case, make sure that another method for cleaning up the journal account is enabled on the mail server in order to prevent unlimited growth on the mail server and to stay in compliance with your organization’s message retention policies.
- Click Add to add the journal account; verify the Status field displays green, and then click Save.
- To remove a journal account, click the Delete (
 ) icon, and confirm you want to remove the account.