

This article refers to the Barracuda Message Archiver firmware version 5.0 and higher, and the Kerio Connect Mail Server.
Select the Kerio connect Mail Server deployment option based on your environment.
Option 1. Configure SMTP Mailbox Journaling
This option describes how to configure SMTP to deliver all messages to the Barracuda Message Archiver. This deployment option requires configuration of DNS entries and firewall routing rules.
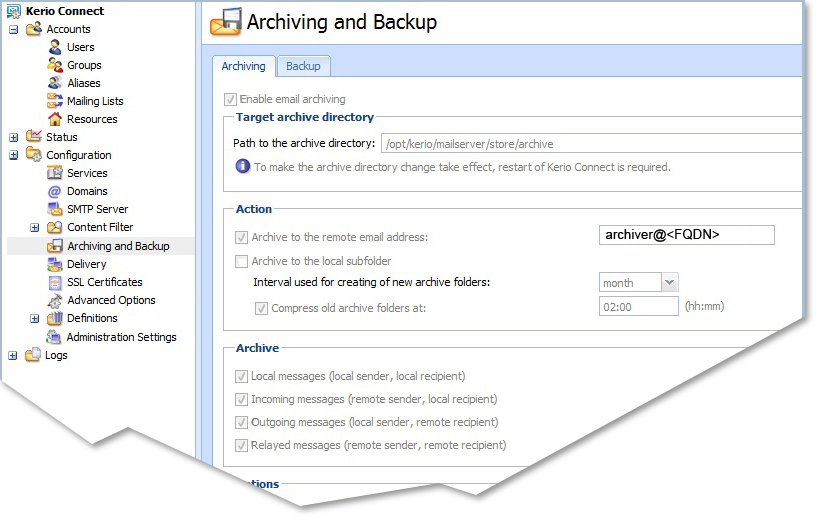
- Navigate to the Kerio Connect directory, expand Configuration, and click Archiving and Backup.
In the Archiving tab, turn on Enable email archiving to facilitate archiving to the Barracuda Message Archiver. In the Path to the archive directory field, enter the full path to the archive directory based on the conventions of the operating system on which Kerio Connect is running.
- In the Actions section, enter the remote email address in the Archive to the remote email address field. Email is resent to this remote email address.
- In the Archive section, select the following options:
- Local messages (local sender, local recipient) – All local messages (messages sent from the local domain) will be archived
- Incoming messages (remote sender, local recipient) – All incoming messages will be archived (from remote senders to local recipients)
- Outgoing messages (local sender, remote recipient) – All outgoing messages will be archived (from local senders to remote recipients)
- Relayed messages (remote sender, remote recipient) – All messages forwarded to a relay server will be archived (from remote senders to remote recipients)
Once configured, an archive folder is automatically created when the first message is delivered. The folder is named based on the selected interval (daily, weekly, or monthly) in the Archiving tab. Any time Kerio Connect is restarted, a new archive folder is created upon receiving the first message, and uses the settings specified in the Archiving section in the Archiving tab.
Option 2. Configure POP3 Mailbox Journaling
This option describes how to configure Kerio Connect to journal to a mailbox on your server and then configure mailbox journaling on the Barracuda Message Archiver.
Step 1. Enable Email Archiving
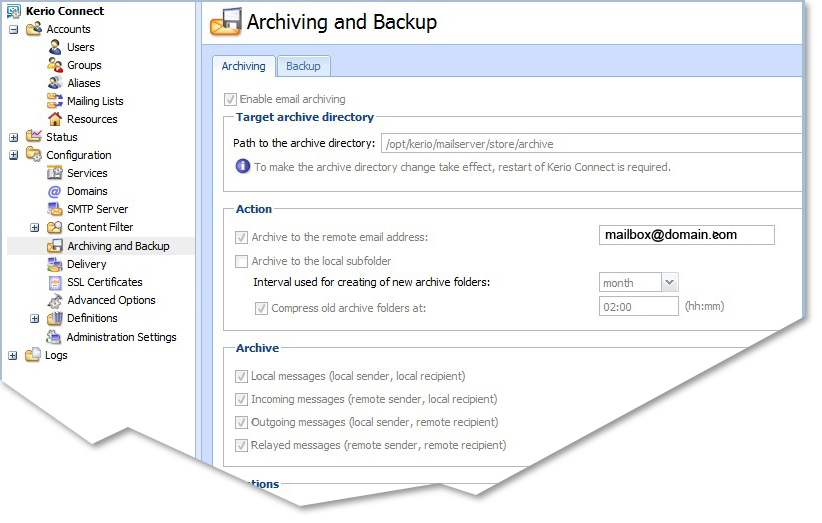
- Navigate to the Kerio Connect directory, expand Configuration, and click Archiving and Backup.
In the Archiving tab, turn on Enable email archiving to facilitate archiving to the Barracuda Message Archiver. In the Path to the archive directory field, enter the full path to the archive directory based on the conventions of the operating system on which Kerio Connect is running.
- In the Actions section, enter the journal mailbox address you previously created in the Archive to the remote email address field. Email is re-sent to this address, for example: journal@domain.com
- In the Archive section, select the following options:
- Local messages (local sender, local recipient) – All local messages (messages sent from the local domain) will be archived
- Incoming messages (remote sender, local recipient) – All incoming messages will be archived (from remote senders to local recipients)
- Outgoing messages (local sender, remote recipient) – All outgoing messages will be archived (from local senders to remote recipients)
- Relayed messages (remote sender, remote recipient) – All messages forwarded to a relay server will be archived (from remote senders to remote recipients)
Once configured, an archive folder is automatically created when the first message is delivered. The folder is named based on the selected interval (daily, weekly, or monthly) in the Archiving tab. Any time Kerio Connect is restarted, a new archive folder is created upon receiving the first message, and uses the settings specified in the Archiving section in the Archiving tab.
Step 2. Set Service Parameters
- Log into the Kerio administration interface, and go to Configuration > Services.
- Click the POP3 service, and verify the following settings:
- Status is set to Running
- Startup Type is set to automatic
- Listening IP Addresses is set to All addresses: 110
- Click Edit to update settings as needed.
Step 3. Add a Journal Account to the Barracuda Message Archiver
Once you configure the Service on your Kerio Connect Mail server, you can add the journal account to the Barracuda Message Archiver to begin retrieving new messages for archiving.
- Log into the Barracuda Message Archiver as the administrator, and go to Mail Sources > Journal Accounts.
- In the Journal Accounts section, enter the following details:
- Enable Journal Accounts – Select Yes to allow the Barracuda Message Archiver to poll the listed accounts for new messages for archiving.
- Enable Journal Testing – When set to Yes, all listed accounts are tested for connectivity with each page view.
- Polling Frequency – Specify how often to poll each journal account for new messages
- In the Journal Accounts Configuration section, specify the following details for each journal account:
- Status – Displays the connection status for each account.
- Server – Enter the hostname of the mail server where the account resides.
- Protocol – Select whether the account is POP3 or IMAP; once you select the protocol, the default port number automatically populates the Port field.
- Username – Enter the username or ID associated with this mailbox as defined by your server. This is usually the mailbox designated as the "journaling" email address on your mail server, and specified by the complete email address such as journal@example.com.
- Password – Enter the password associated with the username.
- Encryption – Select the type of encryption used to connect to the mail server:
- TLS (if available)
- TLS
- SSL
- None
- Port – Select port 110.
- Keep Items on Server:
- Select Off to allow the Barracuda Message Archiver to automatically clean up the contents of the journal mailbox after each import.
Select On to prevent the Barracuda Message Archiver from removing the journaled messages from the mail server; only turn this option on if the contents of the journal account is required by other applications. In this case, make sure that another method for cleaning up the journal account is enabled on the mail server in order to prevent unlimited growth on the mail server and to stay in compliance with your organization’s message retention policies.
- Click Add to add the journal account; verify the Status field displays green, and then click Save.
- To remove a journal account, click the Delete (
 ) icon, and confirm you want to remove the account.