

This article refers to Barracuda Message Archiver Legacy Release firmware or higher. If you are deploying the virtual appliance, refer to the Barracuda Message Archiver Vx Deployment.
This article assumes you are logged in using the admin role, except where noted.
Use this article as a sample road map for setting up and testing the Barracuda Message Archiver appliance in your organization's environment:
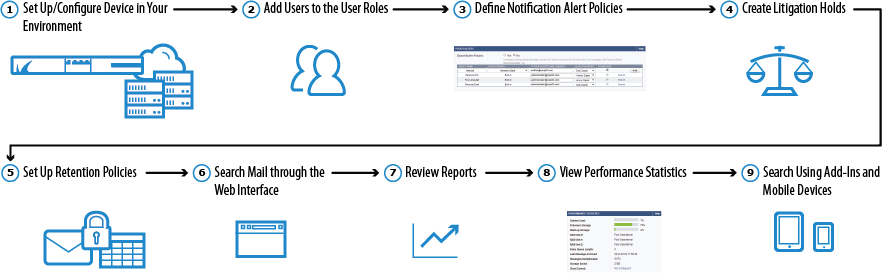
Step 1. Initial Setup and Configuration
Complete the steps in the Getting Started section; configure manually or using the Setup Wizard.
After you complete your deployment configuration, mail begins forwarding to the Barracuda Message Archiver. Log into the web interface as the administrator, and go to the BASIC > Status page. Processed mail displays in the Message Statistics table.
Step 2. Add a User to a User Role
The Barracuda Message Archiver supports four user roles:
- User – The user can view and search content associated with their own mailbox and any shared mailboxes.
- Auditor – The auditor can view all items from any user, and can create and activate policies. Note that the auditor role can be restricted to specific domains by the Admin role.
- IT Admin – The IT admin can make system and network configuration changes only.
- Admin – The admin can view all items from any user, create and activate policies, and make system and network changes.
USE CASE – Add a User in the Auditor Role Including a Saved Search Filter
In this example, the administrator adds Ryan in the auditor role including a Saved Search used to filter his search results for email related to the word "petition" from the domain @corporatenamehere.com. The administrator uses the following steps to add Ryan and set up the Saved Search:
Step 1: Create a Saved Search
On the BASIC > Search page, click Advanced. Select Email > Entire Message > contains, and type petition* as the first set of search criteria.
- Click the + symbol to the left of the search parameter, select Email > Domain > contains, and type @corporatenamehere.com

- Click Search to execute the search and verify that the provided search parameters return the expected results.
- Click Save Search, enter Petition Audit as the Search Name:
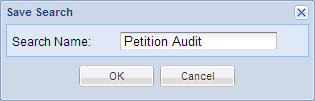
- Click OK; the search is added to the Saved Searches page.
Step 2: Add User
- On the USERS > User Add/Update page, type the user's email address: rdouglas@corporateid.com
- Click No for Use Email Address as Account Name, and then type rdouglas in the Account Name field.
- Click Populate to retrieve a list of User Aliases from the LDAP server for the entered Email Address; Ryan's user aliases populate the table.
- Enter the user's new login password, and select Auditor from the Role drop-down menu.
- Leave the Domain field blank to allow Ryan to access all items from all domains.
- From the Saved Search drop-down menu, select Petition Audit:
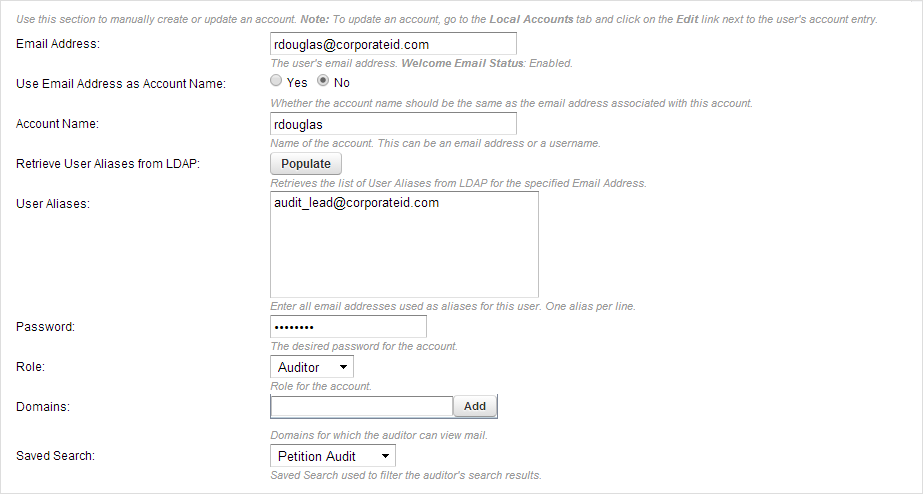
- Click Save at the top of the page to add the new user.
Ryan is added as a user with the auditor role in the Accounts page, and the Saved Search criteria defined in Petition Audit is automatically applied to all searches performed by Ryan.
Step 3. Notification Alert Policies
You can enable policy alerts to send a notification to the administrator when corporate email is being used inappropriately or for non-business matters. Each time a message matching the specified criteria enters the Barracuda Message Archiver, an automatic email notification is sent based on the selected Alert Frequency on the POLICY > Alerts page.
To set up policy alerts, log in to the web interface, and on the POLICY > Alerts page, set Enable Built-In Policies to Yes, and click Save. Built-In Policies include:
- Personal Info – Looks for Personally Identifiable Information inside messages. It scans for various formats of Social Security numbers, credit card numbers, and other types of potentially sensitive information.
- Foul Language – Looks for messages containing specific words that have been identified as Foul Language.
- Personal Email – Looks for messages sent to and from various sites that have been classified as non-business sites, such as recreation or gambling sites.
In addition to built-in policies, you can define custom policies based on a Saved Search that you create on the BASIC > Search page.
USE CASE – Custom Alert Policy
In this example, Sena is an administrator for the Barracuda Message Archiver at a local law firm. She wants to set up an alert whenever messages in the social media site 'Facebook' are encountered. Sena defines a custom alert policy in the Barracuda Message Archiver using the following steps:
- On the BASIC > Search page, click Advanced.
- Select Social Media > Site as the search criteria:

- Click Search to execute the search and verify that the provided search parameters return the expected results.
- Click Save Search, enter Social Media Filter for the name of the saved search, and click OK.
- Go to the POLICY > Alerts page, enter Social Media as the Policy Name, select Social Media Filter from the Saved Search drop-down menu, enter the alert email address skendrick@mylawfirmname.com, and set Dashboard to On so that the custom policy statistics display in the Policy Statistics table on the BASIC > Status page.
- Click Add to save and activate the Policy Alert, and then click Save:
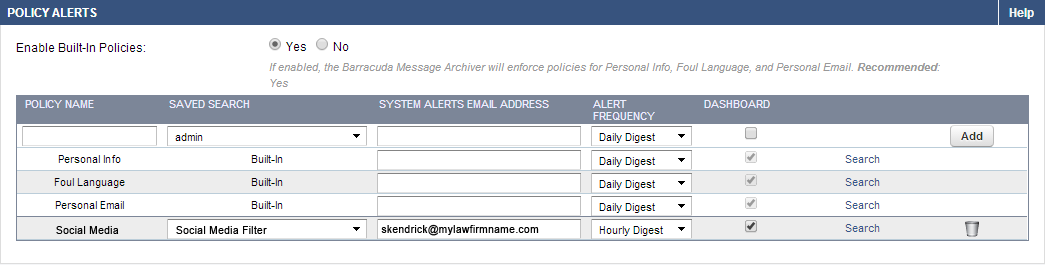
Once activated, each time an email containing the social media site 'Facebook' is encountered, an alert notification is generated and sent to skendrick@mylawfirmname.com.
Step 4. Litigation Holds – Auditor Role Only
A user with auditor role can create litigation holds which prevent messages matching the criteria of a specific Saved Search from being removed from the Barracuda Message Archiver. On the BASIC > Search > Saved Search page, litigation hold details include:
- Auditor – The account name of the auditor who created the Litigation Hold
- Saved Search – The name of the Saved Search associated with this Litigation Hold
- Hold End Date – The date and time when this Litigation Hold expires
Before an auditor can set up a litigation hold, the administrator must first enable litigation holds by completing the following steps:
- Log in to the Barracuda Message Archiver, and go to the POLICY > Retention page.
- Set Enable Litigation Holds to Yes, and click Save.
USE CASE – Litigation Hold
In this example, Sue is a user with auditor role at a large corporation, and has been asked to set up a litigation hold to retain all emails related to the user 'Dallen' from their client 'CorpName'. Sue uses the following steps to set up the litigation hold:
- Log in to the Barracuda Message Archiver in the auditor role.
- Go to the BASIC > Search page, and click Advanced.
- Select Email > Domain > contains, and type @corpname.com as the domain name. Click the + symbol to the left of the search parameter.
- Select Email > From/To/Cc > contains, and type dallen as the second set of search criteria:

- Click Search to execute the search and verify that the provided search parameters return the expected results.
- Click Save Search, and type dallen – Litigation Hold as the Saved Search name:
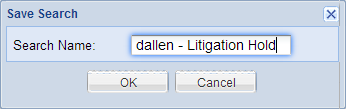
- Click OK. Click the Saved Searches tab:

- In the Actions column, click Apply Litigation Hold. In the Apply Litigation Hold window, to hold the associated emails indefinitely, click None, or you can specify a specific expiry date. For this example, select Specific Date, click the Calendar icon, and select the date to end the litigation hold.
- Click OK to apply the litigation hold.
Once a litigation hold is added, it displays in the Litigation Holds section on the POLICY > Retention page when a user is logged in using the admin role:

Step 5. Retention Policies
By default, automated archived message purging on the Barracuda Message Archiver is disabled. If you enable this ability, the Global Retention Policy and any Saved-Search retention policies are compared to all archived messages once a week. You can allow these messages to be deleted from the Barracuda Message Archiver based on the Saved Search retention policies. Note that before you can create a Saved Search retention policy, you must create at least one Saved Search in the BASIC > Search > Advanced Search page.
A Saved Search retention policy enables you to automatically expire messages matching a specified saved search. Use this feature to create exceptions to the global Retention Policy.
USE CASE – Saved Search Retention Policy
In this example, Kari is the administrator and wants to set the maximum age of a set of archived messages before they are permanently purged from the archive. Kari uses the following steps to set up a retention policy based on a Saved Search:
Step 6. Search Mail Using the Web Interface
There are two search modes on the BASIC > Search page:
- Basic – Run a search based on a word or phrase across all messages accessible by your account.
- Advanced – Run a complex search query based on multiple criteria; note that you can save queries for future use.
When you initially go to the BASIC > Search page, all messages accessible by your account display in the message list in the Standard tab.
Use the Basic Search mode to perform a quick search across all of your messages. Use Advanced Search mode to perform complex search queries based on selected attributes.
USE CASE – Export Messages
In this example, Uma works in a real estate office. She recently closed a sale for property on Hernandez Avenue with M. Beckly. The procedure in the office is to burn a CD with all correspondence regarding a sale once the sale is complete. Uma needs to search for all messages related to the sale, and then export the messages to a .zip file:
- Log into the Barracuda Message Archiver as a user.
- Go to the BASIC > Search page, and click Advanced.
- Select Email > From/To/Cc > contains, type beckly as the first set of search criteria, and click the + symbol to the left of the search parameter.
- To the right of the first set of search criteria, click AND to toggle to OR.
- Select All > Entire Message > contains, and type hernandez:

- Click Search to execute the search and verify that the provided search parameters return the expected results.
- In the results window, use Ctrl- and Shift-click to select all of the messages to include in the .zip file.
- Click the Tools menu, and select Export Messages; in the Export Messages dialog box, specify the export details as follows:
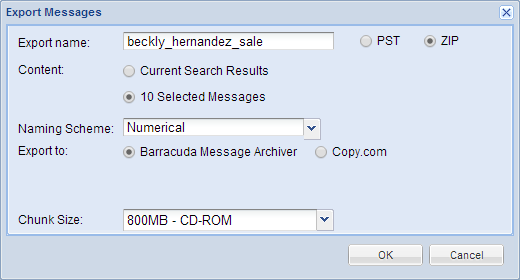
- Click OK. Go to the Tasks tab to view the download progress. Once the download is complete, click Download to save the .zip file to your local system.
UMA can now burn the .zip file to a CD to place in M. Beckly's customer file.
USE CASE – Authorized Search of Another User's Email
In this example, Abe is a legal assistant for Dale. Dale often needs Abe to search through his email on his behalf. To avoid sharing Dale's ldap credentials with Abe, the administrator creates a local user account with entitlements so that Abe can access Dale's email:
Step 1. Administrator Creates a Local User Account
- Log into the Barracuda Cloud Archiving Service as the account administrator.
- Go to the USERS > LDAP User Add/Update page.
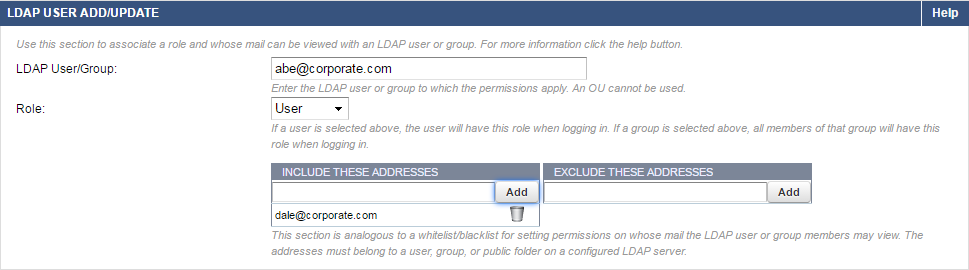
- Type Abe's email address, abe@corporate.com, in the Email Address field, and select User from the Role drop-down menu.
- In the Include These Addresses field, type Dale's email address, dale@corporate.com:
- Click Add, and click Save.
Step 2. Abe Searches Dale's Email
Dale asks Abe to search his account for all email correspondence with MarilynCorp during May, 2013.
- Abe logs into the Barracuda Message Archiver.
- Go to the BASIC > Search page, and click Advanced.
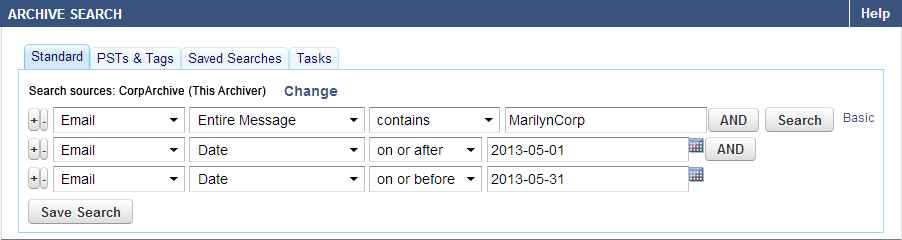
- Select Email > Entire Message, and type MarilynCorp as the first set of search criteria.
- Click the + symbol to the left of the search parameter. To the right of the first set of search criteria, leave the value as AND.
- Select Email > Date > on or after, click in the associated field, and type or select the date 2013-05-01.
- Click the + symbol to the left of the search parameter. To the right of the first set of search criteria, leave the value as AND.
- Select Email > Date > on or before, click in the associated field, and type or select the date 2013-05-31:
- Click Search to execute the search.
Step 3. Abe Saves Search Results
Abe now saves the search results as a .csv file that his manager, Dale, can download from the Tasks tab.
- Once the search results are returned, from the Tools menu, click Save Results as CSV.
- In the Export Name field, type MarilynCorpArchive:
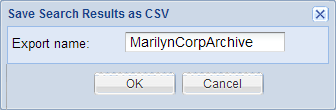
- Click OK. The .csv file is now available for download from the Tasks tab.
- Dale selects the item in the table, and clicks Download to save the .csv file to his local system.
Step 7. View Reports
The built-in reports on the Barracuda Message Archiver provide statistics on various operational, legal, and storage aspects. Default reports include message archive growth, policy violations, archive traffic, and cost analysis and projected archive storage growth.
On the BASIC > Reports page you can generate the following reports:
- Email Activity Report – View Barracuda Message Archiver email activity by user
- Top Storage Users Report – View Barracuda Message Archiver storage usage by user
- Policy Violations Report – View Barracuda Message Archiver email policy violations by user
- Global Searches Report – View the top Barracuda Message Archiver global searches by user
- Usage Report – Generate an overview of Barracuda Message Archiver cost analysis and projected archive storage growth
USE CASE – Automatically Generate Daily Reports
In this example, Wiley, the system administrator, receives automated reports. His boss, Francis, wants to receive an automated report of policy violations at his email address 'francis@corporateid.com':
- Log into the Barracuda Message Archiver, and go to the BASIC > Reports page.
- In the Automated Reports section, Wiley adds Francis' email address to the Policy Violations Report:
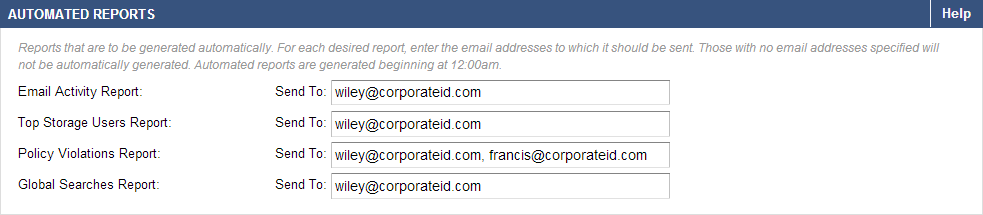
- Click Save.
Francis will now receive a daily report of all policy violations, and the number of times each policy was violated, by user for the previous day. This report includes custom policies, and all built-in policies when enabled on the POLICY > Alerts page.
Step 8. View Statistics
View operating status on the BASIC > Status page when you log into the Barracuda Message Archiver using either the auditor or administrator role as described in the following table:
| Status Type | Description |
|---|---|
| Message Statistics | A snapshot of archived email, appointments, contacts, distribution lists, notes, and tasks. |
| Policy Statistics | Statistics for built-in and custom policies configured and selected on the POLICY > Alerts page. |
| Performance Statistics (1) | Current operating status and performance of the Barracuda Message Archiver including system load, firmware and mail/log storage, RAID disk array status, indexed queue length, storage percentages, and status of the connection to Barracuda Cloud Control. |
| Storage Statistics (1) | Statistics on the amount of data stored on the Barracuda Message Archiver by hour, day, and total. |
| Subscription Status (1) | Current status of your Energize Updates subscription, and the optional Instant Replacement and Premium Support subscriptions. |
| Cluster Status (1) | Number of messages awaiting processing on the Barracuda Message Archiver and its mirror, if one has been configured on the ADVANCED > Clustering page. |
Hourly Statistics | Breakdown of message traffic and policy violations for the last 24 hours. |
| Daily Statistics | Breakdown of message traffic and policy violations for the last 30 days. |
| Note: (1) Statistics for this item are not visible when a user is logged in with the auditor role. | |
Step 9. Tools and Add-Ins
You can download and install Barracuda Message Archiver tools and add-ins to your local system.
Barracuda Archive Search for Outlook
Barracuda Archive Search for Outlook allows users to perform various functions with messages that are stored on your organization's Barracuda Message Archiver, including:
- Synchronization of your archived folders with Outlook
- Search for archived messages and other Microsoft Outlook data, such as Contacts
- View and interact with (forward, reply to, etc.) all of your archived Outlook items
- Access stubbed attachments
- Archive messages
These functions are available directly from Outlook, allowing transparent access to your messages and attachments, all with no browser interaction required. All that is needed is a network connection to your organization’s mail server and to the Barracuda Message Archiver.
Barracuda Archive Search
The Barracuda Archive Search provides access to the search features of the Barracuda Message Archiver for Mac OS X and Microsoft Windows users. This utility allows users to search through their own archived messages directly from their desktop without needing to log into the Barracuda Message Archiver web interface, and perform actions such as forwarding or replying to the located messages.