It seems like your browser didn't download the required fonts. Please revise your security settings and try again.

How to Back Up Archives

  • Last updated on

This article refers to Barracuda Message Archiver firmware 5.1.1 or higher.

In the event of a catastrophe, your raw email data and search index can be quickly restored. To accomplish this, back up the raw email data including .zip files present on the data partition as well as data directories that house statistics, index, and other metadata snapshots the Barracuda Message Archiver generates for content.

Message Archiver models (excluding the 150) provide RAID storage to protect against physical drive failure. However, other environmental or catastrophic issues may occur that the built-in RAID redundancy cannot protect against. It is strongly recommended that the Barracuda Message Archiver administrator make use of the available mechanisms to back up the email data to an external location.

 There are four methods for backing up the data partition on your Barracuda Message Archiver from the web interface:

  • Option 1. Copy Archived Data to your Network
  • Option 2. Configure a Data Partition Mirror
  • Option 3. Mirror to the Cloud
  • Option 4. Back Up Data to Barracuda Backup

Option 1. Copy Archived Data to your Network

Use the following steps to connect to the Barracuda Message Archiver via SMB and copy archived data to your network.

Step 1. Enable SMB Access to the Barracuda Message Archiver's Data Partition

Use the following steps to enable backup of your stored content via SMB:

  1. Log into the Barracuda Message Archiver, and go to the Advanced > Backups page.
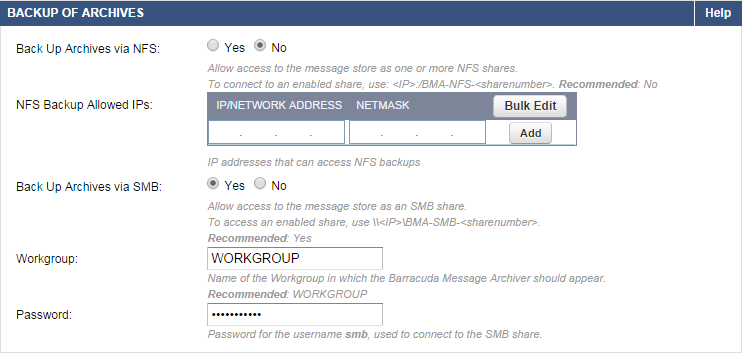
  2. In the Backup of Archives section, set Back Up Archives via SMB to Yes to allow access to the Barracuda Message Archiver message store as an SMB share.
  3. Enter the Workgroup in which the Barracuda Message Archiver should appear.
  4. Enter the Password for the username smb used to connect to the SMB share:
    SelectSMB.png 
  5. Click  Save .

The number of shares on the Barracuda Message Archiver can vary. All models have share number 1, while higher model numbers may have additional shares. Possible share configurations include:

Share Numbers
1
1, 2
1, 2, 3, 4

To access the share after it is enabled, connect to \\ host \BMA-SMB-# where host is the hostname or IP address of the Barracuda Message Archiver and # is the share number. For example, if the IP address of your Barracuda Message Archiver is 192.168.1.10, to connect to the second share you would use: \\192.168.1.10\BMA-SMB-2

Step 2. Set Up Raw Email Data and Metadata Snapshot Backup
  1. Log into your Windows Network or Backup System such as Barracuda Backup.
  2. Connect to the Barracuda Message Archiver data partition by accessing \\ host \BMA-SMB-#.
  3. Back up the following files and directories:
    • Raw Email data:
      • *.zip (1GB-sized message archives)
      • <nnn>/ (directory containing recently received emails, not yet merged into a . zip)
    • Snapshots of Metadata

      The following snapshots are performed nightly. In the event that data restoration is necessary, typically only the raw emails (from .zip files) arrived in the last day must be reprocessed.

      • FolderSync (snapshot of foldersync data) 
      • index (snapshot of archives of index metadata)
      • index_backup (snapshot of the entire index)
      • ldap_cache (snapshot of ldap group information)
      • log (snapshot of important system information)
      • postgres_backup (snapshot of system databases)

You must disable anti-virus scan on the external share used to contain your backups.

You can use any network share that supports the SMB/CIFS file sharing protocols to copy your data to.

In older Barracuda Message Archiver models 650 and higher, the dedicated hardware iSCSI adapter can be integrated with any iSCSI storage-area network (SAN).

Option 2. Configure a Data Partition Mirror

You can add network storage volumes and enable mirroring for internal storage to provide data redundancy. Configure a real-time mirror of the Barracuda Message Archiver's data partition on the Advanced > Storage Manager page.

You must disable anti-virus scan on the external share used as a mirror before adding the mirror share to the Barracuda Message Archiver mirror.

You can use any network share that supports the SMB/CIFS file sharing protocols as the mirror.

In older Barracuda Message Archiver models 650 and higher, the dedicated hardware iSCSI adapter can be integrated with any iSCSI storage-area network (SAN).

Use the following steps to add the mirror share to your configured network share:

  1. Log into the Barracuda Message Archiver as the administrator, and go to the Advanced > Storage Manager page.

  2. If you have a CIFS/Windows share already set up, complete the following sub-steps, otherwise go to step 3:
    1. In the Default (Group) table, select the share from the drop-down menu.
    2. Click Add Mirror.
  3. If you do not have a CIFS/Windows share already set up, complete the following steps:
    1. In the CIFS/Windows Share section at the bottom of the page, enter the share details, and click Add.
    2. In the Group table, select the share you want to use to back up the data from in the drop-down menu, and click Add Mirror.

Once you click Add Mirror, the Barracuda Message Archiver synchronizes the data on the internal share(s) with the mirror share.

For more information, log into your Barracuda Message Archiver, go to the Advanced > Storage Manager page, and click Help.

Option 3. Mirror to the Cloud

Starting September 2, 2024, the Cloud Storage feature will no longer be available. For more information, see Cloud Storage Discontinuation.

Use Cloud Storage to mirror data from the Barracuda Message Archiver to the Barracuda Cloud. You must activate cloud storage before you can configure mirroring.

Prerequisites
  • You must have a Cloud Storage Subscription available from Barracuda Customer Services.
  • If the appliance is located behind a corporate firewall, you may need to open the following ports to allow communication between the appliance and Barracuda Networks:
    • Ports 80/443 and 1194 outbound for both TCP and UDP are required for communication 
    • Ports 5120-5129 are used to replicate data to Barracuda Cloud Storage; contact Barracuda Networks Technical Support to restrict outbound network traffic on these ports to only reach Barracuda Networks

Barracuda Cloud Storage may only be used to mirror the data that is stored on the Barracuda Message Archiver to Barracuda Cloud Storage for off-site redundancy. Retention policies that you set on the Message Archiver appliance will be the same in Cloud Storage. Once you link your Barracuda Message Archiver to a Barracuda Cloud Control account, you can mirror all new and existing mail and then search, export, or forward that mail from both the Barracuda Message Archiver web interface and from Barracuda Cloud Control. Select Mirror in the Cloud Storage section on the Advanced > Cloud Storage page in the web interface.

The wizard for creating retention policies is dynamic and based on the selected Cloud Mode defined on the Advanced > Cloud Storage on the Barracuda Message Archiver.

Use the following steps to set up mirroring to the Barracuda Cloud:

  1. Log into the Barracuda Message Archiver as the administrator, and go to Advanced > Cloud Storage.

  2. Click Connect to Cloud Storage; the Login page displays.
  3. Enter your Barracuda Cloud Control account credentials, and click Sign In.
  4. In the Location page, enter the City, State, and Country where your mail server is hosted; your account can only link to one location. The first Barracuda Message Archiver appliance you link to determines the data center that all appliances on your account will use. For example, if you select Canada as your country, your appliances will use the data center in Canada.
  5. Click Next. In the View Summary page, click Activate to link your Barracuda Message Archiver to the Barracuda Cloud Control account.
  6. The Advanced > Cloud Storage page refreshes and displays the Cloud Storage options. Select Mirror; read the warning, and click Confirm to continue.
  7. In the Rate Control section, specify the data replication rate to Barracuda Cloud Storage.

As messages are sent to Cloud Storage, related statistics display on the BASIC > Dashboard page.

Option 4. Back Up Data to Barracuda Backup

You can back up archives using your Barracuda Backup via SMB access to the Barracuda Message Archiver's data partition.

Before continuing, follow the steps outlined in Option 1. Copy Archived Data to your Network to enable the Message Archiver SMB shares.

Use the following steps to back up the Barracuda Message Archiver using Barracuda Backup:

  1. Log into Barracuda Backup as the Administrator, and go to the Backup > Sources page.
  2. Click Add a Computer. In the Add a Computer page, enter a Computer description and enter the IP address or fully qualified domain name (FQDN) in the Computer Name field.
  3. From the Computer Type drop-down menu, select Microsoft Windows.
  4. Set Enable File Share Backups. In the Username field, type smb and enter the password you set up on the Advanced > Backups page in the Barracuda Message Archiver web interface:
    backup_setup.png 
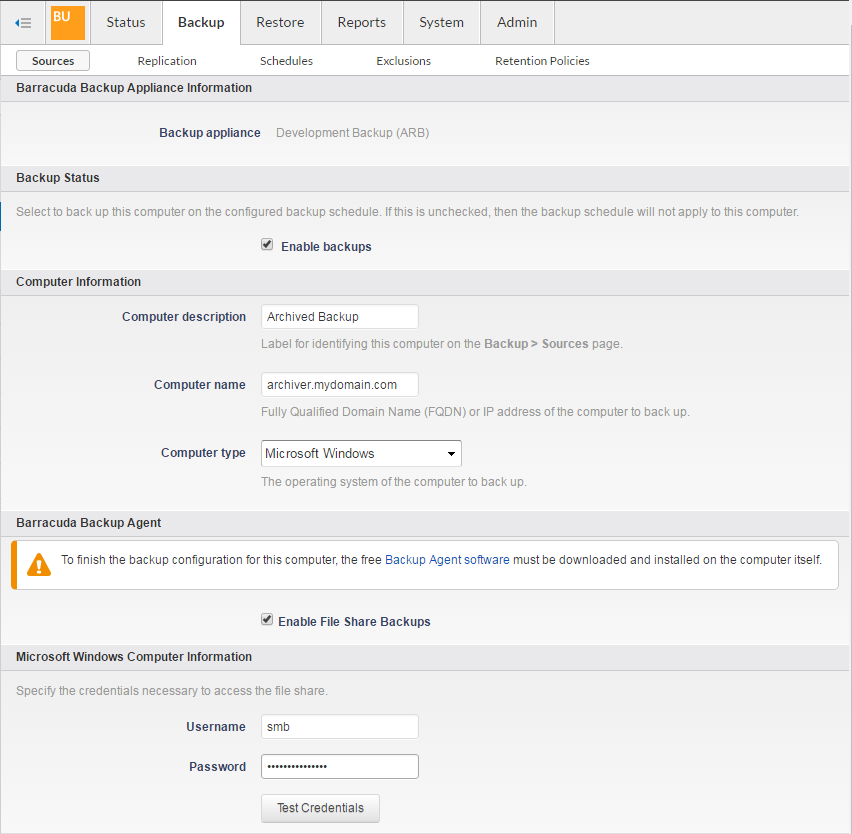
  5. Click Test Credentials to verify access to the file share.
  6. Click Save at the top of the page.
  7. In the Add Data Source page, from the Data Type drop-down menu, select File Share - CIFS.
  8. Verify Enable Backups is set to On .
  9. In the File Share Information section, enter BMA-SMB as the Share Name
  10. Click Test Share. In the Folder Selection section, specify which folders you want to back up.

    Barracuda Networks recommends selecting all folders for backup. See Option 1, Step 2. Set Up Raw Email Data and Metadata Snapshot Backup for a description of the data to be backed up.

  11. To replicate to the cloud, turn on Replicate to Barracuda Cloud Storage.
  12. Select the backup schedule for the SMB share.
  13. Click Save to save your configuration and add the data source.

For more information, go to the go to the Advanced > Backups page in the Barracuda Message Archiver, and click Help.