

The Barracuda Message Archiver on Amazon Web Services (AWS) is a complete and affordable virtual email archiving solution designed for optimizing email storage in the AWS public cloud service, meeting regulatory compliance and e-discovery requirements, and providing easy access to old emails. Before getting started, select the licensing option that best suits your environment.
Licensing Options
The Barracuda Message Archiver is available on AWS with the Bring Your Own License and Hourly / Metered option.
Bring Your Own License
With the Bring Your Own License (BYOL) option, you are required to obtain a Barracuda Message Archiver license token either through a free evaluation or online purchase. Request a Barracuda Message Archiver AWS license by:
- Providing the required information for a free evaluation: https://www.barracuda.com/purchase/evaluation, or
Purchase a license online: https://www.barracuda.com/purchase, or
Wait to select licensing (free evaluation or purchase) once you deploy the VM and log in to the web interface the first time.
Table 1. Supported AWS Instance Types
The following table lists the supported AWS instances; f or more information, see Amazon EC2 Instances :
| Model | vCPU | Memory (GB) | Instance Type |
|---|---|---|---|
| Model 150 | 2 | 4GB | t2.medium |
| Model 350 | 2 | 8GB | t2.large |
| Model 450 | 4 | 16GB | m3.xlarge |
| Model 650 | 8 | 32GB | m3.2xlarge |
| Model 850 | 8 | 64GB | i2.2xlarge |
| Model 950 | 16 | 128GB | i2.4xlarge |
| Model 1050 | 16 | 128GB | i2.8xlarge |
Hourly / Metered
With the Hourly / Metered licensing option, you complete the purchase or evaluation of the Barracuda Message Archiver entirely within the AWS Marketplace. After the instance is launched, it is automatically provisioned, requiring no manual setup. You are charged hourly for both the Barracuda Message Archiver Software and Amazon Elastic Compute Cloud (Amazon EC2) usage on Amazon. For pricing information, refer to the AWS Marketplace.
For Hourly / Metered licensing, Barracuda Networks offers four models. The following table lists each instance type with its CPU, memory, and the number of Private IP addresses that can be associated per ENI.
If you want to increase the performance of an existing VM, configure it with a larger instance type on AWS and you will be charged accordingly by Amazon. The VM will automatically be reconfigured by Amazon with the resources and capabilities of the larger instance type.
Table 2. Supported AWS Instance Types
| Amazon Instance | Equivalent Supported Barracuda Message Archiver Model | Addressable Storage | Recommended Users |
|---|---|---|---|
| t2.medium | Model 150 | 500 GB | 100 |
| t2.large m3.large m4.large | Model 350 | 2 TB | 300 |
| m3.xlarge m4.xlarge | Model 450 | 4 TB | 600 |
| m3.2xlarge m4.2xlarge | Model 650 | 8 TB | 1,200 |
| I2.2xl | Model 850 | 18 TB | 2,500 |
| I2.4xl | Model 950 | 28 TB | 4,000 |
| I2.8xl | Model 1050 | 66 TB | 10,000 |
When you purchase an instance, Amazon charges you based on the associated model. For example, If you have 500 users and purchase an m3.xlarge, you are automatically licensed for Model 450.
Step 1. Set Up a Virtual Private Cloud
Use the following steps to set up a Virtual Private Cloud (VPC) on Amazon Web Services:
- Log in to the AWS Management Console.
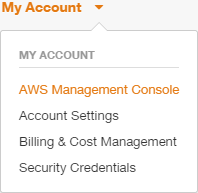
- From the My Account drop-down menu, click AWS Management Console:
- From the Services menu, click VPC, and in the left pane, click Your VPCs.
- In the VPC Dashboard, click CreateVPC. The Create VPC dialog box displays:
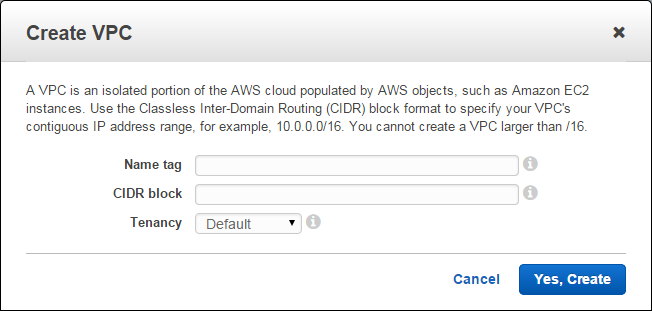
- Complete the following:
- Enter a Name tag (optional)
- Enter the IP address range to be used for your VPC in the CIDR block field
- Select Default from the Tenancy drop-down menu
- Click Yes, Create.
Step 2. Set up and Attach an Internet Gateway
- In the left pane, click Internet Gateways, and then click Create Internet Gateway.
- In the Create Internet Gateway dialog, click Yes, Create.
- Click on the Internet Gateway, enter a Name tag (optional), and then click Attach to VPC.
- In the Attach to VPC dialog box, select the newly created VPC from the drop-down menu, and then click Yes, Attach.
Step 3. Set up Subnet
- In the left pane, click Subnets, and then click Create Subnet. The Create Subnet dialog box displays:
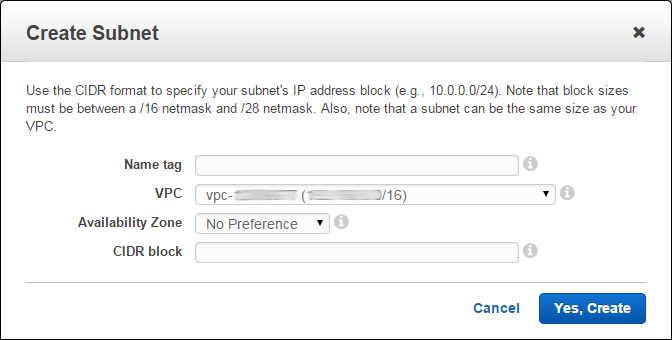
- Enter a Name tag (optional), select the Availability Zone where your VPC resides, and enter the IP address range in the CIDR block.
- Click Yes, Create.
Step 4. Set up Route Table
- In the left pane, click Route Tables, and then click Create Route Table:
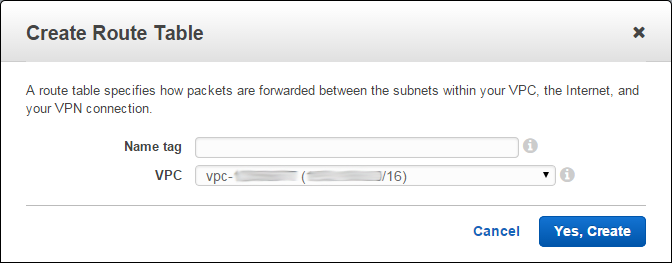
- Enter a Name tag (optional), and select the newly created VPC from the drop-down menu.
- Click Yes, Create .
- Click the Routes tab.
- In the Destination field, enter 0.0.0.0/0, verify the newly created Internet gateway displays in the Target field, and then click Save.
Step 5. Create a Security Group
- Log in to the Amazon EC2 Management Dashboard.
- In the left pane, expand Network & Security, and click Security Groups.
- Click Create Security Group.
- In the Create Security Group dialog box, enter a name and description to identify the security group.
- From the VPC drop-down menu, select a VPC ID.
Use the Security group rules section to add Inbound and Outbound security rules.
- Click Create. The group displays in the Security Group table.
Step 6. Launch Barracuda Message Archiver Instance
- Log in to the Amazon EC2 Management Dashboard.
- From the drop-down menu in the upper right corner, select the region for the instance to allow Amazon EC2 resources to be shared between regions:

- In the EC2 Dashboard, click Launch Instance; follow the onscreen prompts to launch the instance:
- Step 1: Choose an Amazon Machine Image (AMI):
- In the left pane, click AWS Marketplace.
- Search for Barracuda Message Archiver, and then click Select.
- Step 2: Choose an Instance Type:
- Click All instances or General purpose in the left pane, and then select the desired instance type in the table.
- Click Next: Configure Instance Details.
- Step 3: Configure Instance Details:
- Enter the Number of instances to launch.
- Select the Network and Subnet.
- In the Advanced Details pane, keep the default setting for all parameters.
- Click Next: Add Storage.
- Step 4: Add Storage:
- Modify the values if necessary.
- Click Next: Tag Instance.
- Step 5: Tag Instance:
- If required, add or remove tags for the instance.
- Click Next: Configure Security Group.
- Step 6: Configure Security Group:
- Select a security group defined in Step 5. Create a Security Group.
- Click Review and Launch.
- Step 7: Review Instance Launch:
- Review the Instance settings.
- Click Launch.
Once provisioning is complete, the Barracuda Message Archiver virtual machine boots up.
- Continue with Barracuda Message Archiver on Amazon Web Services Quick Start Guide.