

Before Getting Started
Complete the Barracuda Message Archiver Deployment steps to create the instance.
Step 1. Launch the Instance and Add Licensing
- Sign in to the Amazon Web Services Portal.
- Open the EC2 Management Console, and then click Instances in the left pane.
- In the Instances table, select the Barracuda Message Archiver instance created in the Barracuda Message Archiver Deployment steps, and copy the Public DNS address:
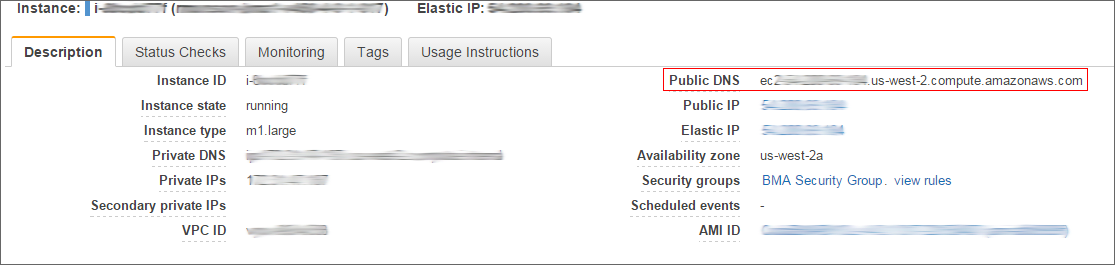
Open a browser window, and paste the public DNS address followed by port 8000 for HTTP; no port is required for HTTPS. For example:
http://<Public DNS>:8000 (Unsecured)
https://<Public DNS> (Secured)After the boot process is complete, the Licensing page displays:
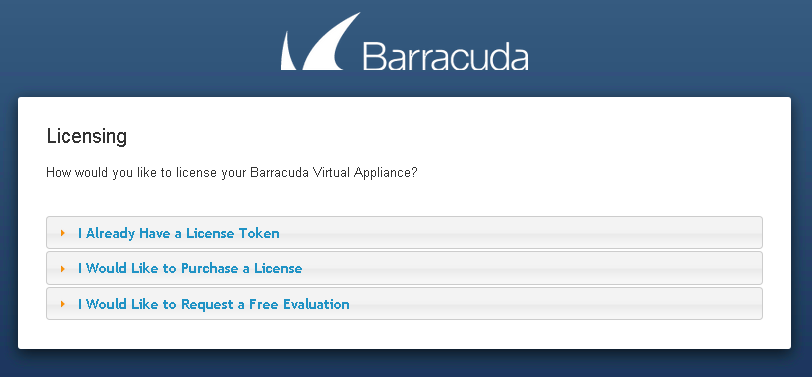
- Select the type of licensing:
- I Already Have a License Token – Use this option to provision your Barracuda Message Archiver with the license token you have already obtained from Barracuda Networks. Enter your Barracuda Networks Token and Default Domain to complete licensing, and then click Provision. The Barracuda Message Archiver connects to the Barracuda Update Server to acquire the required information based on your license, and then automatically reboots. Allow a few minutes for the reboot process. Once the instance is provisioned, you are redirected to the login page.
- I Would Like to Purchase a License – Use this option to purchase the license token for the Barracuda Message Archiver. Provide the required information in the form, accept the terms and conditions, and then click Purchase. The Barracuda Message Archiver connects to the Barracuda Update Server to acquire the required information based on your license, and then automatically reboots. Allow a few minutes for the reboot process. Once the instance is provisioned, you are redirected to the login page.
- I Would Like to Request a Free Evaluation – Use this option for a 30-day free evaluation of the Barracuda Message Archiver. Provide the required information in the form, accept the terms and conditions, and then click Evaluate. The Barracuda Message Archiver connects to the Barracuda Update Server to acquire the required information based on your license, and then automatically reboots. Allow a few minutes for the reboot process. Once the instance is provisioned, you are redirected to the login page.
Step 2. Update Password and Verify Configuration
- To log in to the Barracuda Message Archiver web interface, enter the URl as described in Step 4 of the previous section.
- Log in using the administrator credentials:
- Username – admin
- Password – Enter your Barracuda Message Archiver in Amazon Web Services Instance ID.
- Navigate to the BASIC > Administration page, and change your password.
Step 3. Update the Barracuda Message Archiver Firmware
Use the following steps to update the firmware.
- Go to the ADVANCED > Firmware Update page, and verify the installed version matches the Latest General Release. The Download Now button next to Latest General Release is disabled if the Barracuda Message Archiver is up-to-date with the latest firmware.
- If the installed version does not match Latest General Release: read the release notes to learn about the latest features and fixes provided in the new firmware version, and click Download Now to begin the download. Updating the firmware may take several minutes; do not turn off the unit during this process. Click the Refresh button next to the firmware download progress to view the download status. A Firmware downloaded message displays once the download is complete, and the Refresh button is replaced by Apply Now.
- Click Apply Now when the download is complete.
- Click OK when prompted to reboot the Barracuda Message Archiver. A Status page displays the progress of the reboot. Once the reboot is complete, the login page appears.
- After the firmware update, press Ctrl-F5 to reload JavaScript and clear your cache.
Step 4. Update Definitions
To apply the newest definitions provided by Energize Updates:
- Go to the ADVANCED > Energize Updates page.
- Set Automatic Updates to On. The recommended setting is On for all available definitions.
- Verify the current version is the same as the latest general release. If the rules are not up-to-date, continue to the next step, otherwise definition update is complete.
- Click Update to download and install the latest available definitions to the Barracuda Message Archiver.
Continue with Step 4 - How to Configure Administrative Settings.