

Introducing an active Barracuda Network Access Client environment involves several components, such as global objects, trustzone settings, Access Control Service, and gateway firewall configuration. Using the Barracuda Network Access Client does not necessarily require complex policy rulesets. Although rulesets will become more elaborate due to required exceptions, this example includes only one policy within the Local Machine ruleset.
Example Scenario
The client LAN has an IP address range of 10.0.8.0/24. The protected servers are located in the 172.16.0.0/24 network. In addition to the protected servers, one server acts as a Microsoft Domain Controller and as a remediation server for updating the antivirus patterns. This server has an IP address of 172.16.0.10. Even unknown or unhealthy clients need access to this server. Access to the other servers in the 172.16.0.0/24 network should only be available for clients conforming to the corporate health policy. The health policy requires having a client installed and the personal firewall enabled. In addition, the company uses Trend Micro antivirus products, so it is required to have the Antivirus engine enabled and to receive regular antivirus pattern updates.

Before You Begin
Prepare the Access Control Objects for referencing when configuring the trustzone. Setting up a Barracuda Network Access Client infrastructure usually starts with configuring two different welcome messages, two different Personal Firewall rulesets, and one welcome bitmap. To give users customized information regarding their health state, define different welcome messages for unrestricted access (healthy status) and quarantine (unhealthy status). If a computer is quarantined, having all the necessary information to contact the company's IT support will be useful.
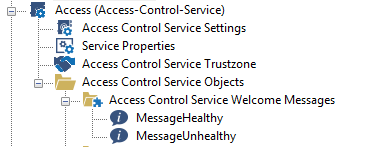
For more information, see Configuring Access Control Objects in the Barracuda CloudGen Firewall documentation.
Step 1. Create a Personal Firewall Ruleset
All of your clients, regardless of their health state, require network access. They need to contact the Access Control Service (TCP port 44000 - this rule is included in the default ruleset) and the Microsoft Domain Controller. Otherwise, users cannot log in. In addition, depending on the antivirus or anti-spyware product, access to HTTP servers may be necessary. Backup software, remote support, and automatic software distribution often trigger connections from server to client, so it may be necessary to modify the incoming ruleset of your personal firewall to allow incoming connections.
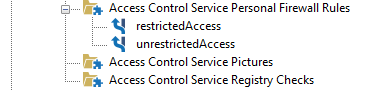
First, create the quarantine ruleset:
- Expand the Access Control Objects configuration node.
- Right-click Personal Firewall Rules and select New Access Control Firewall Ruleset.
- Create an object for the ruleset, named
restrictedAccess
In the restrictedAccess ruleset, the following rules must be added:
- Explicitly block Skype application.
- Allow connections to the remediation servers (172.16.0.10).
- Allow HTTP/HTTPS connections to the Internet. Some antivirus products use HTTP or HTTPS to download updates to engines and patterns.
Create another ruleset for healthy clients, named unrestrictedAccess
Step 2. Introduce an Access Control Service Trustzone
The hierarchical structure of a Barracuda Firewall Control Center allows introducing Access Control Service Trustzones at different levels (Global, Range, and Cluster). Thus, a decision about the proper place for a company's trustzone is required. You may use global trustzones or switch to range trustzones. On a stand-alone unit, configure your trustzone within the Access Control Service > Access Control Trustzone node.
To guarantee that the policy trustzone has a public/private key pair to properly authenticate clients to all participating Access Control Services, you must create a Health Passport Signing Key in Settings > Identity > Health Passport Signing Key. The Health Passport is used for authenticating against other Access Control Service instances (e.g., Remediation Service or Border Patrol). Click New Key to create a new Health Passport Signing key. In this setup with locally created public/private keys, use the previously created key and export the public part into the clipboard. This public key is imported again as the Health Passport Verification key.
Step 3. Create a Policy Rule
Create at least one rule within the Local Machine policy ruleset. The first available rule should be a catch-all rule that usually should be at the end of your policy ruleset. The Policy Rule dialog is split up into these views:
- Identity Matching
- Required Health State
- Policy Assignments
For the Identity Matching and Required Health State views, Basic and Advanced configuration dialogs exist.
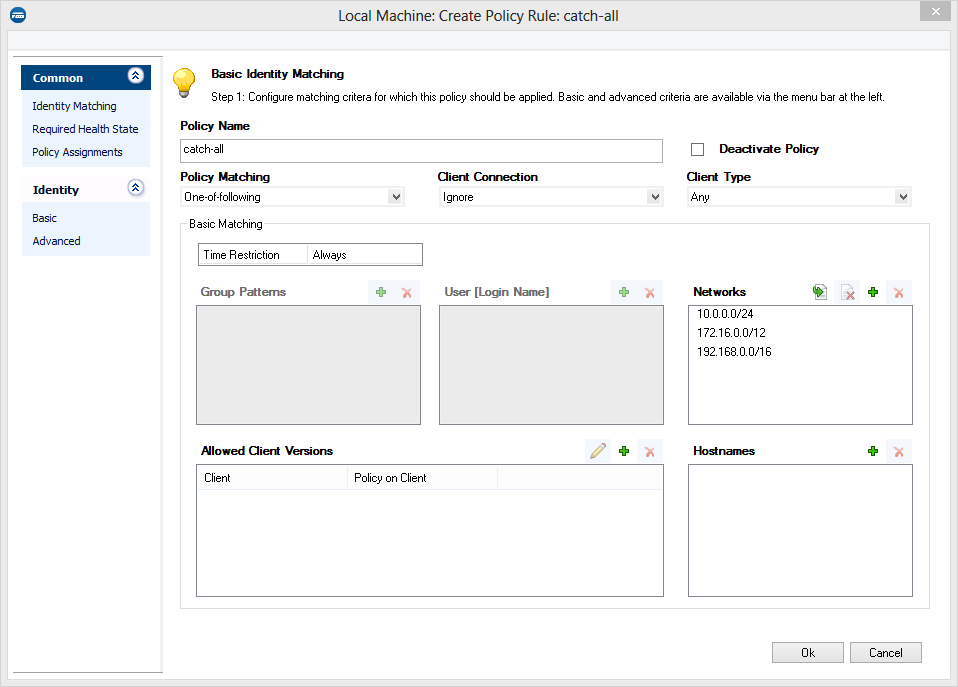
Since the Access Control Service in this example setup is only reachable using private IP addresses, you can restrict the Networks section to the private address ranges.
In the next step, configure the Required Health State conditions. For the catch-all rule, you can define the same policies you require for known clients because security policies usually further restrict unknown clients instead of granting them lower health requirements. To comply to the above-mentioned security requirements, you must set the following parameters in Access Control Service Trustzone > Local Machine > Edit Policy Rule:
- Barracuda Personal FW On – Required
value automatically enables the Barracuda Personal Firewall if deactivated.
Windows Security Center > Virus Protection – Checking engine and pattern versions of antivirus or anti-spyware products requires up-to-date information on the server side.
Continue with the Policy Assignments view and assign the following attributes:
- Assign the unrestrictedAccess firewall object as Ruleset Name.
- Assign the Welcome message. This message is displayed as soon as a user has logged in.
- Assign, for example, the Barracuda Network Access Client Logo as welcome picture.
- For limited access, assign the appropriate ruleset and message.
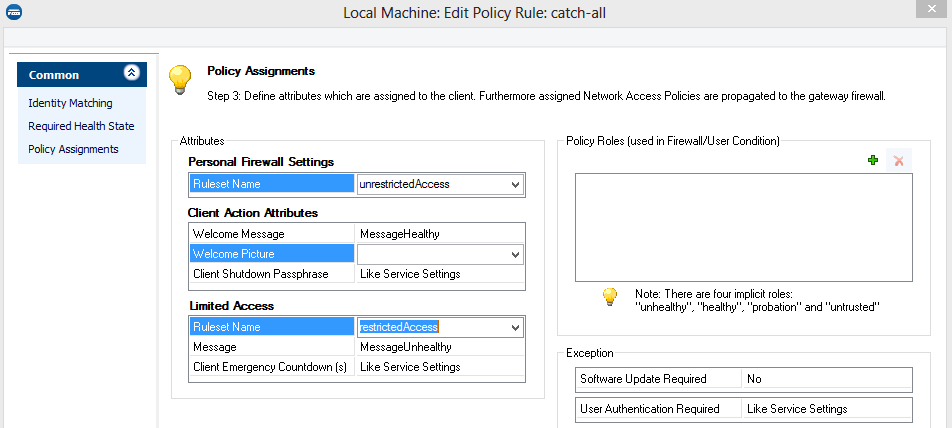
For the catch-all rule matching all clients in the LAN, no automatic client update is required. Therefore, the Software Update Required parameter is set to No.
In the example, you are not required to manually add Network Access Policies. Instead, you can set up your access rules on the gateway firewall using the implicit roles unhealthy, healthy, probation and untrusted.
Step 4. Configure the Forwarding Firewall Ruleset
Enforcement of the security policy is provided by the Barracuda Network Access Client software installed on the endpoint itself. Whenever leaving the local collision domain, CloudGen Firewalls can provide additional protection. To enforce the health policy, CloudGen Firewalls may interpret the access policy attribute assigned to the endpoint within their rulesets. This provides a way to enforce network access control concepts based on date and time, identity and health state as well as the type of network access.
To allow communication with protected servers only for clients conforming to the health policy, modify the gateway access ruleset as follows:
- Open the forwarding firewall ruleset and navigate to the Users and Groups section.
- Select New in the context menu to create a new user object.
- After defining a name for the user object, for example,
healthy-clients, add a new User Condition: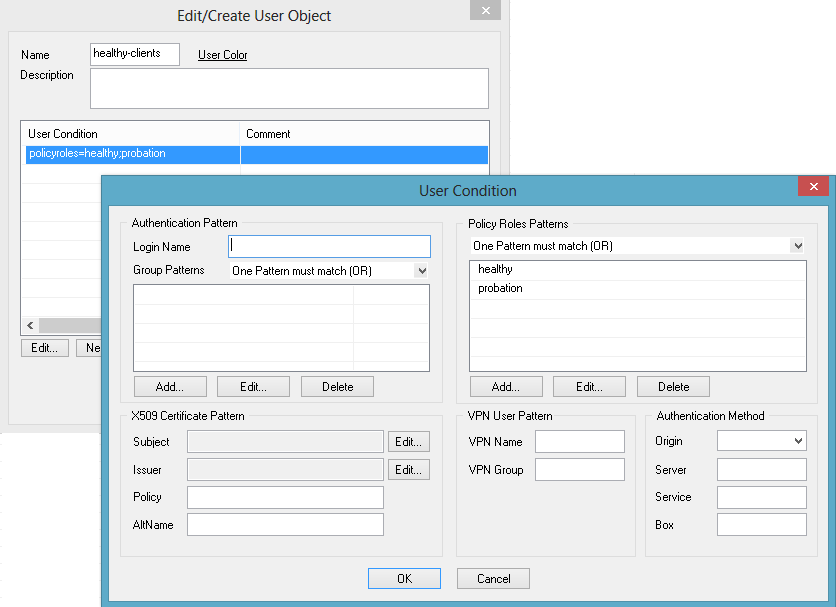
- Within the Policy Roles Patterns section, change the logic operation to One Pattern must match (OR).
- Add two new Policy Roles Patterns: healthy and probation.
- Close the User Condition dialog.
- Create or edit the Healthy-Access-to-Protected-Servers access rule:
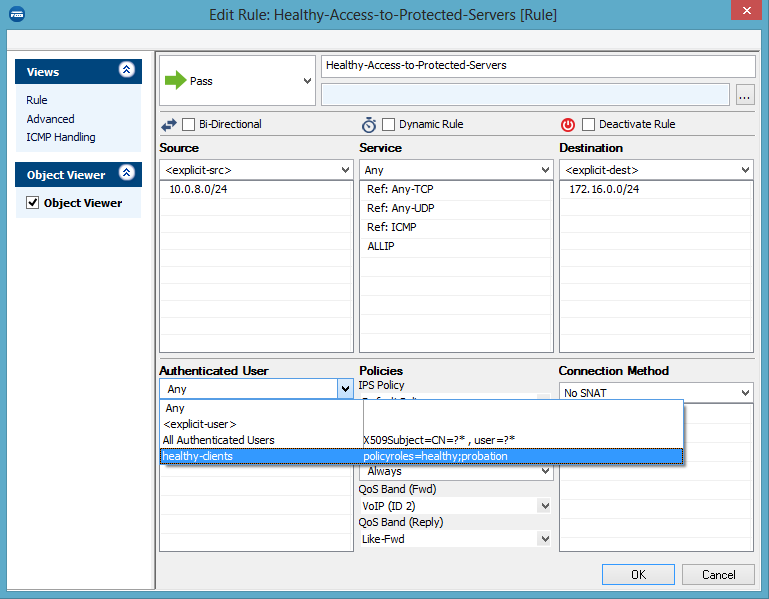
- Add a reference to the new healthy-clients user object within the Authenticated user dialog box
If the user authentication is assigned to the access rule, only clients either fully conforming to the healthy policy or clients in probation state are allowed to access the protected network.
To avoid blocking new connections and terminating existing connections for a few minutes because the antivirus patterns are not up-to-date, Barracuda Networks even allows access for clients in probation status. Remember that the client is in probation status while it tries to execute the remediation actions. If the remediation fails, the client becomes unhealthy.