

No Internal DNS Server Available
If the VPN Group Policy is set up with an external DNS server without any further configurations, the DNS will not be used for any external traffic. It is recommended to use an internal DNS server to bypass this behavior. The following example shows the introduction of an App Redirect rule with the DNS caching service enabled while the gateway IP is used as a DNS server. This configuration ensures a correct DNS resolution.
Step 1. Configure DNS Settings on the Barracuda CloudGen Firewall
Go to CONFIGURATION > Configuration Tree > Box > Administrative Settings.
In the left menu, click DNS Settings.
Click Lock.
In the DNS Server IP table, add the public DNS Server IP address to the DNS Server IP list. This address will be queried by the Barracuda CloudGen Firewall.
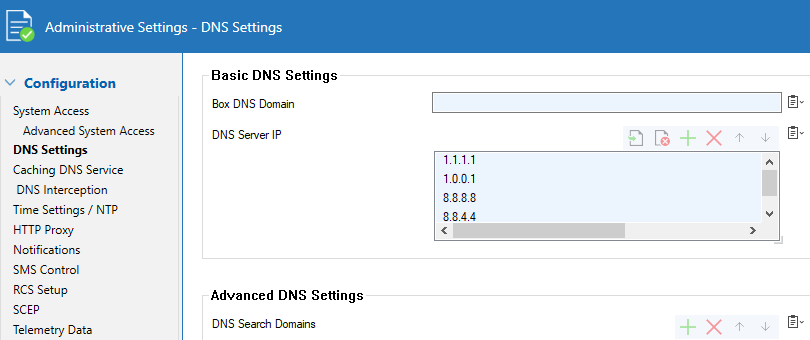
Click Send Changes and Activate.
Step 2. Enable Caching DNS on the Barracuda CloudGen Firewall
Go to CONFIGURATION > Configuration Tree > Box > Administrative Settings.
From the Configuration Mode menu, select Switch to Advanced View.
In the left menu, click Caching DNS Service.
Click Lock.
From the Run Forwarding/Caching DNS list, activate the local caching/forwarding DNS service.
In the DNS Query ACL table, add the network address
0.0.0.0/0to allow access to the DNS service via an App Redirect rule.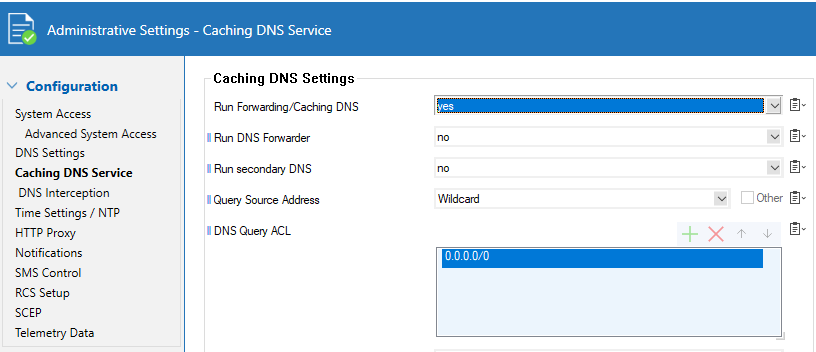
Click Send Changes and Activate.
For general instructions on how to configure DNS settings on the Barracuda CloudGen Firewall, see How to Configure DNS Settings and How to Configure a Caching DNS Service.
Step 3. Configure the Client Network
Go to CONFIGURATION > Configuration Tree > Box > Assigned Services > VPN-Service > VPN Settings.
Click Lock.
In the left menu, select Client Networks.
Configure the VPN client network. As the Type, select routed (Static Route).
Enter Network Address and Gateway.
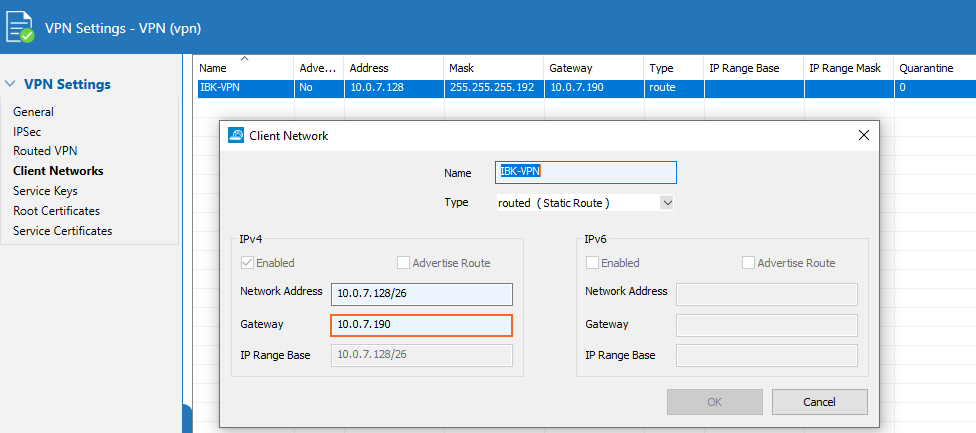
Click Send Changes and Activate.
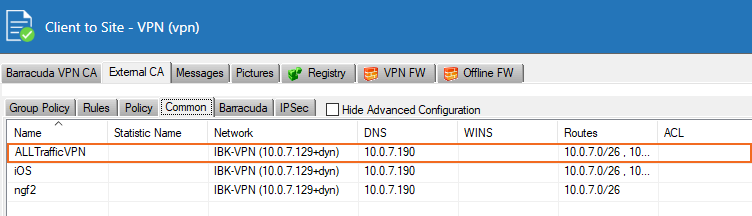
Configure Common Settings
Go to CONFIGURATION > Configuration Tree > Box > Assigned Services > VPN-Service > Client-to-Site.
Click the External CA tab and then click the Common tab.
Click Lock.
Right-click the table and select New Common.
Enter a descriptive Name.
Select the network you created from the Assigned Networks list.
In the DNS IPv4 field, enter the gateway IP address.
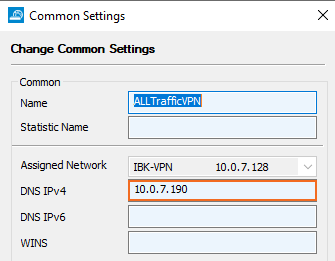
In the Network Routes section, enter the VPN network IP address, and click Add.
Click OK.
Click Send Changes and Activate.
Configure the VPN Group Policy
Go to CONFIGURATION > Configuration Tree > Box > Assigned Services > VPN-Service > Client-to-Site.
Click Lock.
Configure the VPN Group Policy using the gateway IP address as DNS IPv4. For more information, see Step 2 in How to Configure a Client-to-Site VPN Group Policy.

Click Send Changes and Activate.
Step 4. Create an App Redirect Rule
Create an access rule to allow the VPN client network to access the DNS service.
Go to CONFIGURATION > Configuration Tree > Box > Assigned Services > Firewall > Forwarding Rules.
Create an access rule with the following settings:
Action – Select App Redirect.
Source – Select the VPN client network.
Destination – Select explicit and enter the gateway IP address.
Service – Select DNS.
Redirection – Enter the local IP address and port of the DNS service.
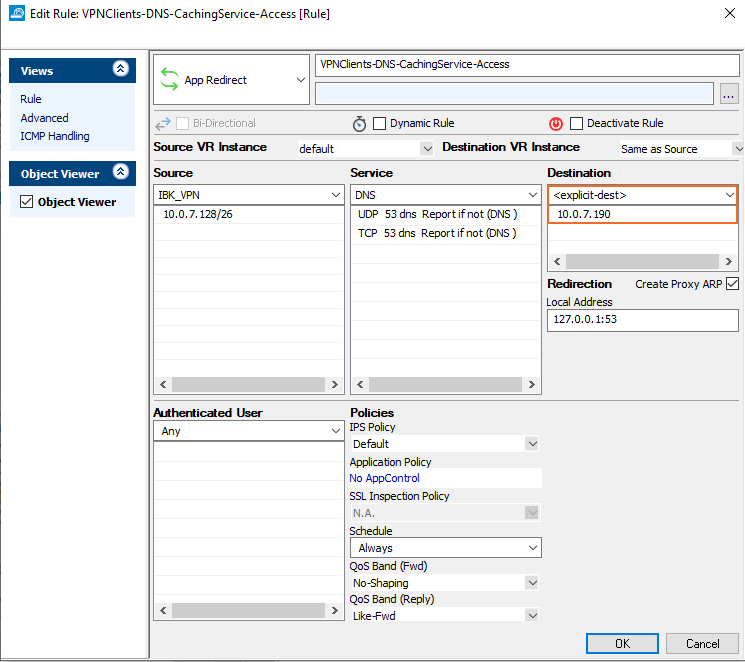
For general instructions on how to create an App Redirect rule on the Barracuda CloudGen Firewall, see How to Create an App Redirect Access Rule.
The VPN configuration should now be up and running with the gateway acting as DNS server IP address.

DNS Probing
The VPN configuration, such as changes to the resolve.conf file, is now done exclusively by the system. To get information about the current DNS configuration, use scutil --dns
Note that nslookup is not using the default system API.