

Configure the Barracuda NextGen X-Series Firewall to be the authoritative DNS server for your domains or subdomains to take advantage of Split DNS or dead link detection.
Step 1. Make the X-Series Firewall the authoritative DNS server at your domain registrar
To become the authoritative DNS server for a domain contact the registrar for your domain to use the static or dynamic WAN IP addresses of your X-Series Firewall.
Hosting a subdomain
If you want to delegate a subdomain to the X-Series Firewall, add ns1 and ns2 records to the zone file of the domain where it is stored at the registrar. If the domain is yourdomain.com, and you want to host subdomain.yourdomain.com add the following DNS records:
subdomain IN NS ns1subdomain IN NS ns2ns1 IN A <WAN IP 1 OF YOUR BARRACUDA FIREWALL>ns2 IN A <WAN IP 2 OF YOUR BARRACUDA FIREWALL>
Step 2. Enable authoritative DNS on the X-Series Firewall
In the DNS Servers table, you can view a list of the static IP addresses for which the DNS Server service is enabled (NETWORK > IP Configuration). Dynamic IP addresses are not listed. An access rule is created in step 3 to redirect incoming DNS requests on dynamic interfaces to the DNS service on the firewall. The access rule LOCALDNSCACHE must be active after enabling authoritative DNS for local clients to access the DNS server.
- Go to the NETWORK > Authoritative DNS page.
- Enable Authoritative DNS.
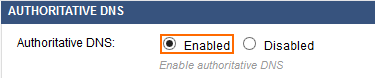
- Click Save.
Step 3. (Dynamic WAN connections only) Create a redirect access rule
To redirect DNS traffic for dynamic WAN interfaces you must redirect the incoming traffic to the authoritative DNS service.
- Go to the FIREWALL > Firewall Rules page.
- Click on Add Access Rule.
- Create a Redirect to Service rule:
-
Name – Enter a name for the access rule, e.g.
DHCP-2-ADNS - Source – Select Internet and click +.
- Destination – Select the network object for the dynamic interface and click +. Repeat for each dynamic WAN connection. E.g., DHCP1 Local IP
- Redirect To – Select Authoritative DNS.
-
Name – Enter a name for the access rule, e.g.
- Click Save.
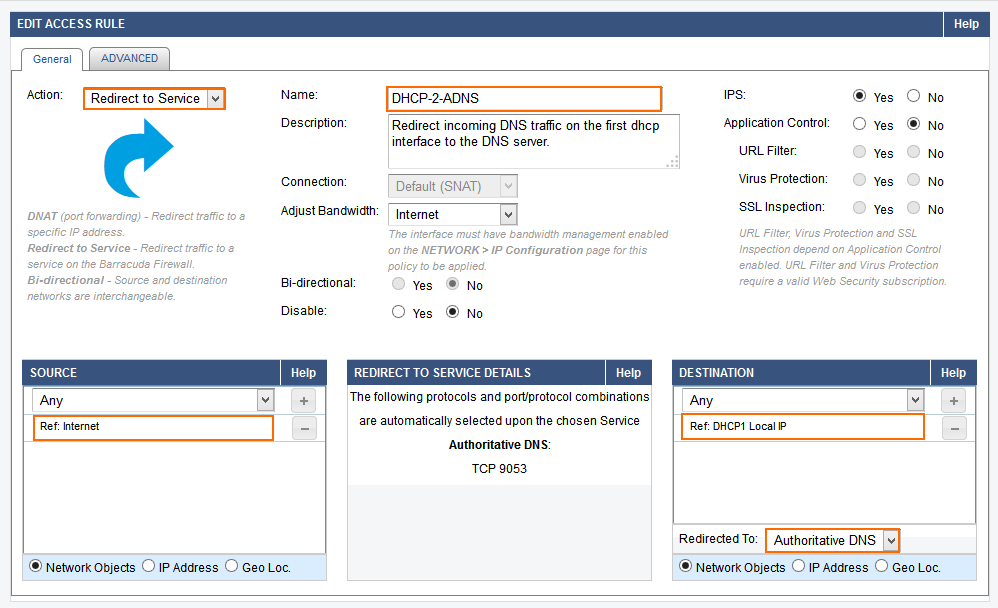
- Place the access rule toward the top of the ruleset so that no access rule before it matches incoming DNS traffic on dynamic interface(s).
Step 4. Add a domain
Add a new domain to the ADNS configuration.
- Go to the NETWORK > Authoritative DNS page.
- In the DNS RECORDS section click on Add New Domain. The DOMAIN windows opens.

- Enter the settings for the domain or subdomain:
-
Domain – Enter the domain or subdomain. E.g.,
yourdomain.comorsubdomain.yourdomain.com -
Access to Domain/Zone
- Internal and External – The DNS Server answers queries from all networks.
- Internal – The DNS Server answers queries from trusted networks.
- External – The DNS Server answers queries from untrusted networks.
- TTL (Time to Live) – This value determines how long DNS records are cached by recursive DNS servers. Use D for days, H for hours, W for weeks or nothing for seconds. Recommended TTL for a A records: 2D.
- Zone Transfers – Enable to allow recursive DNS server to cache DNS records. Disable to force clients to query the DNS server on the firewall directly for each DNS request. Default: enabled.
-
Domain – Enter the domain or subdomain. E.g.,
- Click Save.
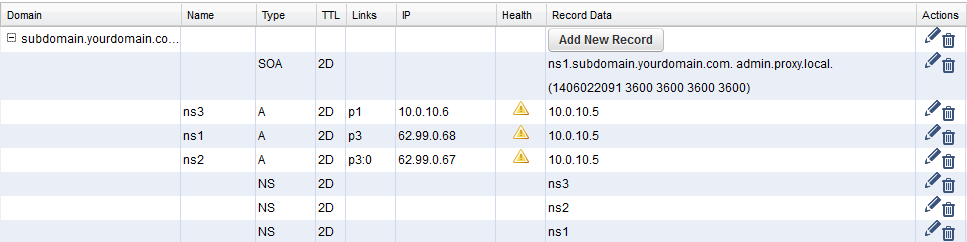
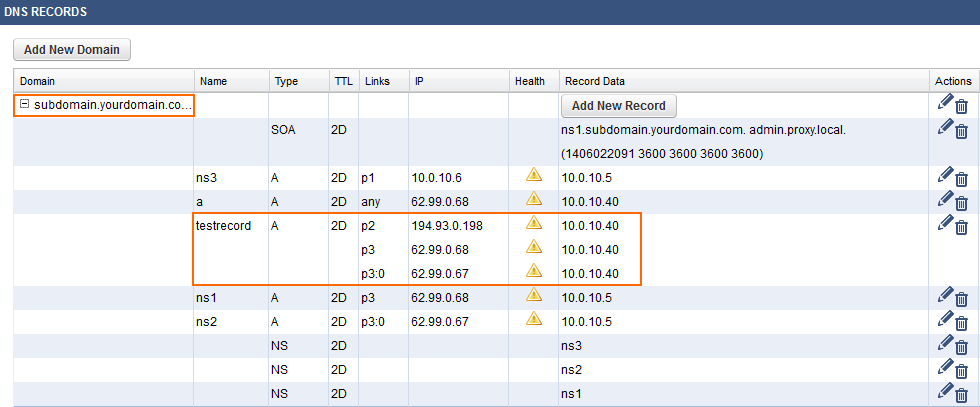
The domain or subdomain is now listed in the DNS RECORDS section. NS and SOA records are automatically created for the new domain. The NS records are set to the static IP addresses with the DNS server listener enabled.
Step 5. Add DNS records for the domain
You can now create DNS records for your domain or subdomain.
- Go to the NETWORK > Authoritative DNS page.
- In the DNS Records section click on the Add New Record button in the Record Data column for your domain. The DNS RECORD window opens.

- Select the Type of DNS Record. E.g.,
testrecord -
Enter the parameters required for the chosen DNS record type.
- Configure IP Addresses for the record (do this for all interfaces you want to use:
LINKS – Select the interface for which this response is valid. ANY is valid for all interfaces, INTERNAL ONLY only for requests coming from Trusted Networks.
WAN IP ADDRESS – Enter the IP address which will be returned for DNS requests from the Internet.
-
LOCAL NETWORK – Enter the IP address which will be returned for DNS requests from Trusted Networks.
HEALTH CHECK – Select the health check type: Ping, DNS, Host:Port. The TARGET will be checked by this method periodically to verify that the link is still up. When the health check fails this IP address is removed from the DNS response. Default Interval: 60 seconds.
- TARGET – The IP address, DNS name, or Host:Port target which will be checked periodically. Use a health check target that is behind the interface chosen as the LINK. Default interval: 120 seconds
- Click +
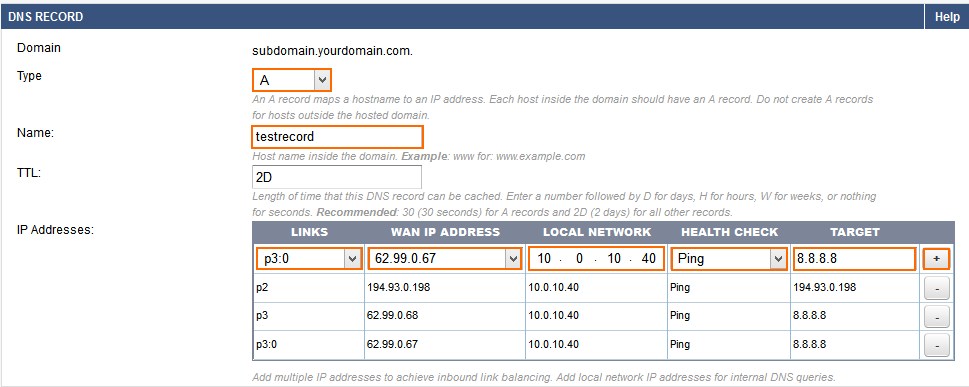
- Repeat 5. and 6. for the other interfaces if necessary.
- Click Save.
The DNS records are now listed in the DNS RECORDS section. Refresh the page until the health check checks for all records turn green.
Step 6. Test your DNS records
From a host on the Internet, run.
nslookup - [YOUR WAN IP WITH DNS SERVER ENABLED]Enter the domain names and verify that the WAN IP address for the interface or ANY IP Address is returned.
Repeat with a host in your local network
nslookup - [LOCAL IP OF YOUR BARRACUDA FIREWALL WITH DNS SERVER ENABLED]Enter the domain names and verify that the LOCAL NETWORKS IP for the interface or ANY IP Address is returned.
When not using the X-Series Firewall DNS directly, it might take some time for your changes to be distributed throughout the Internet. A new domain name might take up to a day until it is accessible via other DNS servers. If the DNS record is modified, any server on the Internet that has the old DNS records will not request an update until the TTL of the original record has expired.
Expert Settings
To change expert settings for the ADNS service append the following string to the URL: &expert=1

- Health Check interval – Time interval in seconds between health checks.
- Update Dynamic Interface IP every – Interval in seconds for checks of IP changes to dynamic interfaces