You must create an Address Book of people who will receive your campaign emails.
There are several ways you can create an Address Book:
Import from Barracuda Cloud Control – Connectors can be set up once and shared across all Barracuda Networks products. Supported infrastructures are:
- Google Directory,
- LDAP, and
- Entra ID (Microsoft 365).
You can also set up connectors for LDAP and Microsoft 365 from within Security Awareness Training (see below), but imported data cannot be shared with other Barracuda Networks products.
- Create a Dynamic Address Book, which the system automatically populates, as part of an Automated Campaign – See How to Create a Dynamic Address Book and Understanding Automated Campaigns.
Import from LDAP – See Importing from LDAP section below.
Upload a file manually (CSV or XLS) – See Importing from a Non-LDAP Data Source section below.
- Import from Microsoft 365 – See Importing from Microsoft 365 section below.
- Create the Address Book by hand, entering one address at a time – See How to Edit an Address Book.
Each Address Book is intended to be used with a single campaign. Creating a new Address Book for each campaign helps ensure an accurate list of recipients.
Depending on your data source, the import process is different and is described in separate sections in this article. Processes that are common, like verifying the data import, are described in common sections in this article. Click a section below to expand its content.
Before you can import data using this method, you must map between Google Directory, LDAP or Entra ID (M365) and Barracuda Cloud Control (BCC).
Establish connectors between a data source and BCC
- Login to your BCC Account (login.barracudanetworks.com) and click on the Admin tab.
- Click the Directories button to show the list of directories associated with your account.
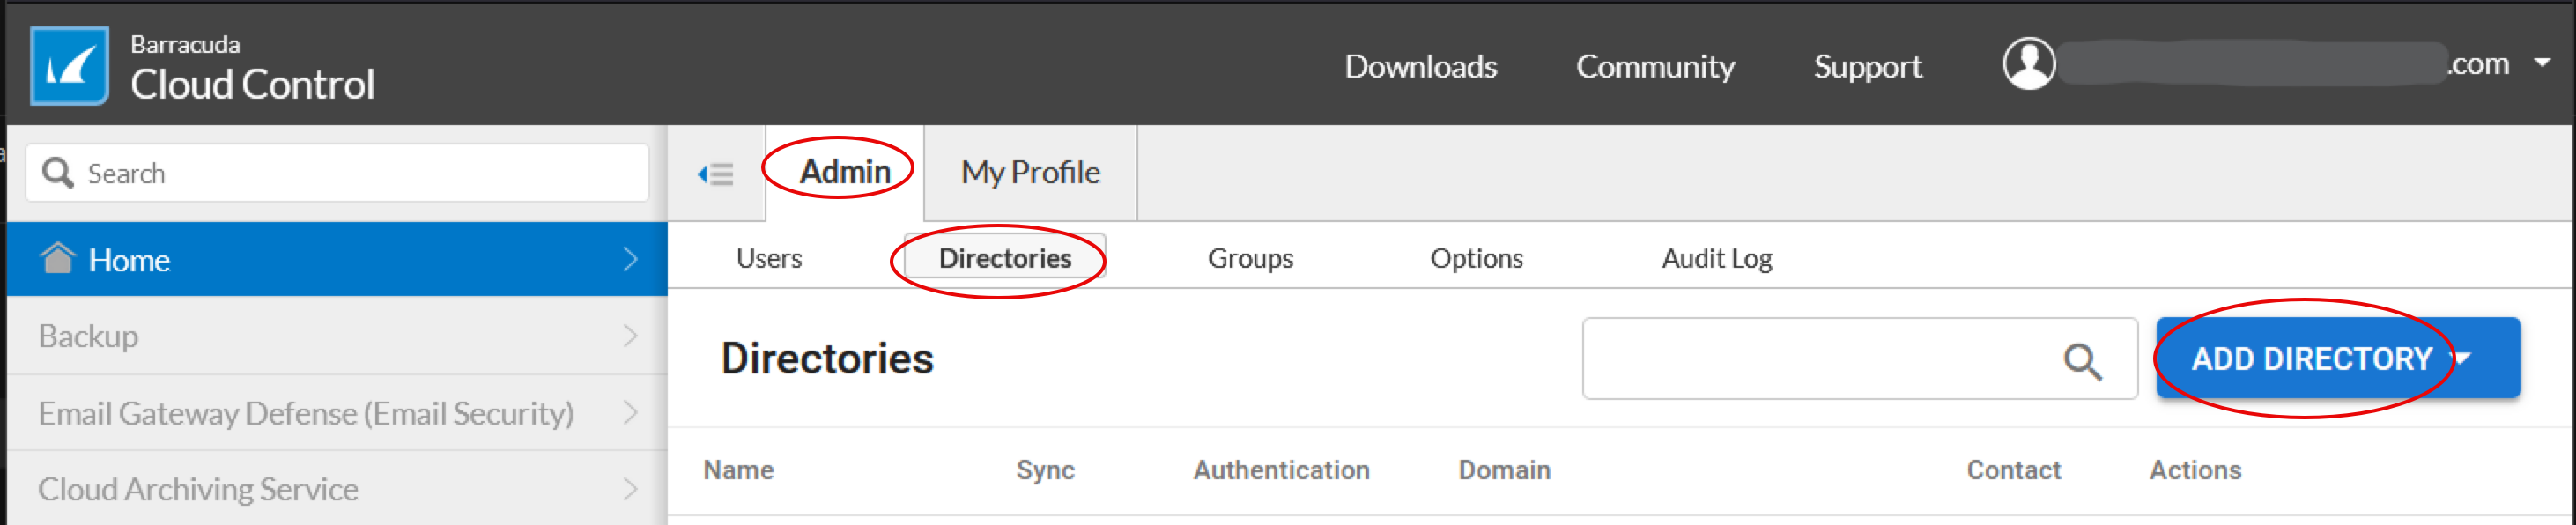
- Click on the ADD DIRECTORY button and choose from the following options:
- LDAP Active directory
- Microsoft Entra ID
- Google Directory
- Follow the prompts to finish adding the directory. Note: you may need to work with your Email Administrator to give you permissions to connect and synchronize entries from your directory.
- Once completed, you directory will sync and appear in the Directories list.

Now data is ready to import into Security Awareness Training using the steps below.
Importing into Security Awareness Training
- After you map the data source (above steps), navigate to Campaigns > Address Books.
- Click New.
- For Source Type, select Barracuda Cloud Control (BCC).
- Click Save. Addresses will immediately start importing from the directories you setup in your BCC account.
- When the import is finished you will see the log for the import as well as the number of email addresses imported.
Continue with Common Operations sections below.
Before you can import data from your LDAP source, you must map the data between the LDAP source and your Security Awareness Training Address Book.
Before you perform the steps in this section, configure data mapping from your Security Awareness Training Address Book to LDAP. Follow the instructions in described in LDAP/AD Configuration Manager.
To create an Address Book, importing data from an LDAP source:
- After you map the data, navigate to Campaigns > Address Books, then click New.
- For Source Type, select LDAP.
- Enter a Name and optional Description for the Address Book.
- Click Save. The page refreshes.
In the General Settings section, under LDAP Config Name, select the name of your LDAP data source.
Optionally specify an Address Book Group name. Each address book can belong to only one group. Groups can contain multiple address books. For additional information, refer to the Address Book Group section below.
Select the Active check box.
Scroll to the Import Processing section.
For Import Action Request, select Perform an import when I hit the Save Button.
Note
If you require more time to set up the import, select Do not import when I hit the Save Button.
- Click Save.
Continue with Common Operations sections below.
Before You Begin
If you are importing data from an existing non-LDAP data source, prepare the data to be imported.
- In your existing address data source, export the data as a CSV or XLS file.
- Save the file with a name and location you will remember for importing into Security Awareness Training.
- Check that the file is not password protected. You cannot import password-protected files into Security Awareness Training. Continue with the instructions in Importing Data below.
Importing Data
To create an Address Book, importing data from a file:
- Navigate to Campaigns > Address Books, then click New.
- For Source Type, select Manual Entry/File Upload.
- Enter a Name and optional Description for the Address Book.
- Click Save. The page refreshes.
In the General Settings section, optionally specify an Address Book Group name. Each address book can belong to only one group. Groups can contain multiple address books. For additional information, refer to the Address Book Group section below.
Select the Active check box.
- Scroll to the Import Processing section.
- Under Upload an Import File, click Choose File. Locate the CSV or XLS file you want to import.
Map the columns (fields) in the Security Awareness Training Address Book to the corresponding columns in your data file. For example, map the Email Address field to the column in your import file that contains the Email Address data.
Note
Mapping the email address field is required for non-LDAP data sources. You will likely also want to map at least First Name, Last Name, and Full Name.
You can choose to specify up to 40 of your columns as Custom fields.
A list of field names and their descriptions is at the end of this article.
For Import Action Request, select Perform an import when I hit the Save Button.
Note
If you require more time to set up the import, select Do not import when I hit the Save Button.
- Click Save.
Continue with Common Operations sections below.
Before you can import data from your Microsoft 365 account, you must set up a connector between your Microsoft 365 account and Security Awareness Training.
Required Access Level
To create the connection, you must have at least User.Read.All permissions, an elevated level of access, in the Microsoft 365 account. If you do not have the adequate access, a screen from Microsoft instructs you to submit the form to ask your organization's Office 365 Administrator for updated credentials. Your Office 365 Administrator can either accept or deny your request. In either case, you will will receive an email from Microsoft. If your request was accepted while you were in the middle of Step 4 below, restart that part of the procedure.
To create an Address Book, importing data from an Microsoft 365 source:
- You must have a configured connector between your Microsoft 365 account and Security Awareness Training.
- If you are unsure if a connector has been configured, go to System > Microsoft 365 Connection Manager. All connectors are listed.
- If you need to configure a connector, follow the steps to create a new connection.
- Navigate to Campaigns > Address Books, then click New.
- For Source Type, select Microsoft 365.
- Enter a Name and optional Description for the Address Book.
Click Save.
- In the Microsoft 365 Connector field, select the account you want to use to create this address book.
Note that most organizations will have only one Microsoft 365 connector. Optionally specify an Address Book Group name. Each address book can belong to only one group. Groups can contain multiple address books. For additional information, refer to the Address Book Group section below.
Select the Active check box.
Scroll to the Import Processing section.
For Import Action Request, select Perform an import when I hit the Save Button.
Note: There is no mapping for this type of address book creation.
- Click Save.
Continue with Common Operations sections below and be sure to read the Microsoft 365 section at the bottom of this article.
Common Operations
Unless otherwise noted, the following sections describe operations that are common to both LDAP and non-LDAP sources.
Verifying the Import
After the data is imported, take a moment to verify that the data was imported correctly.
- When the page refreshes, locate the Email Addresses section.

The number displayed represents the number of email addresses in the Address Book. For a brand new Address Book, this is the number of email addresses you just imported. - Click Email Addresses. The Detail tab of the Email Address Manager displays.
- Review the contents of the Email Address field and other fields you mapped. If needed, click the Edit button
 for a different view of the information. Ensure that the content of each field matches the title of the field. For example, ensure that the contents of the First Name and Last Name fields are not switched.
 - Email addresses are automatically marked Active.
- If everything looks fine, no further action is required on this Address Book at this time.
If there is a problem, click Return to the Address Books and continue with Fixing Mistakes below.
Fixing Mistakes
You can address any importing issues without having to restart the process.
- Determine the cause of the problem and take the appropriate action.
- For the Import Action Request, select Delete unused email addresses, and then perform an Import when I hit the save button.
This action will delete the improperly imported addresses and import only the new data/data mapping that you just specified. - Click Save.
- Verify your data as described above.
If you are reimporting data, for the Import Action Request, be sure to select Delete unused email addresses, and then perform an Import when I hit the save button. This removes the incorrect data and imports the correct data into the Address Book. You will have one accurate copy of each record.
If you select Perform an import when I hit the Save Button, as you did in the original import, the incorrectly imported data will remain in the Address Book and the new, corrected data will also be added to the Address Book, resulting in two versions of each record, one correct and one incorrect. If you accidentally choose this option when fixing mistakes, repeat the process using the Delete unused email addresses, and then perform an Import when I hit the save button.
Address Book Fields
This list of fields can help you with the mapping process.
Notes on fields:
- Use the predefined fields first, rather than using Custom fields. For example, use the Country field, rather than defining a Custom field to include Country data.
- It is best to be as consistent as possible so your filters will be applied consistently. For example, if you want to filter for Language Code in your campaign, you might want to specify the filter as English. But filtering for English will not match any entries using the ISO code of en.
Field Names and Descriptions
Fields imported from Microsoft 365 sources are noted with a ‡ symbol. For Microsoft 365 field names, refer to Microsoft 365 Connection Manager.
-
Email Address ‡ – (Required) Properly formatted email address for this contact.
-
First Name ‡ – First name associated with the contact email address.
-
Last Name ‡ – Last name associated with the contact email address.
-
Full Name ‡ Complete name associated with the contact email address, usually consisting of the first and last name, but can also include a middle name.
-
Personal Title – Title associated with the contact email address, such as Dr., Mr., Ms., and so on.
-
Name Suffix – Any descriptors that follow the full name, like Jr., III., Esq., and so on.
-
Hire Date – The date this user associated with this email joined your organization. Hire Date must be in one of the following formats:
YYYY-MM-DD, MM/DD/YYYY, DD-MM-YYYY, or YYYYMMDDHHMMSSZ.
-
Organization Area – Part of the organization, like department or division, corresponding to the email address entry.
-
Organization Level ‡ – Title or management level corresponding to the email address entry.
-
Organization Tenure – How long the person has been with the organization. Can be a numerical or alphabetical entry.
-
Mobile Phone ‡ – Mobile phone number associated with this contact email address that can be used for text messaging. (The ability to create and run new SMS and/or voice campaigns is currently unavailable in the product.)
-
Phone – Phone number associated with this contact email address to receive voice messaging. (The ability to create and run new SMS and/or voice campaigns is currently unavailable in the product.)
-
Company – Name of the organization corresponding to the email address entry.
-
Country – Geographic country corresponding to the email address entry.
-
Region – Geographic region where the email address is located, like EMEA or Northeast. You can also choose to use ISO region codes.
-
Site/Location ‡ – Descriptor for the location of the email address, like Manufacturing or Downtown Branch.
-
Language Code ‡ – The language code corresponding to this contact email address. This is usually the ISO language code.
-
Timezone – Time zone associated with this contact email address. The time zone is used to determine when to send campaign emails. (Go to System > Address Book Time Zone Mapper to set the time zone.)
-
Street Address – Geographic street address corresponding to the email address entry.
-
City – Geographic city corresponding to the email address entry.
-
State – Geographic state corresponding to the email address entry.
-
Zip Code – Zip or other postal code for the geographical address corresponding to the email address entry.
-
Source – The source of the email address. This field can be an Open Source Intelligence source or perhaps data from human resources or a response from a certain marketing campaign.
-
Customer Training URL – If you are using an external training system, the URL for the external customer training.
-
Manager Email Address – Email address of this Address Book entry’s manager.
-
Manager Name – Name of this Address Book entry’s manager or supervisor.
-
Custom Fields – Additional information that does not correspond to one of the fields above. There are 40 available custom fields. Custom fields might have a generic name like Custom1 or might have a custom name like Cost Center. Refer to Custom Field Naming Utility and Custom Fields for more information.
Editing an Address Book / Creating Without Existing Data
To make small changes to imported data or to create an Address Book without importing data from an existing source, refer to the instructions in How to Edit an Address Book.
Additional Information on Microsoft 365 Importing
Importing Criteria
Security Awareness Training imports all enabled user accounts that meet the following criteria:
- Users must have a valid email address (not including @onmicrosoft.com email addresses)
- Users must have an email address that uses a domain that is authorized in Security Awareness Training. (See Domain Authorization.)
- The account is not an external or guest account.
- The account has an active, provisioned Exchange plan.
Omitting Users from Campaigns
Depending on how you have configured Microsoft 365, the imports above might include some items that you do not want to include in phishing campaigns (e.g., service accounts, conference rooms).
Before the users are imported, edit the configuration and add specific email addresses to the Email Block List.
For additional information, refer to Microsoft 365 Connection Manager.
Address Book Groups
This topic is of interest to MSPs who might run a single campaign for hundreds of separate address books.
If you run the same campaign for multiple address books, using Address Book Groups can simplify your process. You can create a single Address Book Group and assign multiple address books to that group. Then, when creating a campaign, you can specify one Address Book Group, rather than specifying hundreds of individual address books.
Create an Address Book Group during the Address Book creation process, described above.

