

Microsoft offers the Azure VPN Gateway, to connect Azure virtual network with your private Edge Service (on-premises) SecureEdge appliances. The Azure VPN Gateway are available in three different versions: basic, standard, and high performance. Only standard and high performance SKUs offer the option to use BGP to learn the routes. It is possible to configure multiple parallel VPN connections up to the peer limit of the Azure VPN Gateway SKU. To connect to the VPN Gateway, configure an IPsec IKEv2 site-to-site VPN tunnel on your SecureEdge appliance and configure BGP to exchange routing information with the Azure VPN Gateway.
Requirements and Limitations
Azure tunnels must be configured to initiate the connection.
When creating general settings for an IPsec tunnel on the SecureEdge appliance, you must disable the Initiates field for your connected Barracuda-hosted Edge Service or Edge Service for vWAN. However, you can enable the Initiates field for your connected Site or Private Edge Service.
Before You Begin
You will need the following information:
Public IP address of on-premises SecureEdge appliance.
A transient network IP address (e.g.,
172.16.201.227) for the BGP sessions over the tunnel.(private) ASN number. Note that the following private ASN numbers are reserved by Azure and cannot be used for the Azure VPN Gateway:
Private ASNs: 65515, 65517, 65518, 65519, 65520
Remote and local networks
Step 1. Create a Network in the Microsoft Azure Cloud
Create a virtual network in the Microsoft Azure cloud. Use prefixes that do not infringe on the ones of your local networks to avoid IP address conflicts.
Log into your Azure Portal (https://portal.azure.com).
Search for Virtual networks.
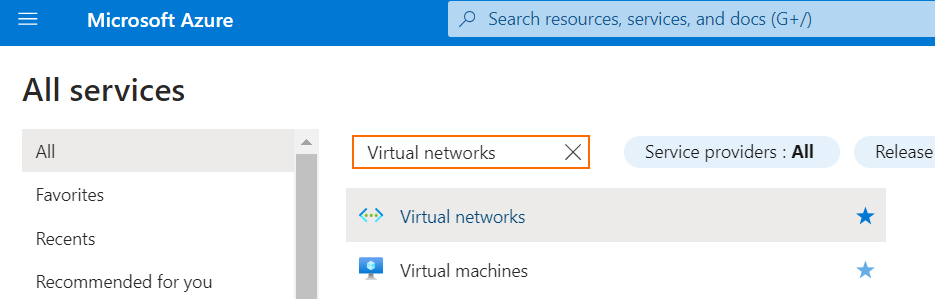
Next to the Virtual networks entry, click + / Create to create a new network. The Virtual network windows opens.
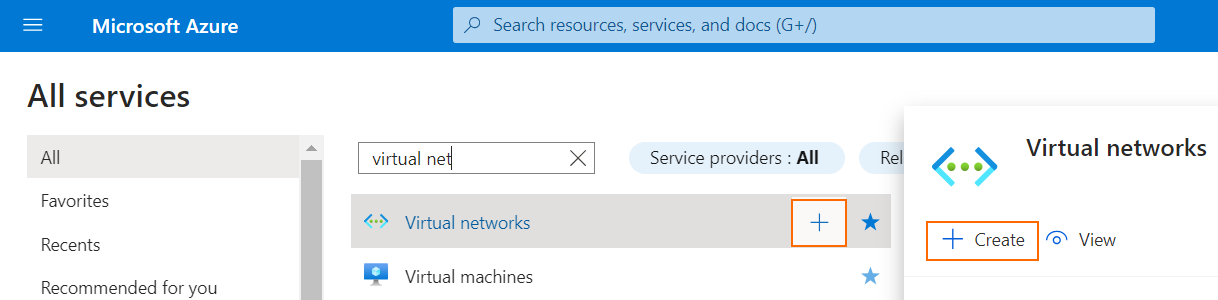
Select Virtual network and click Create.
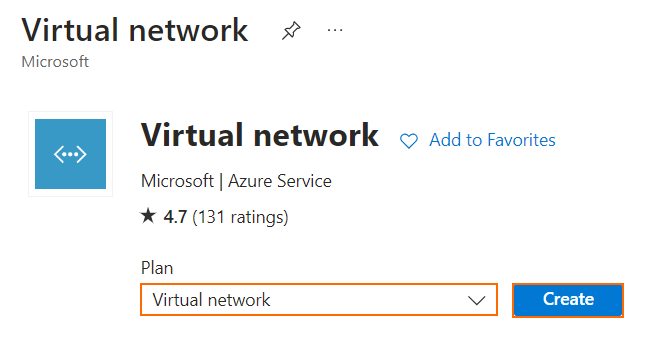
Select Virtual network and click Create.
The Create virtual network windows opens. In the Basics window, select your Subscription.
Select the Resource group for the virtual network, or create a new resource group.
Enter a descriptive Name for the virtual network.
Select the Region your network resides in.
Click Next.
Click the IP addresses tab.
Define the address space of your virtual network. E.g.,
172.16.200.0/24(By default, an address space is automatically created.)Click Add subnet:
Name – Enter a name for the subnet.
Starting address – Enter the first IP address of the IP range for the subnet. E.g.,
172.16.200.0Size – Select the subnet mask from the list. E.g.,
/25for 128 IP addresses.
Click Add.
Review the IP addresses page and remove address spaces and subnets that you do not need.
Select Review + create to validate the virtual network settings.
Select Create to create the virtual network.
Step 2. Create a Gateway Subnet
The gateway subnet resides in the IP address range of the virtual network and contains the IP addresses used by the virtual network gateway resources and services.
Go to your virtual network.
In the left menu, select Subnets.
The Subnets window opens. Click + Gateway subnet.
In the Add a subnet window, adjust the IP address range value:
Starting IP – Enter the first IP for the gateway subnet. E.g.,
172.16.200.128Size – Select the subnet mask from the list. E.g.,
/27for 32 IP addresses. Note: It is recommended that you create a gateway subnet that uses a /27 (or larger), for example, /27 or /26. For more information, see Microsoft Azure - Create a gateway subnet.
Click Add.
Click Save to save the subnet.
The Azure Virtual Network you have just created is now listed in the network menu in the Azure management interface.
Step 3. Create a VPN Gateway
Create the Azure virtual network gateway.
Log into your Azure Portal (https://portal.azure.com).
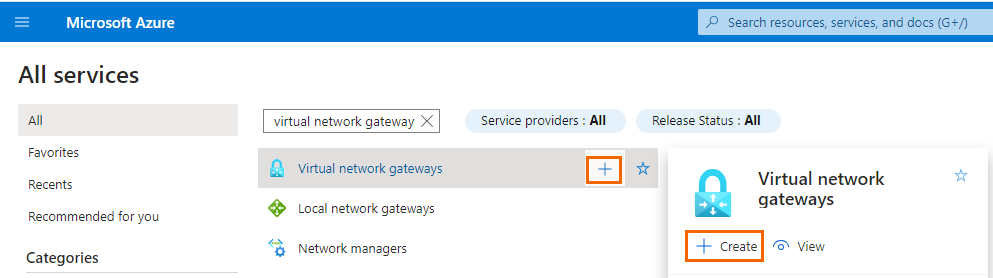
Search for Virtual network gateways.
Next to the Virtual network gateways entry, click + / Create to create a new VPN gateway.
The Create virtual network gateway window opens.
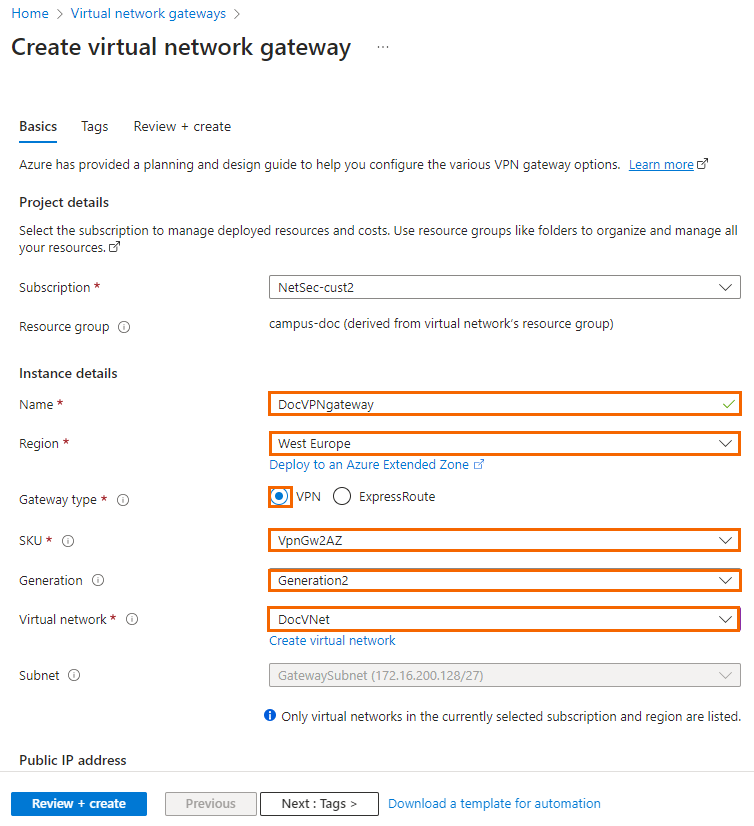
In the Basics tab, configure the following settings:
Subscription – Select your Subscription.
Name – Enter a descriptive name for the VPN gateway.
Region – Select the region your network resides in.
Gateway type – Select VPN.
SKU – Select VpnGw2.
Generation – Select Generation 2.
Virtual network – Select the virtual network created in Step 1.
Subnet – Gateway subnet created in Step 2 is auto-selected .
Public IP address – Select Create new.
Public IP address name – Enter a name for your first public IP address instance.
Availability zone – Select Zone-redundant, unless you know you want to specify a zone.
Enable active-active mode – Select Enabled.
Second public IP address – Select Create new.
Public IP address name – Enter a name for your second public IP address instance.
Availability zone – Select Zone-redundant, unless you know you want to specify a zone.
Configure BGP – Select Enabled.
Autonomous system numbers (ASN) – Enter ASN. E.g.,
65513.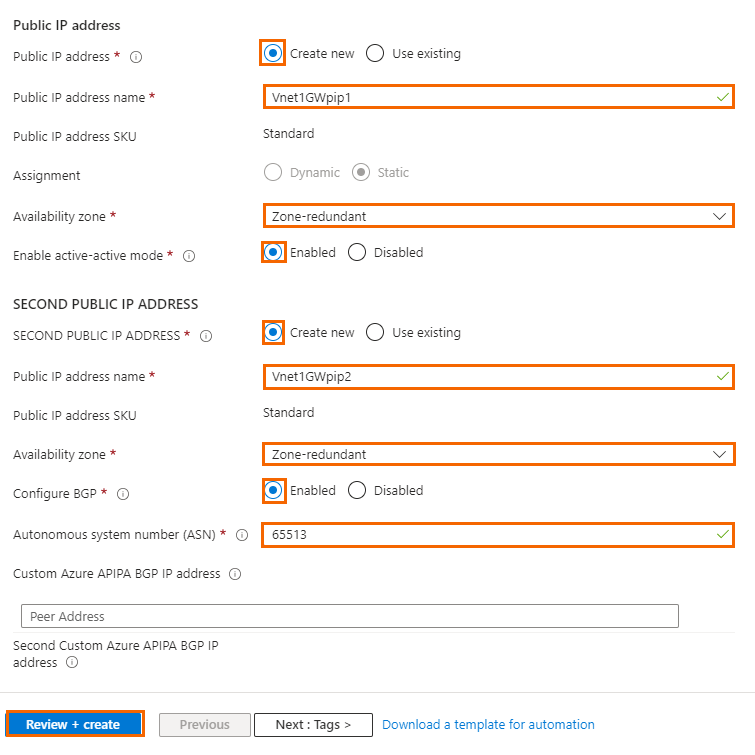
Select Review + create to validate the settings.
Select Create to create the virtual network gateway.
On the Overview page, you can see the deployment status for your gateway. After the gateway is created successfully, you can obtain the public IP addresses on the VPN gateway. Note: These public IP addresses are needed to configure your on-premises SecureEdge appliance.
View Public IP Address
To view public IP addresses associated with your virtual network gateway:
Go to your VPN gateway that you created in Step 3. For example, in this case DocVPNgateway.
In the left menu, go to Settings > Properties.
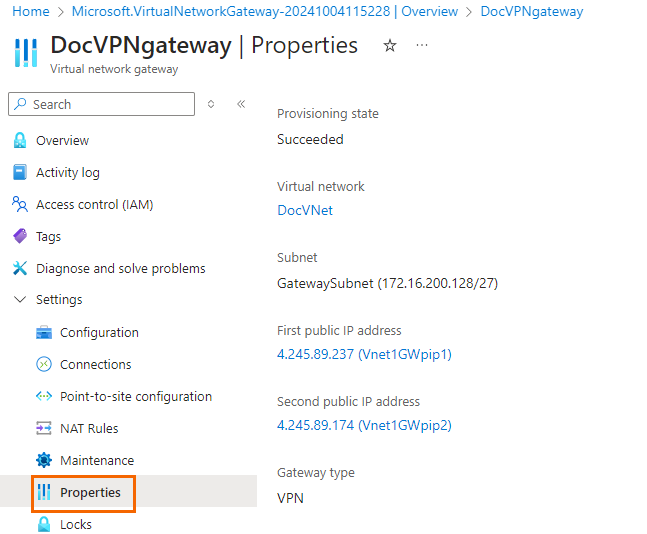
Make a note of the public IPs. To view more information about the IP address, click the associated IP address link. E.g., First public IP address
4.245.89.237(Vnet1GWpip1) and second public IP address4.245.89.174(VnetGWpip2).
View BGP Peering IPs
After the VPN gateway is created, you can obtain the BGP peer IP addresses.
Go to your VPN gateway that you created in Step 3. For example, in this case DocVPNgateway.
In the left menu, go to Settings > Configuration.
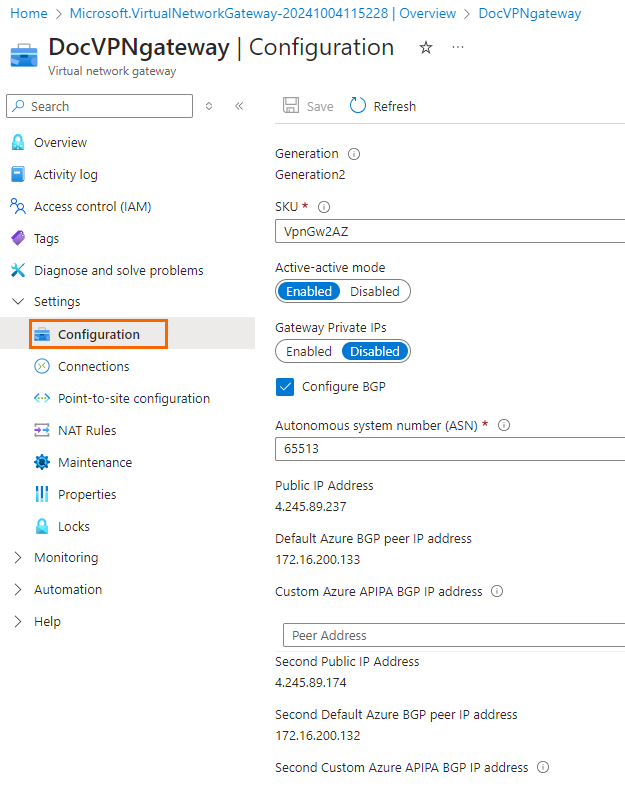
Make a note of the BGP peer IP address and ASN .
Step 4. Create a Local Network Gateway
The Local Network Gateway is the description of your Barracuda SecureEdge appliance in Azure. To configure a local network gateway with BGP settings:
Log into your Azure Portal (https://portal.azure.com).
Search for Local network gateways. Next to the local network gateways entry, click + / Create to create a new local network gateway.
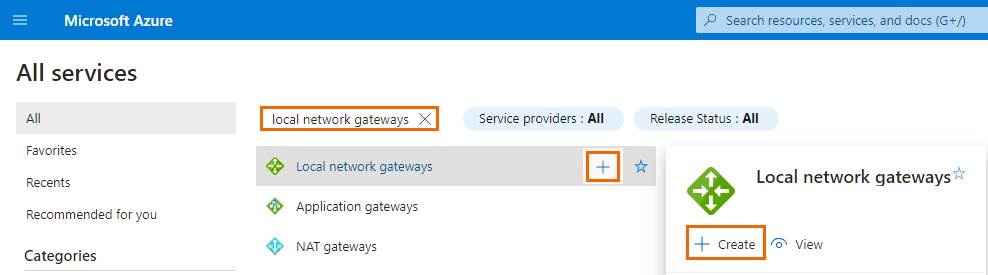
The Create local network gateway window opens.
In the Basics tab, specify the values for your local network gateway.
Region – Select the region.
Name – Enter a name for your local network gateway object.
Endpoint – Select the endpoint type for the on-premises SecureEdge appliance. You can choose between IP address or FQDN (Fully Qualified Domain Name). In this case, select IP address.
IP address – Enter the public IP address of your local gateway. Note: If BGP is enabled, no address space is required.
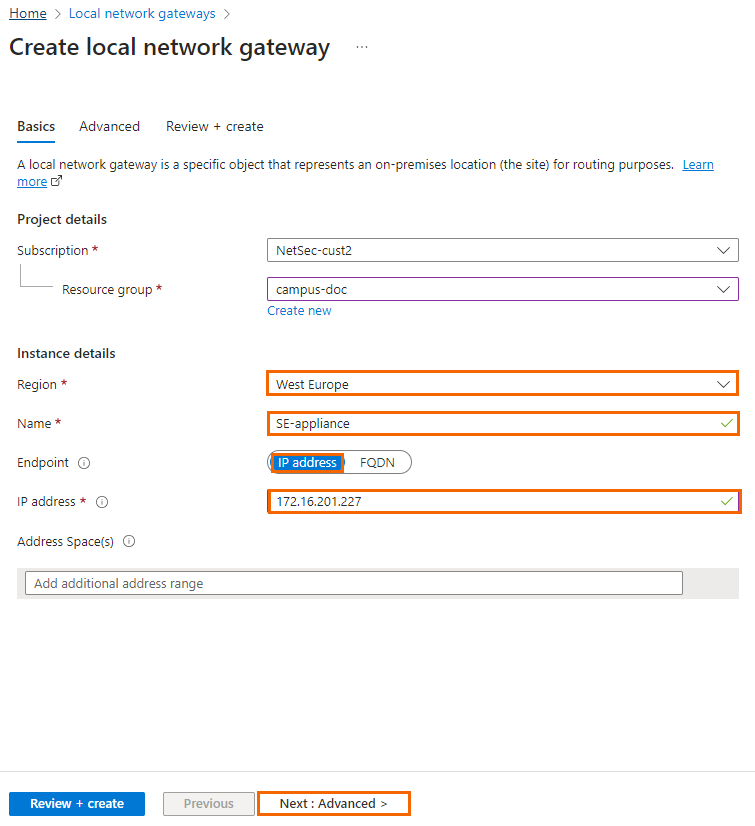
Select Next: Advanced.
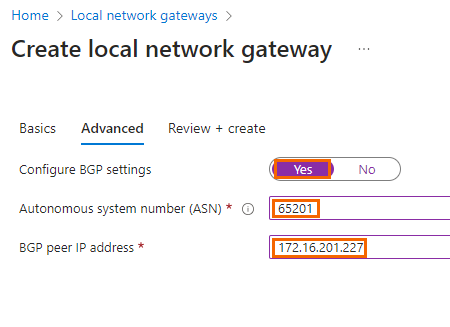
In the Advanced tab, specify the values for BGP settings.
Configure BGP settings – Set Yes.
Autonomous system numbers (ASN) – Enter the ASN of the local side, e.g.,
65201BGP peer IP address – Enter the IP address of the on-premises SecureEdge appliance.
Select Review + create.
Select Create to create the local network gateway.
Step 5. Create the VPN connection
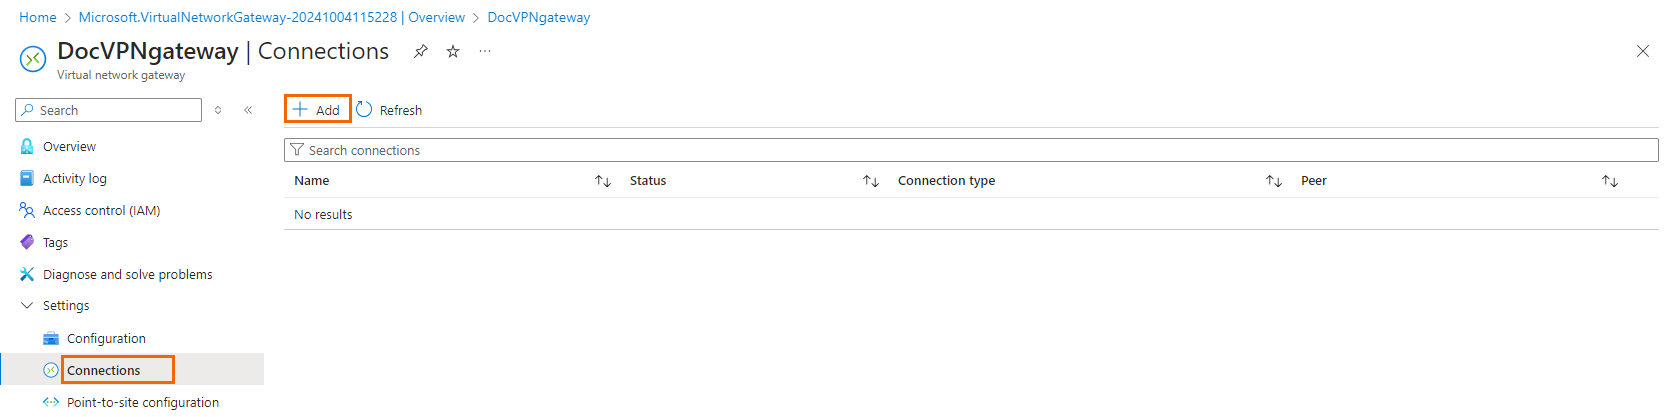
Go to your virtual network gateway.
In the left menu, select Connections.
The Connections window opens. At the top of the Connections page, click + Add.
In the Basics tab, specify the values for your connections.
Connection type – Select Site-to-site (IPsec).
Name – Enter the name for this connection.
Region – Select the region for this connection.
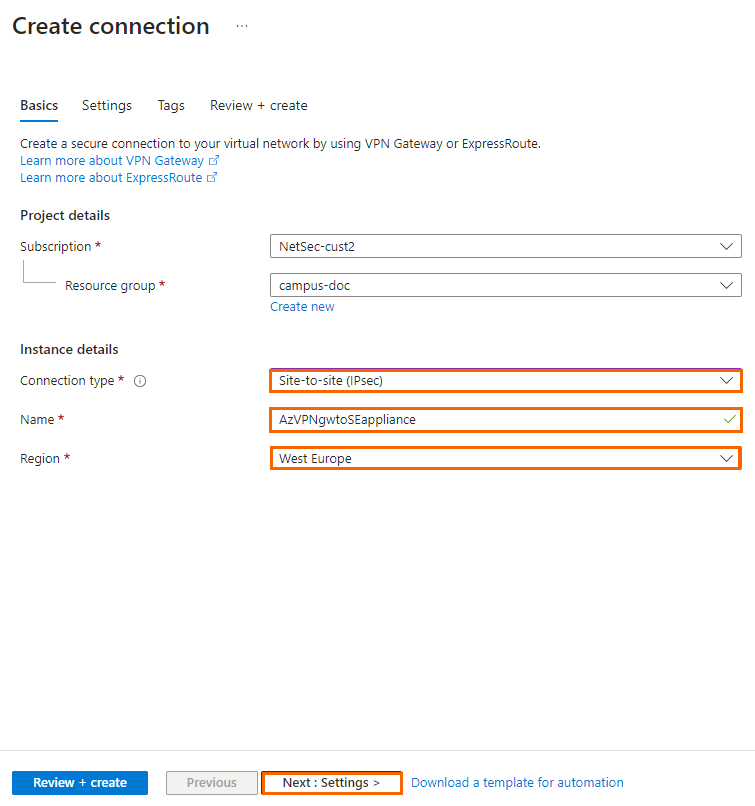
Select Next: Settings.
In the Settings tab, specify the values for the following:
Virtual network gateway – Select the virtual network gateway from the drop-down list.
Local network gateway – Select the local network gateway from the drop-down list.
Authentication Method – Select Shared Key (PSK).
Shared key – Enter the key value. Note: The key value must match the key value that you used for your local on-premises SecureEdge appliance.
IKE Protocol – Select IKEv2.
Enable BGP – Select the box.
IPsec/IKE policy – Select Default.
Connection Mode – Select Default.
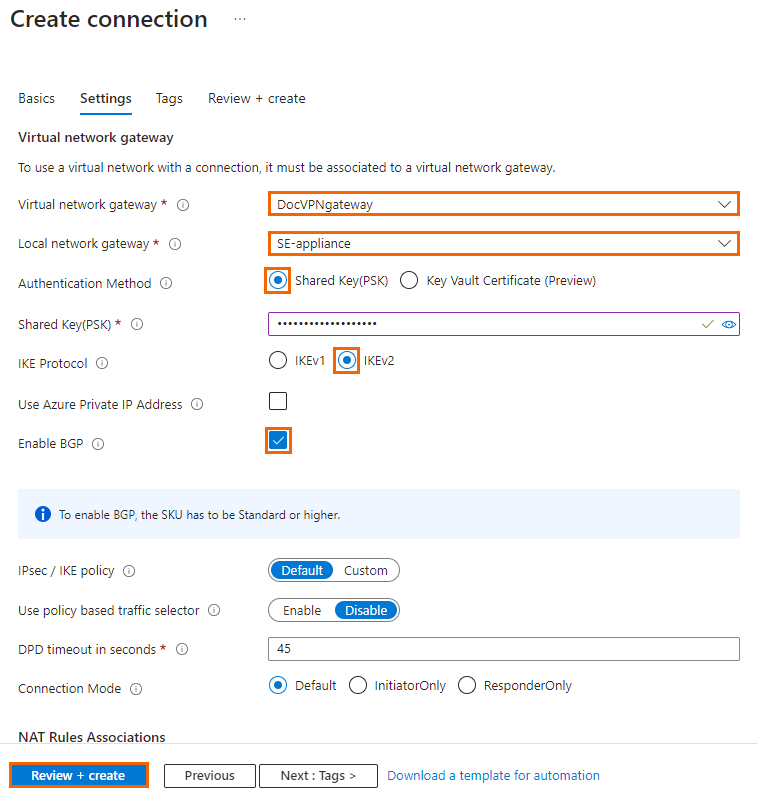
Select Review + create.
Select Create to create the connection.
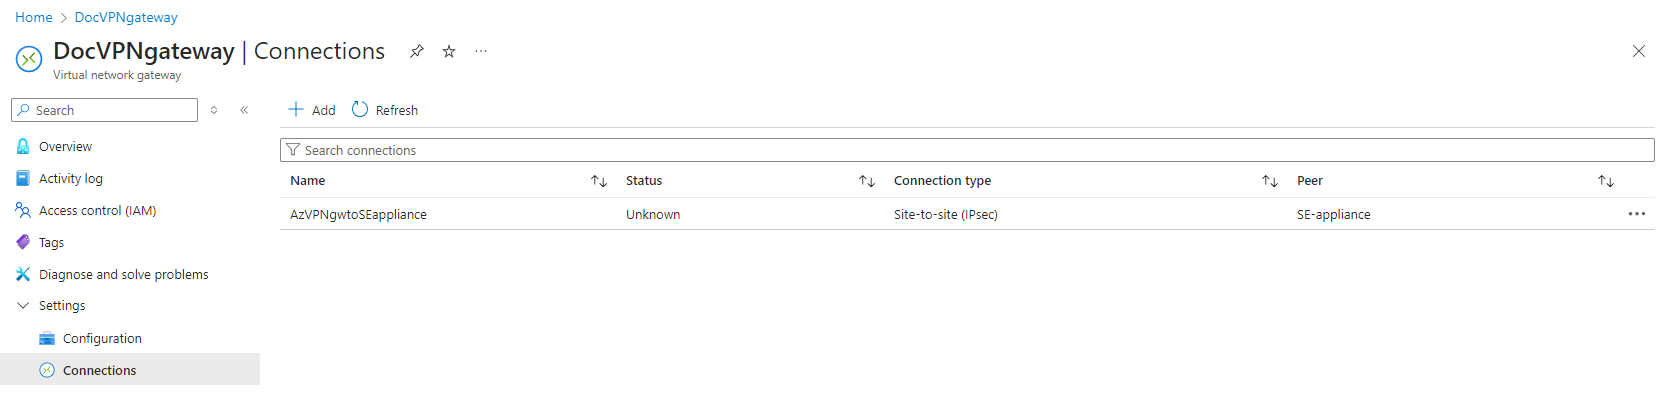
On the Overview page of your VPN gateway under the Settings > Connections , you can see the deployment status for your VPN connection.
Step 6. Configure an IPsec VPN on the SecureEdge
Go to https://se.barracudanetworks.com and log in with your existing Barracuda Cloud Control account.
The chosen Tenant/Workspace is displayed in the top menu bar.
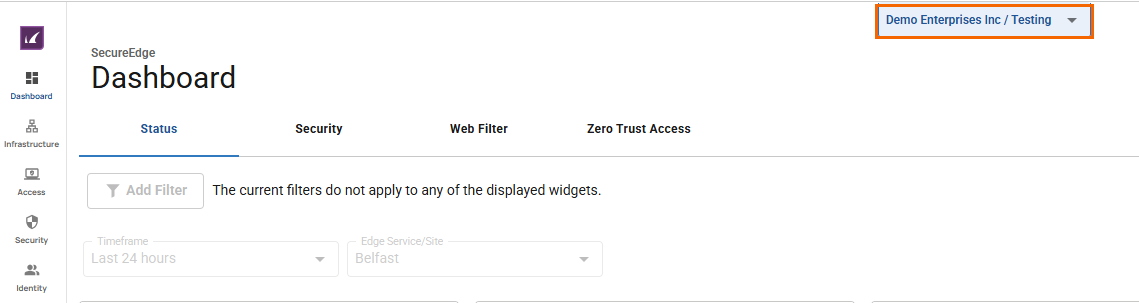
Click the expandable drop-down menu and select the workspace you want to configure the IPsec IKEv2 tunnel for.
Go to Integration > IPsec VPN. The IPsec VPN page opens. To add a tunnel, click Add an IPsec Connection.
The Create IPsec Tunnel window opens.
In the General tab, specify values for the following:
Enable – Click to enable.
Initiates – Click to disable.
In the GENERAL INFORMATION section, specify values for the following:
Name – Enter a unique tunnel name. E.g.,
SE-AzVPNGatewayDescription – Enter a brief description.
In the AUTHENTICATION section, specify values for the following:
Authentication – Select Pre-shared key.
Shared Secret – Enter the same Shared Key you entered when creating the VPN connection on Azure.
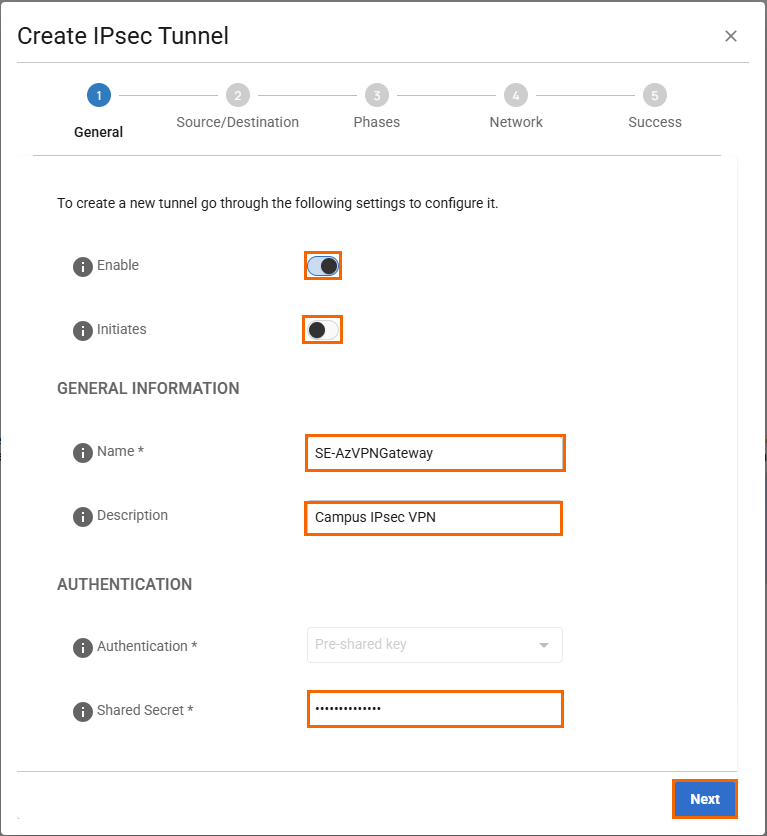
Click Next.
In the Source/Destination tab, specify values for the following:
Enable BGP – Click to enable.
In the SOURCE section, specify values for the following:
Type – Select Edge Service.
Peer – Select peer. E.g., Campus, a Edge Service.
Local ID – Enter
West-Europe-WAN1.Peering Addresses – Enter your local on-premises network. E.g.,
172.16.201.227/24ASN – Enter the ASN of the local side, e.g.,
65201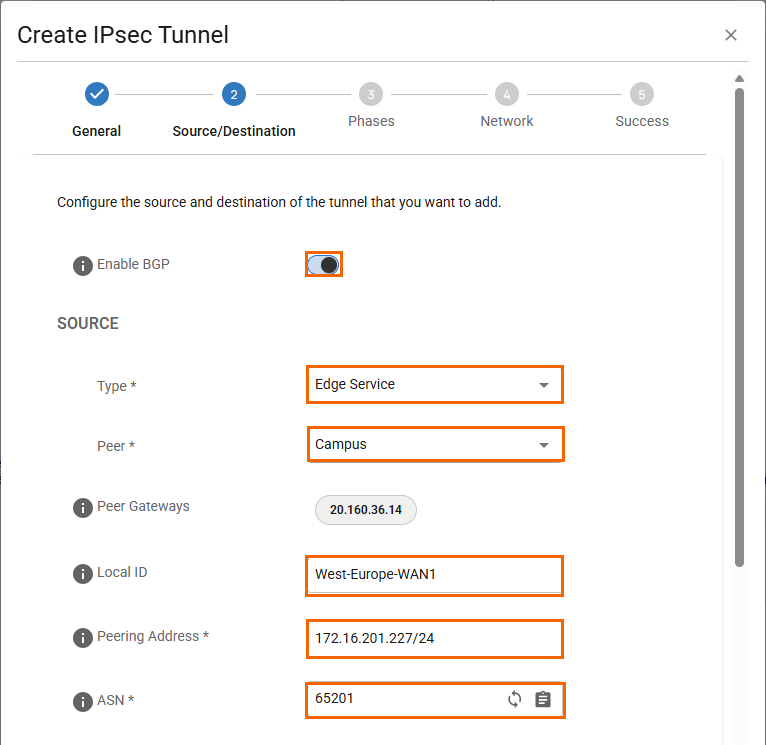
In the DESTINATION section, specify values for the following:
Remote Gateway – Enter the first public IP address of the Azure VPN Gateway created in Step 2. E.g.,
4.245.89.237Remote ID – Enter the first gateway IP address of the Azure VPN Gateway created in Step 2. E.g.,
4.245.89.237Peering Address – Enter the Azure subnet(s) configured in the Azure Virtual Network. E.g.,
172.16.200.133ASN – Enter the ASN of the remote side, e.g.,
65513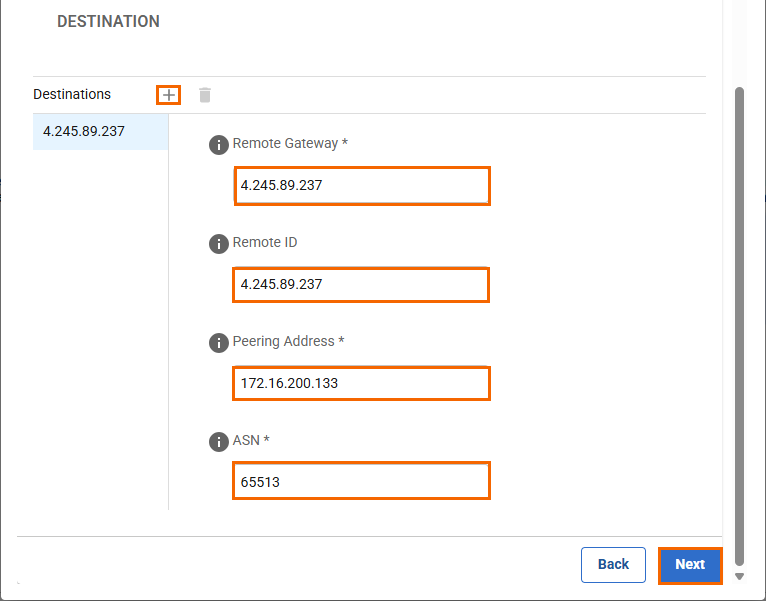
To add a second Azure VPN gateway instance, click + and specify values for the following:
Remote Gateway – Enter the second public IP address of the Azure VPN Gateway created in Step 2. E.g.,
4.245.89.174Remote ID – Enter the second public IP address of the Azure VPN Gateway created in Step 2. E.g.,
4.245.89.174Peering Address – Enter the Azure subnet(s) configured in the Azure Virtual Network. E.g.,
172.16.200.132ASN – Enter the ASN of the remote side, e.g.
65513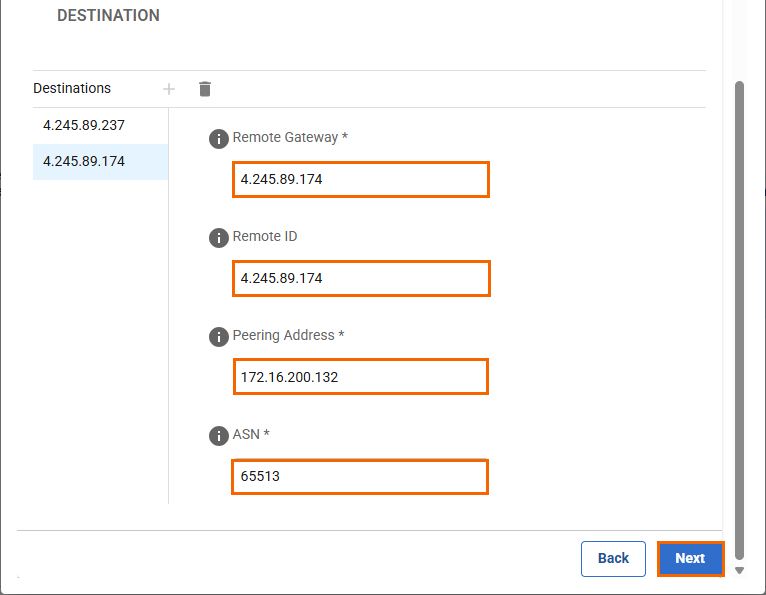
Click Next.
In the Phases tab, enter the Phase1 and Phase2 encryption settings:
PHASE 1
Encryption – Select AES256.
Hash – Select SHA256.
DH-Group – Select Group 2.
Proposal Handling – Select Strict.
Lifetime – Enter
28800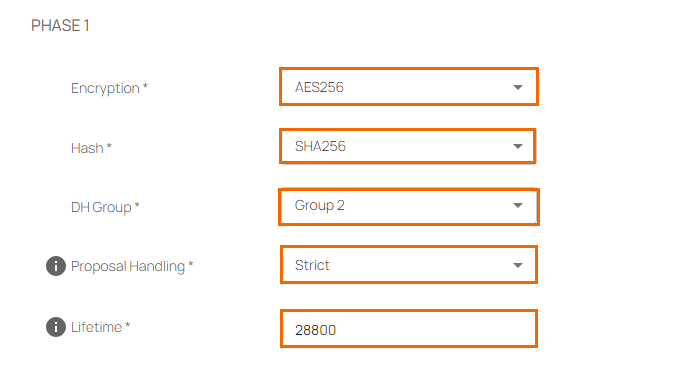
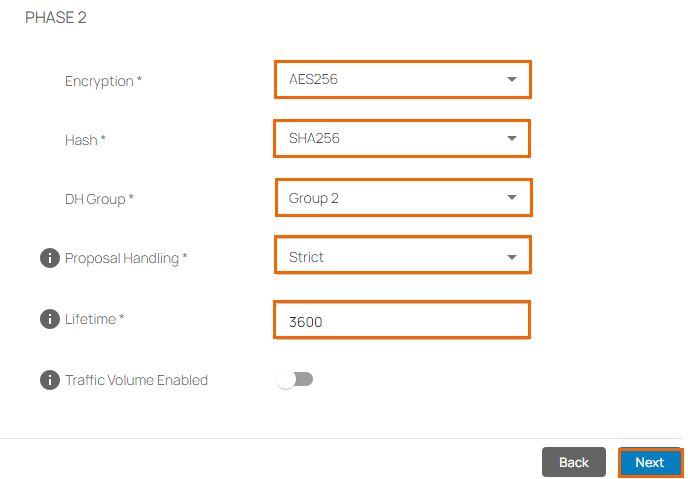
PHASE 2
Encryption – Select AES256.
Hash – Select SHA256.
DH-Group – Select Disable PFS.
Proposal Handling – Select Strict.
Lifetime – Enter
3600Traffic Volume Enabled – Click to disable.
Click Next.
In the Network tab, specify the values for the following:
In the NETWORK SETTINGS section, specify the values for the following:Force UDP Encapsulation – Click to enable.
IKE Reauthentication – Click to disable.
In the DEAD PEER DETECTION section, specify the values for the following:
Action When Detected – Select Restart.
Delay – Enter
30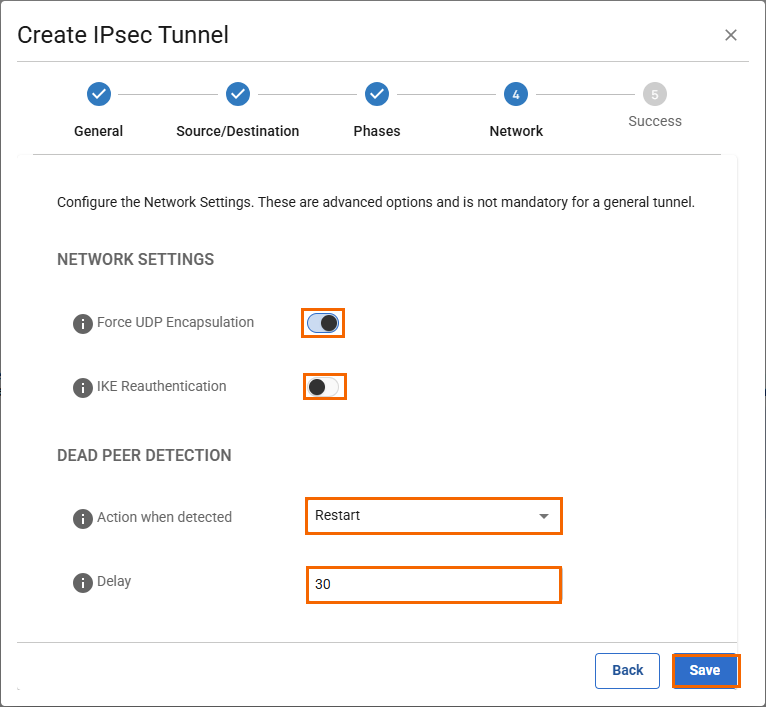
Click Save.

Verify that your IPsec tunnel configuration has been created successfully and click Finish.
After the configuration is complete, you can see a new IPsec tunnel is shown on the IPsec VPN page, and the status of the field names (e.g., Enabled) can be verified.

Your Barracuda SecureEdge appliance will now automatically connect to the Azure VPN Gateway.