

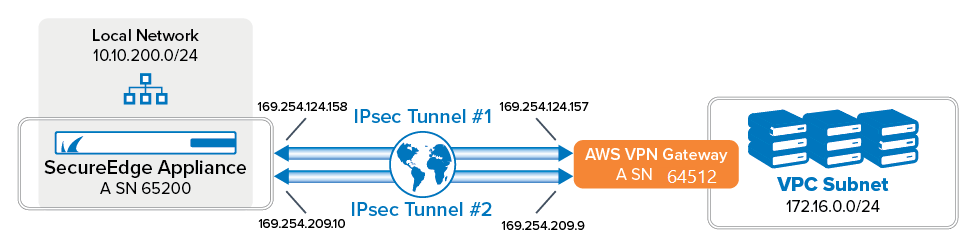
If you are using the Amazon Virtual Private Cloud, you can transparently extend your local network to the cloud by connecting the private networks through a site-to-site IKEv2 IPsec VPN tunnel. The Amazon virtual private gateway uses two parallel IKEv2 IPsec tunnels to ensure constant connectivity. The subnets behind the VPN gateway are propagated via BGP.
Requirements and Limitations
AWS tunnels must be configured to initiate the connection.
Currently, we do not support configuring both tunnels between an AWS VPN gateway and SecureEdge appliances.
When creating general settings for an IPsec tunnel on the SecureEdge appliance, you must disable the Initiates field for your connected Barracuda-hosted Edge Service or Edge Service for vWAN. However, you can enable the Initiates field for your connected Site or Private Edge Service.
Before You Begin
Create an Amazon Virtual Private Cloud (VPC).
Create at least one subnet in the VPC.
The security group of the VPC must allow the desired connections. For more information, see https://docs.aws.amazon.com/en_pv/vpn/latest/s2svpn/SetUpVPNConnections.html#vpn-configure-security-groups.
Step 1 - Create the Amazon VPN Gateway
Step 1.1 - Create a Virtual Private Gateway
The Amazon virtual private gateway is the VPN concentrator on the remote side of the IPsec VPN connection.
Go to the Amazon VPC Management Console.
In the left menu, click Virtual Private Gateways.
Click Create Virtual Private Gateway.

Enter the Name tag for the VPN gateway (e.g., SecureEdge Virtual Private Gateway).
Click Create Virtual Private Gateway.
Select the newly created virtual private gateway, click Actions and select Attach to VPC.
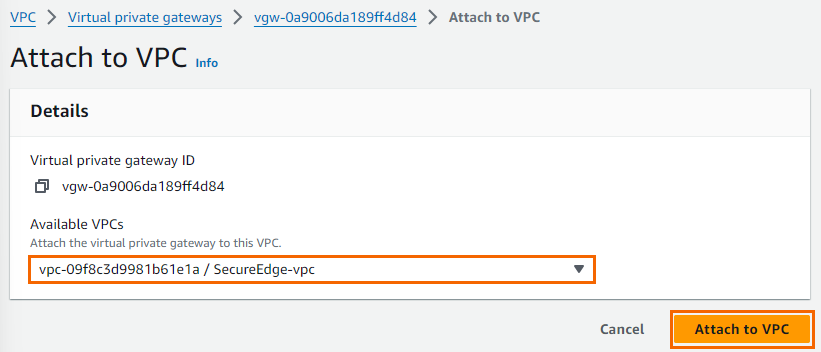
Select your VPC from the VPC list, and click Attach to VPC.
The virtual private gateway is now available.
Step 1.2 - Add Your Customer Gateway Configuration
The Amazon customer gateway is the description in AWS of your Barracuda SecureEdge appliance (your end of the VPN connection). Specify your external IP address and routing type in the customer gateway configuration:
Go to the Amazon VPC Management Console.
In the left menu, click Customer Gateways.
Click Create Customer Gateway.
Enter the connection information for your appliance:
Name – Enter a name for your device (e.g.,
My Barracuda SecureEdge).BGP ASN – Enter your BGP ASN number.
IP Address – Enter your external IP Address.
Device (Optional) – Enter a name for your device.

Click Create Customer Gateway.
Your appliance is now registered in the AWS cloud and you can configure VPN connections.
Step 1.3 - Create a VPN Connection
Create a VPN connection with the customer gateway (Your Barracuda SecureEdge) and the Amazon virtual private gateway that you just created. Then, download the VPN configuration file that contains all necessary information for configuring the VPN connection on the SecureEdge.
Go to the Amazon VPC Management Console.
In the left menu, click Site-to-Site VPN Connections.
Click Create VPN Connection.
In the Create VPN Connection window, enter the configuration information for your VPN connection:
Name tag – Enter a name for your VPN connection (e.g.,
SecureEdgeToAWSCloud).Virtual Private Gateway – Select the virtual private gateway created in Step 1.
Customer Gateway – Select the customer gateway created in Step 1.
Routing Options – Select Dynamic (requires BGP).
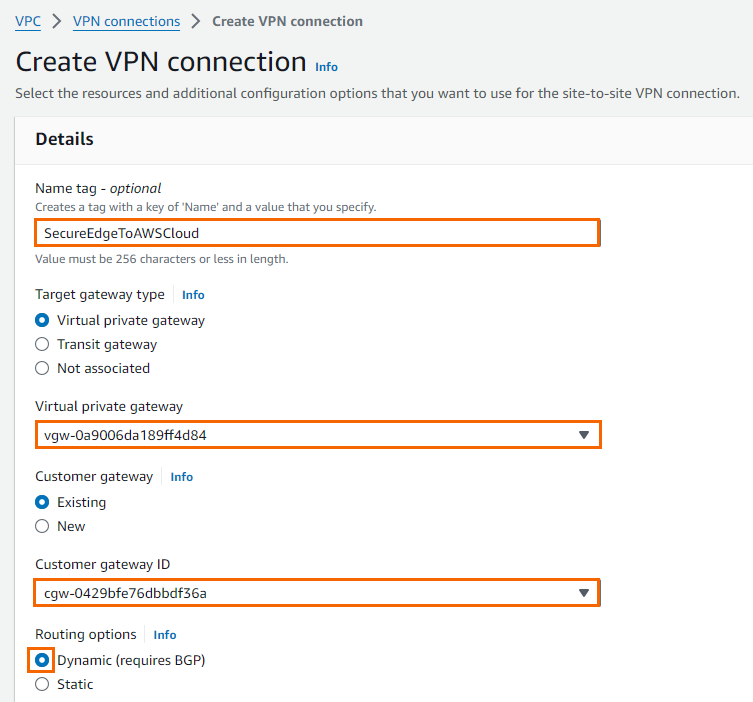
Click Create VPN Connection.
Once the connection is available in AWS, click Download Configuration.

Select generic vendor and platform settings for the configuration file:
Vendor – Select Generic.
Platform – Select Generic.
Software – Select Vendor Agnostic.
IKE version – Select IKev2.
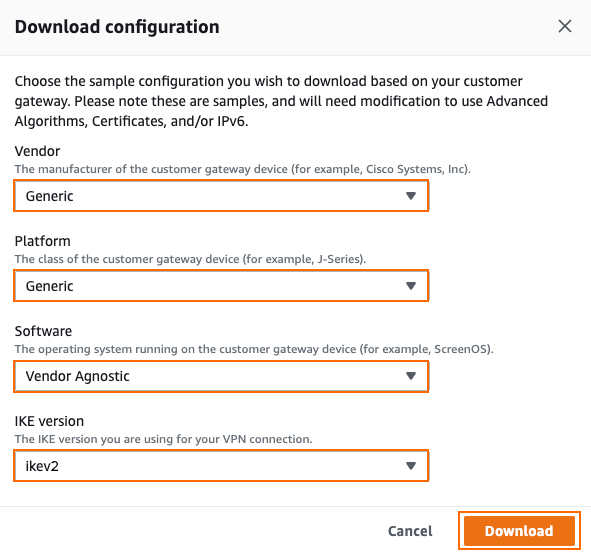
Click Download, and save the
vpn-<YOUR-VPN-CONNECTION-ID>.txtfile. The configuration file contains all required information to configure each VPN tunnel and the respective BGP routing options on your SecureEdge appliance.
Step 1.4 - Enable Route Propagation
Go to the Amazon VPC Management Console.
In the left menu, click Route Tables.
Select the route table attached to your VPC used in Step 1.1.
Click Route Propagation.
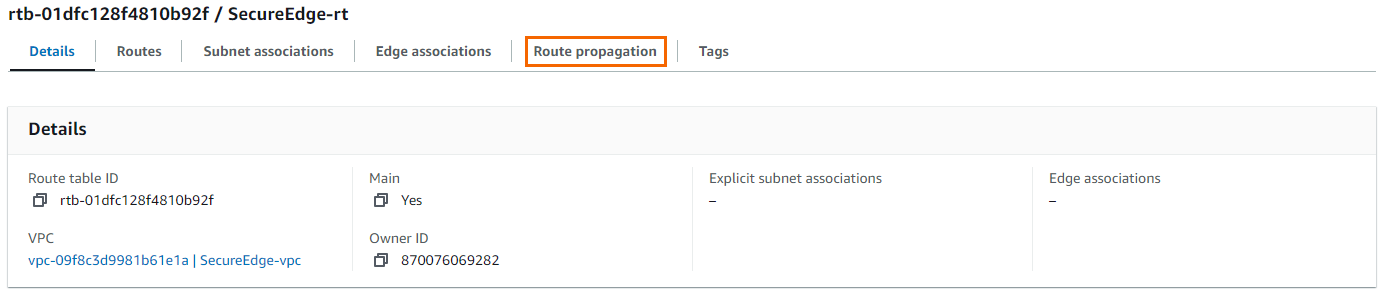
Click Edit Route Propagation.

Enable the route propagation for your virtual private gateway created in Step 1.1 by selecting the check box next to it.

Click Save.
Step 2 - Configure One IPsec Tunnel to One of the AWS VPN Gateway Instance
Configure one IPsec tunnel to one of the AWS VPN Gateway instance. Use the IP addresses provided in the Amazon generic VPN configuration file you downloaded at the end of Step 1.
Go to https://se.barracudanetworks.com and log in with your existing Barracuda Cloud Control account.
The chosen Tenant/Workspace is displayed in the top menu bar.
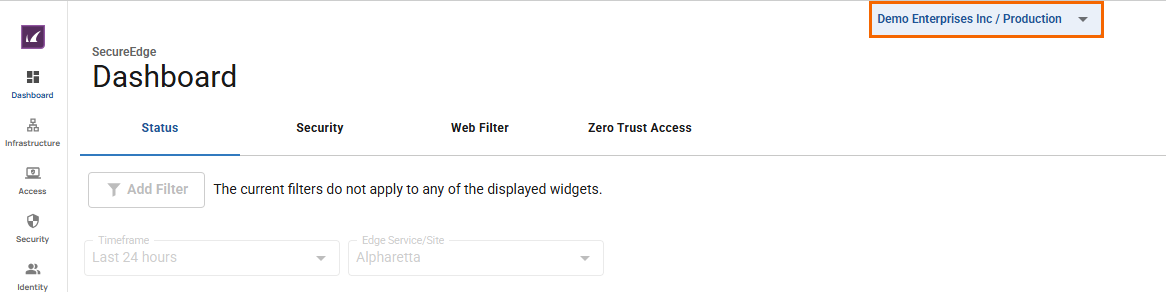
Click the expandable drop-down menu and select the workspace you want to configure the IPsec IKEv2 tunnel for.
Go to Integration > IPsec VPN. The IPsec VPN page opens. To add a tunnel, click Add IPsec Tunnel.
For each IPsec tunnel, click Add IPsec Tunnel. The Create IPsec Tunnel window opens.
In the General tab, specify values for the following:
Enable – Click to enable.
Initiates – Click to enable.
In the GENERAL INFORMATION section, specify values for the following:
Name – Enter a unique tunnel name. E.g., IPsec Tunnel 1:
IPsecAWSTunnel1.Description – Enter a brief description.
In the AUTHENTICATION section, specify values for the following:
Authentication – Select Pre-shared Key.
Shared Secret – Enter the Amazon Pre-shared Key.
IPsecAWSTunnel1
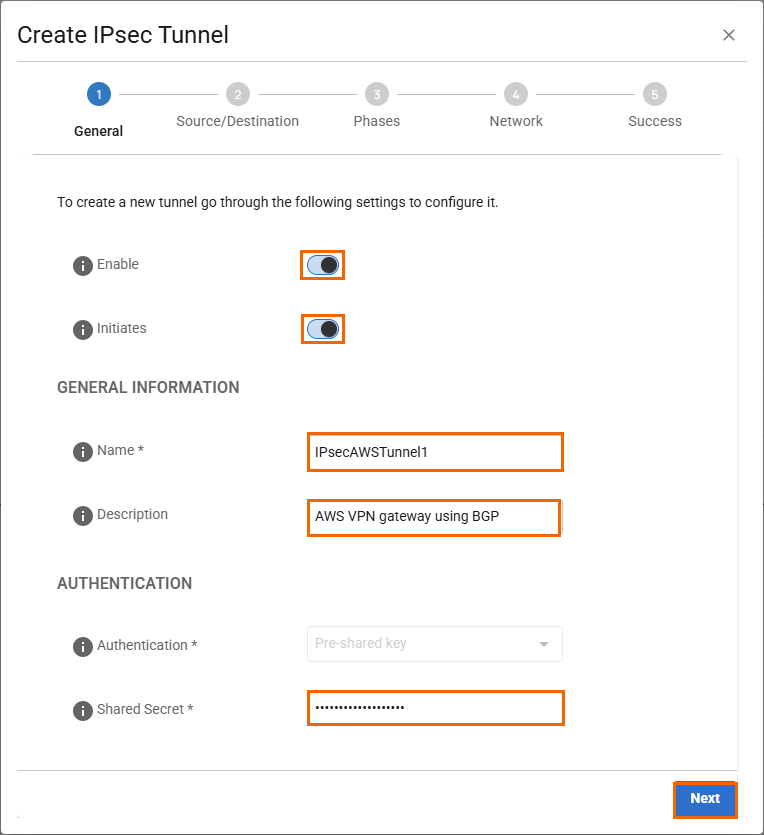
Click Next.
In the Source/Destination tab, specify values for the following:
Enable BGP – Click to enable.
In the SOURCE section, specify values for the following:
Type – Select Site.
Peer – Select peer. E.g., Dubai
WAN Interface – Select WAN interface. E.g., Etisalat
Local ID – Enter local ID. E.g., UAE-Etisalat
Peering Addresses – Enter the Inside IP Address of the customer gateway. E.g., IPsec tunnel 1:
169.254.124.158/30.ASN – Enter the ASN of the SecureEdge appliance. E.g.,
65200.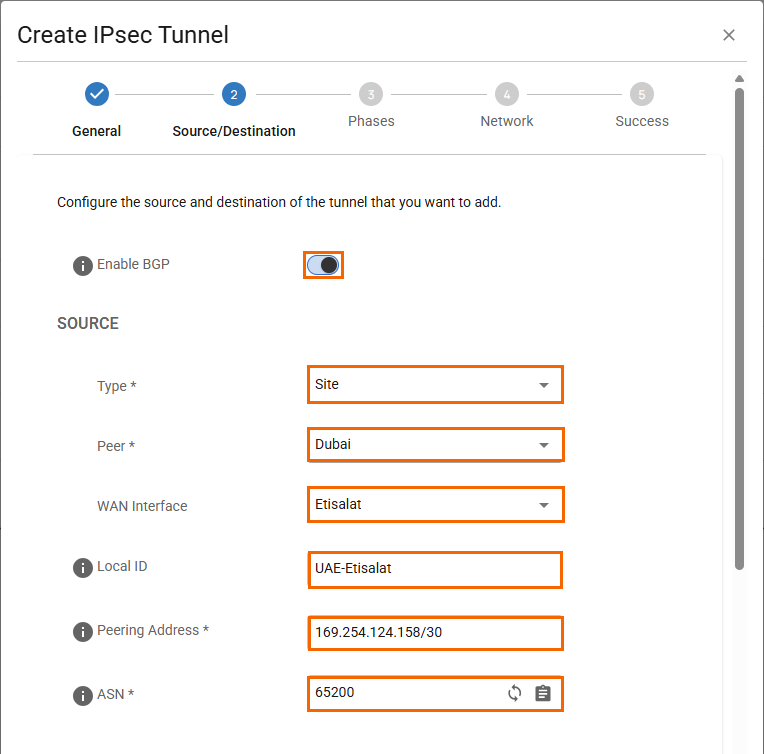
In the DESTINATION section, specify values for a VPN tunnel to one of the VPN gateway instance in AWS:
Remote Gateway – Enter the gateway IP address of the AWS VPN Gateway. E.g., IPsec tunnel 1:
3.225.124.138.Remote ID – Enter remote ID. E.g., IPsec tunnel 1:
3.225.124.138.Peering Address – Enter the Inside IP address of the Virtual Private Gateway. E.g., IPsec tunnel 1:
169.254.124.157ASN – Enter the Amazon ASN. E.g.,
64512.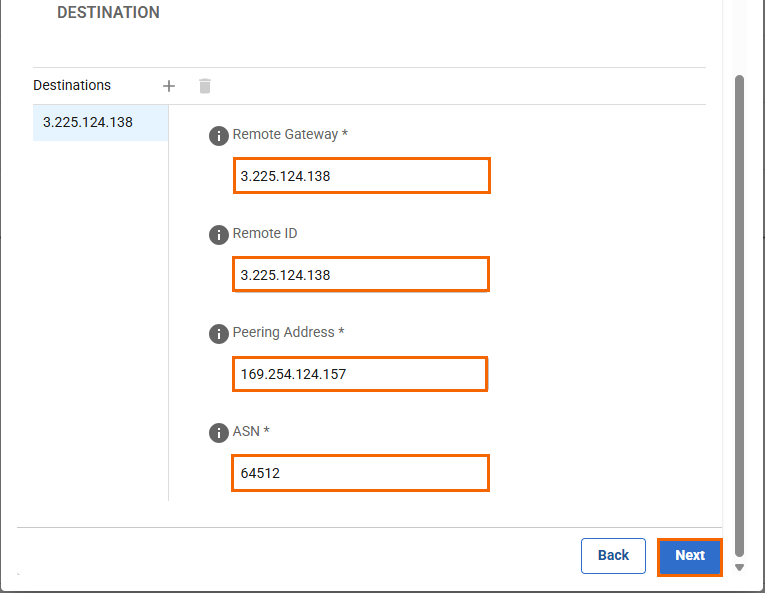
Click Next.
In the Phases tab, enter the Phase1 and Phase2 encryption settings:
Phase 1

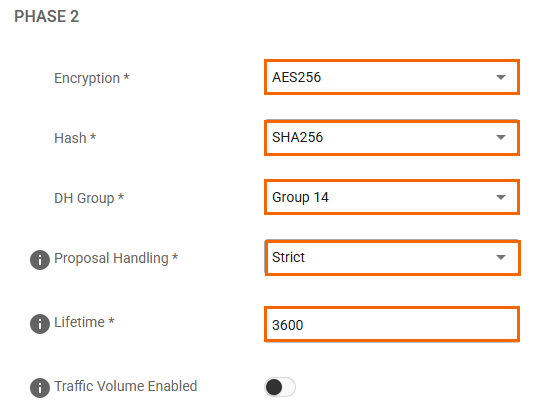
Phase 2
The following values are supported for a tunnel to the AWS VPN gateway:
Phase 1
Phase 2
Encryption
AES
AES 256AES
AES 256Hash
SHA
SHA256SHA
SHA256DH-Group
Group 2
Group 14
Group 15
Group 16
Group 17
Group 18
Group 22
Group 23
Group 24Group 2
Group 5
Group 14
Group 15
Group 16
Group 17
Group 18
Group 22
Group 23
Group 24Lifetime(sec)
28800
3600
Click Next.
In the Network tab, specify the values for the following:
In the NETWORK SETTINGS section, specify the values for the following:Force UDP Encapsulation – Click to enable.
IKE Reauthentication – Click to disable.
In the DEAD PEER DETECTION section, specify the values for the following:
Action When Detected – Select Restart.
Delay – Enter
10.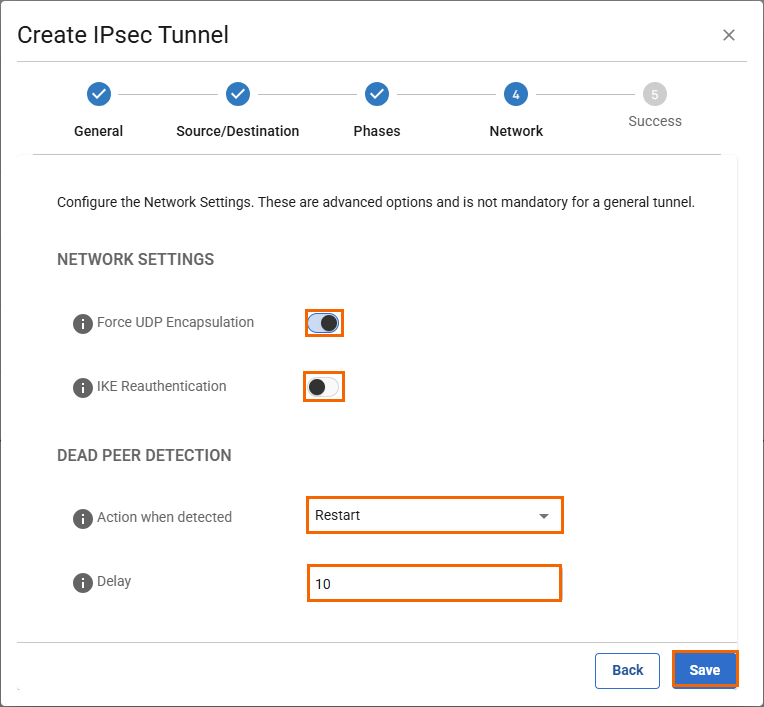
Click Save.
Verify that your IPsec tunnel configuration has been created successfully and click Finish.
AWS VPN Status in the Amazon AWS Management Interface
Go to the Amazon VPC Management Console.
In the left menu, click Site-to-Site VPN Connections.
Search for your connection created in Step 1.
Click Tunnel Details and verify the AWS VPN status. You can see only one of the tunnels will be up.
