

If you become aware that a malicious actor has seized control of an internal email account, you can take steps within Impersonation Protection to begin to mitigate the problem and prevent more takeovers.
Impersonation Protection can detect Account Takeovers based on many factors, including:
- Suspicious sign-ins
- Suspicious Inbox rules
- Suspicious internal and external emails
Handling a New Account Takeover Alert
- Log into Impersonation Protection.
- From the Spear Phishing Protection page, in the Account Takeover Protection section, click View Account Takeover Alerts.
Alternatively, click the menu button in the top left corner and select Account Takeover Protection.
The Alerts tab displays account takeover incidents detected by Impersonation Protection's artificial intelligence system.- New alerts are displayed as Not Reviewed. Continue with the steps below to review and create an incident.
- Alerts display as Reviewed after you click Create Incident for that alert. Click the clipboard icon
 to review details of the alert and, optionally, to create an incident. If you create an incident, continue with Step 5 below.
- Locate the alert you want to handle and click Review.
- Click View Message to learn more about the alert. If you are certain that the email was legitimate, click False Positive and confirm that the email was legitimate.
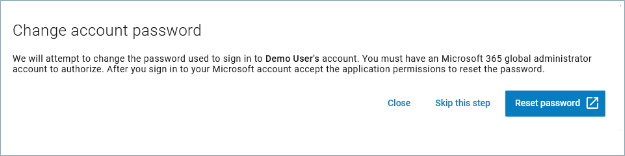
If the email was an account takeover, click Create Incident. When prompted, change the account password. This will keep unauthorized users out of the compromised account.
- To manually block the attacker's access to your user's account, click Sign into Microsoft 365. Microsoft 365 opens in a new browser window. Take the steps listed on the screen. Follow the Learn more links to read Microsoft's documentation on how to complete these actions.
- Internal clean up: Remove malicious emails from your users' mailboxes to prevent further takeovers.
- External notification: Mitigate reputation and brand risk by letting external parties know they received a malicious email from you. Return to Impersonation Protection and click Clean Up Messages. The New Account Takeover Incident wizard launches.
The first step informs you of what this wizard will do. Click Next to continue.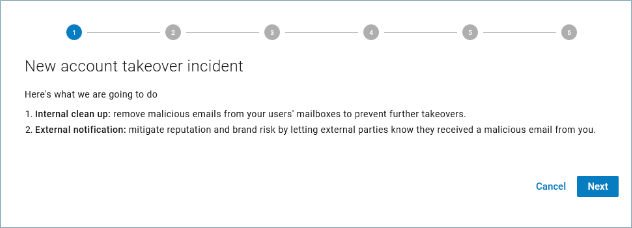
- In Step 2, the search criteria are already entered in the form, based on the information in the alert. Review the information, then click Next to continue.
Note : When you are creating an incident based on a suspicious login alert, you might not have a sample email. In this case, the I don't have a sample... checkbox might be selected.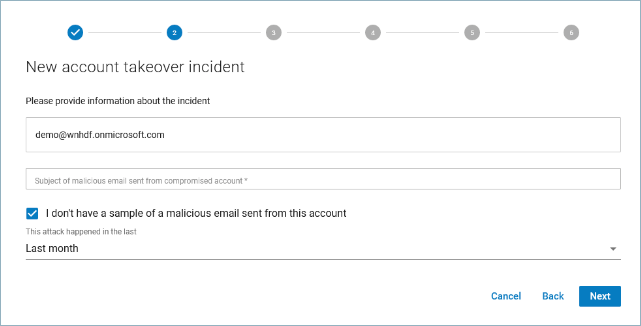
- If no emails are found, you can click Back and change the search criteria, like extending the timeframe, to search again, repeating Step 8 above.
- If emails are found, they are displayed in a table. Click the details iconto view more information about an email. Continue to the next step. Impersonation Protection searches for malicious emails related to the account takeover.
- If you determine that none of the emails are malicious, click No Malicious Emails and continue with Step 12 below.
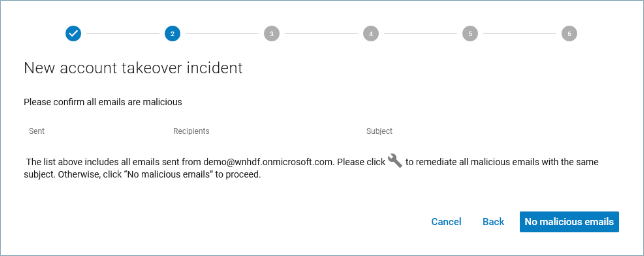
If you determine that the emails are malicious, click the wrench icon and wait a moment for the process to run. This action automatically remediates all emails with the same subject, based on your account settings, which include deleting the email or moving it to the recipient's junk email folder. See How to Specify Attack Response Options.
After the process runs, you are asked to confirm that all of the emails are malicious. Click Yes, All Are Malicious and proceed to the next step.
Clicking Yes removes the malicious emails from the users' mailboxes. - If the email was not sent to other internal recipients, an informational message displays. Click Next to continue.
If the email was sent to other internal recipients, select how you want to remediate it – either permanently deleting the attack from users' Inboxes or moving it to recipients' Junk email folders. Then click Clean Up.
If you choose to skip this step, continue with the following step. - If this email was sent to external users, Impersonation Protection notifies them. Select the account from which you want to send the notifications.
The following options are available, if you choose:- Click Export to CSV to save a record of the external names and emails of those affected by this incident.
Click Edit Email Notification to customize the notification email with your own wording. Click Apply to return to the wizard.
Click Send Notifications to warn external recipients about the incident. Emails will be sent within ten minutes. Continue to the next step.
Alternatively, click Skip to notify recipients using a different method. Continue to the next step.If the email was not distributed externally, an informative message displays. Click Next to continue.
- Review the Inbox Rules for the account that was taken over. Review rules listed on this page – especially rules that move, delete, or forward emails automatically. If there is as problem with a specific rule, click the delete icon
 to remove it.
Click Next to continue.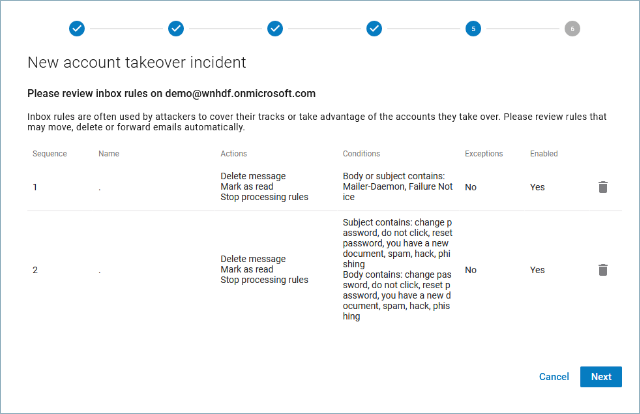
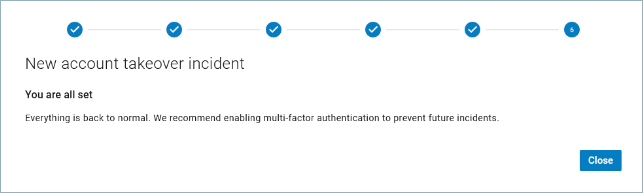
A message displays to let you know that you and Impersonation Protection have taken care of this issue.
The incident is listed on the Incidents tab after you complete step 4 of the wizard (step 12 above).
If you review an alert and create an incident, even if you do not complete creating the incident, the alert is listed on the Alerts tab as Reviewed.