

Virtual machines (VMs) deployed through Azure Gallery prior to mid-February, 2015, do not support Disk Expansion. If you deployed prior to this time period and want to expand the disk, you must redeploy the VM using the latest VM image available in Azure Gallery:
Step 1. Open Network Address Ranges on Firewall
For more information on the list of Open Network Address ranges required for the firewall, refer to the
Step 2. Licensing the Barracuda Web Application Firewall on Microsoft Azure
After provisioning the Barracuda Web Application Firewall on Microsoft Azure, the next step is licensing. After you deploy the Barracuda Web Application Firewall image on the Microsoft Azure environment, do the following:
- Sign into the Microsoft Azure Portal.
- Note the DNS of the deployed Barracuda Web Application Firewall.
Open the browser and enter the noted DNS (from step 2) with port 8000 for HTTP and port 8443 for HTTPS. For example:
For HTTP : http://<DNS>:8000
For HTTPS : https://<DNS>:8443- After the boot process is complete, the Licensing page displays with the following options:
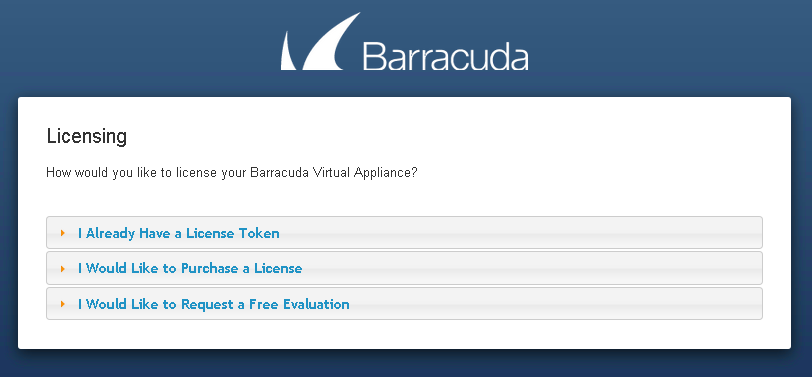
- I Already Have a License Token – Use this option to provision your Barracuda Web Application Firewall with the license token you have already obtained from Barracuda Networks. Enter your Barracuda Networks token and default domain to complete licensing, and then click Provision.
The Barracuda Web Application Firewall connects to the Barracuda Update Server to get the required information based on your license and then reboots automatically. Allow a few minutes for the reboot process. After the instance is provisioned, you are redirected to the login page. - I Would Like to Purchase a License – Use this option to purchase the license token for the Barracuda Web Application Firewall. Provide the required information in the form, accept the terms and conditions, and click Purchase.
The Barracuda Web Application Firewall connects to the Barracuda Update Server to get the required information based on your license and then reboots automatically. Allow a few minutes for the reboot process. After the instance is provisioned, you are redirected to the login page. - I Would Like to Request a Free Evaluation – Use this option to get a 30-day free evaluation of the Barracuda Web Application Firewall. Provide the required information in the form, accept the terms and conditions, and click Evaluate.
The Barracuda Web Application Firewall connects to the Barracuda Update Server to get the required information based on your license and then reboots automatically. Allow a few minutes for the reboot process. After the instance is provisioned, you are redirected to the login page.
- I Already Have a License Token – Use this option to provision your Barracuda Web Application Firewall with the license token you have already obtained from Barracuda Networks. Enter your Barracuda Networks token and default domain to complete licensing, and then click Provision.
Step 3. Verify Configuration and Change the Password
- Log into the Barracuda Web Application Firewall web interface as the administrator using the URL as described in Step 3 of Licensing of Barracuda Web Application Firewall Vx after deploying on Microsoft Azure .
Username: admin
Password: Enter the password specified while deploying the Barracuda Web Application Firewall instance on the Microsoft Azure Management Portal. See Step 6.c in the article Deploying and Provisioning the Barracuda Web Application Firewall in the New Microsoft Azure Management Portal . - Navigate to the BASIC > Administration page and do the following:
- Old Password: Enter the current password.
- New Password: (Optional) Enter a new password.
- Re-enter New Password: Re-enter the new password to confirm.
- Click Save Password.
- Navigate to the BASIC > IP Configuration page and do the following:
Verify the WAN IP Configuration.
- Configure the Primary and Secondary DNS Server in DNS Configuration.
Enter Default Host Name and Default Domain in the Domain Configuration. The Host Name is used in reporting, and is displayed in alerts, notifications and messages sent by the Barracuda Web Application Firewall. The Default Domain is the domain for the system and is appended to the Host Name.
Step 4. Update the Firmware
Navigate to the ADVANCED > Firmware Update page and check if there is a new Latest General Release available. If so, perform the following steps to update the system firmware.
- Click on the Download Now button located next to the firmware version that you wish to install. When the download is complete, the Apply Now button appears.
- Click on the Apply Now button to apply the firmware. This will take a few minutes to complete. After the firmware has been applied, the Barracuda Web Application Firewall will automatically reboot, displaying the login page when the system has come back up.
- After applying the firmware, you will be required to log into the web interface of the Barracuda Web Application Firewall for Azure again.
Configure the Service(s) on the Barracuda Web Application Firewall
You can configure the services on the BASIC > Services page. The services should be created using the system (WAN) IP address of the instance as your virtual IP address (VIP). The Virtual IP Address field is thus automatically populated with the system (WAN) IP address of the instance. After the service is configured, the service will be accessible through the public IP/DNS of the Barracuda Web Application Firewall for Azure VM. Ensure that you have the corresponding ports opened in your security group/endpoints and firewall.
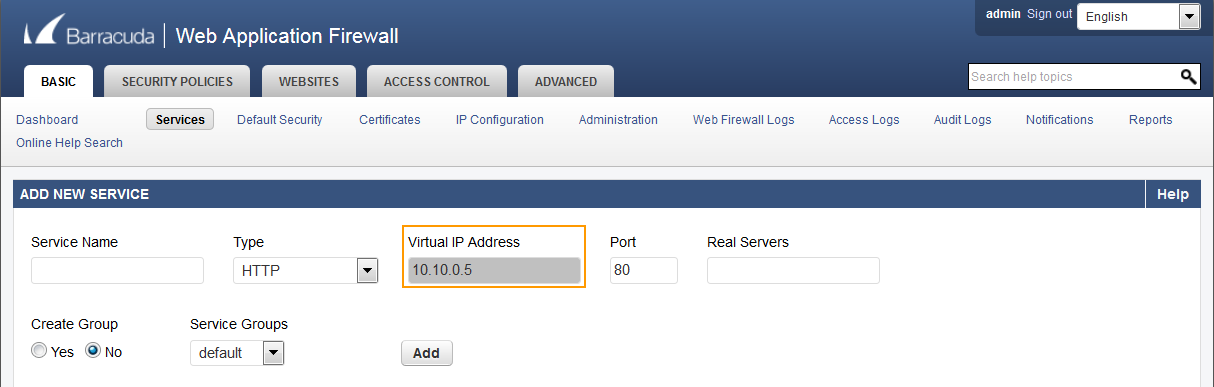
For more information on services, see Step 2: Configuring a Service. For detailed instructions on how to add a service, click the Help button.