

Overview
Kerberos is the native authentication method used by Windows 2000 and later platforms. This authentication protocol provides mutual authentication, i.e., both the user and the server verify the other's identity. Kerberos uses a trusted third party known as the Key Distribution Center (KDC). The Key Distribution Center must be a part of the Windows Domain Controller Active Directory. The Key Distribution Center provides two services, an Authentication Service (AS), which authenticates a user, and a Ticket Granting Service (TGS), which issues a session ticket to a client.
Kerberos relies on Service Principal Names (SPNs) to uniquely identify an instance of a service (which runs on a host) by a client. Each web service should be assigned an SPN that is registered in Active Directory. The SPN is represented in the following format:
<service type>/<instance/host name>, OR <service type>/<instance/host name>:<port number>/<service name>
The port and service name are optional. Port is required only when the <service type> is different than the default.
Prerequisite
- The Barracuda Web Application Firewall should have proper DNS servers configured.
- The DNS Server IP address configured on BASIC > IP Configuration > DNS Configuration should be reachable by the Active Directory domain (the domain where Key Distribution Center (KDC) is installed).
- Ensure the Barracuda Web Application Firewall time is synchronized with the Kerberos server time.
Configure the Kerberos Authentication Service
Perform the following steps:
- Go to the ACCESS CONTROL > Authentication Services page.
- In the New Authentication Service section, click the KERBEROS tab and specify values for the following fields:
- Realm Name – A name identifying the Kerberos authentication service on the Barracuda Web Application Firewall.
- KDC Realm Name – Enter the name of the realm configured on the KDC.
- KDC IPAddress/Name – Enter the name or IP address of the Kerberos server used for authenticating users.
- KDC Port – Enter the port address of the Kerberos server used for authenticating users. Port 88 is the standard port used for Kerberos.
- Domain Alias(Optional) - Enter the domain name alias of the Kerberos Domain Server. For example, if the domain name is "Kerberos.example.com" and the alias for it is "Kerberos", then configure "Kerberos" in this field. This is optional if you are configuring for a single domain, but mandatory when you want to enable multi-domain authentication for users.
- Click Add.
Associate the Service with the Kerberos Authentication Service
Perform the following steps:
- Go to the ACCESS CONTROL > Authentication page.
- Identify the service with which you want to associate the Kerberos authentication service.
- Click Edit next to the service. The Edit Authentication Policy window appears.
- In the Edit Authentication Policy section, do the following:
- Set Status to On.
- Select the Kerberos authentication service from the Authentication Service drop-down list.
Specify the Service Principal Name (SPN) used for enabling Kerberos authentication for this service in the Kerberos SPN field.
- Kerberos Delegation – When set to Yes, the delegation flag will be set in the request from the Barracuda Web Application Firewall to the Kerberos server.
- Specify values of other parameters as required and click Save.
Configure the Authorization Policy for the Service
Perform the following steps:
- Go to the ACCESS CONTROL > Authorization page.
- In the Add Authorization Policy section, specify values for the following:
- Service – Select the service from the drop-down list.
- Policy Name – Enter a name for the authorization policy.
- Status – Set to On.
- Specify values of other parameters as required and click Add. Click the Help icon for more information.
- In the Existing Authorization Policies section, click Edit next to the policy created above to configure advanced authorization settings.
Authentication of Client Traffic in the Kerberos Environment

The following process authenticates client traffic:
- The user attempts to access an application that is protected by Kerberos.
- The Barracuda Web Application Firewall challenges the user to provide login credentials via the Authentication Form.
- The user enters user name and password.
- The Barracuda Web Application Firewall transmits the credentials to the Kerberos server for validation.
- The Kerberos server authenticates the user and creates a session ticket for the user.
- The Barracuda Web Application Firewall sends the request with the session ticket to the backend server to fetch the requested page that it in turn serves to the client.
Load-Balanced Environment
Kerberos requires a unique Service Principal Name (SPN) configured for each service. If you have multiple servers configured for a service, then a single SPN should be registered in Active Directory for that service. For example, consider you have a service “web1.domain.com” for which two servers S1 and S2 are configured for load balancing. The SPN should be created for the domain “web1.domain.com” and registered in Active Directory under the user (e.g.: Web User). The servers S1 and S2 should provide required permissions for that user.
In the above example, the SPN should be registered as HTTP/abc.com abc/Web user
Enable Kerberos Authentication for the Servers Used to Load Balance
Perform the following steps:
Step 1 - Create a User in Active Directory
- From the Active Directory Users and Computers window, right-click Users, select New > User. The New Object – User window appears.
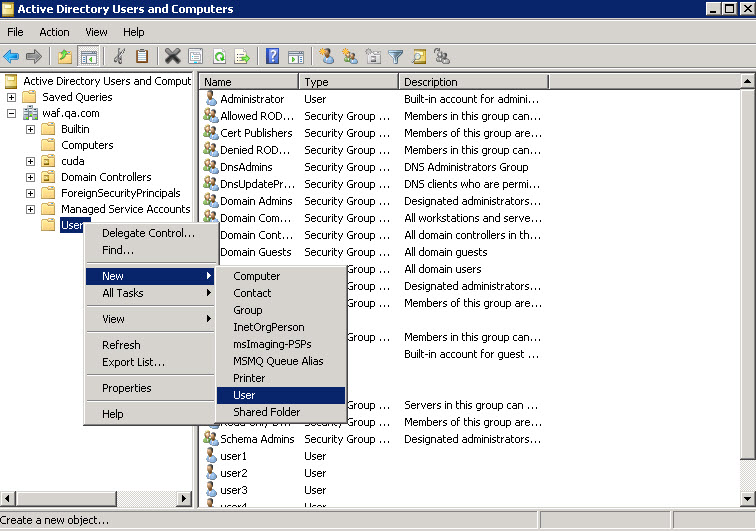
- Specify the first name and last name of the user, as well as the user login name and password.
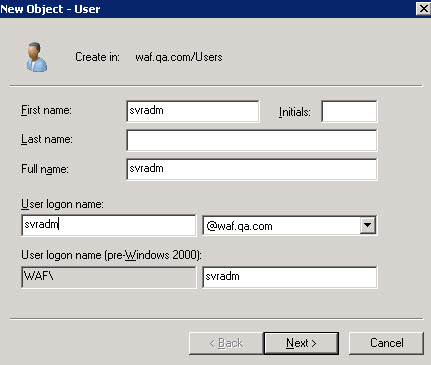
- Click Next and specify values for other fields as required and click Finish.
Step 2 - Set SPN for the User
To set SPN for the user created in the earlier step, open a command prompt and execute the setspn command.

Step 3 - Configure the Web Server Application Poll to Run for the Created User
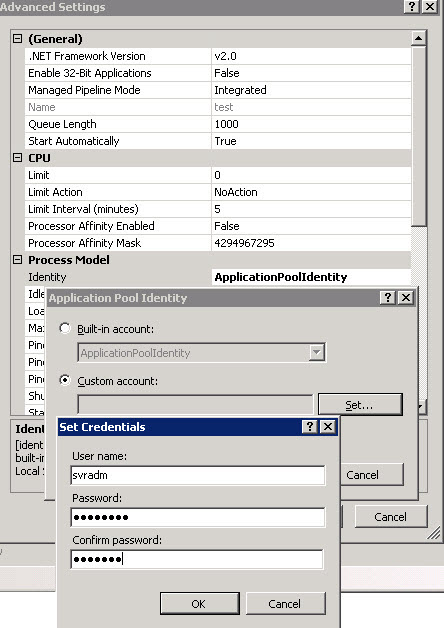
To run the web application poll for the user “svradm”, perform the steps below (Go to server S1):
- In the IIS Manager, click Application Pools in the left pane. All the running applications will get displayed in the right pane.
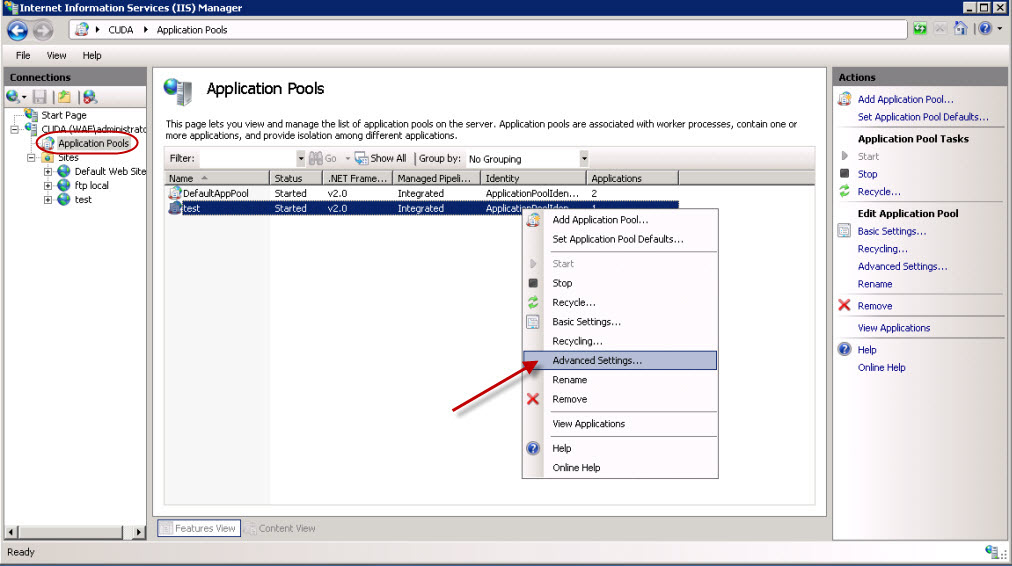
- Identify the application to associate to the user. Right-click on the application and select Advanced Settings.
- In the Advanced Settings window, click the button next to Identity. The Application Pool Identity window appears.
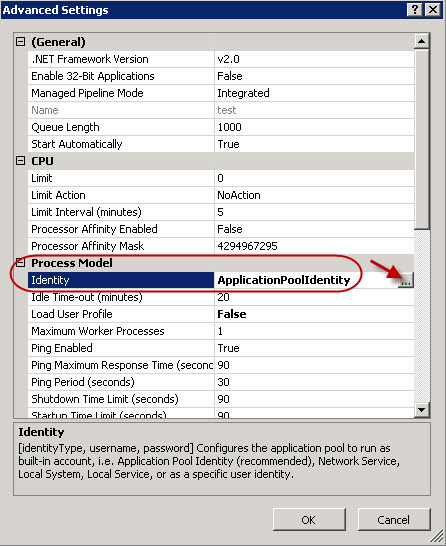
- In the Application Pool Identity window, select the Custom account button and click Set…. Enter the user name and password for the user and click OK.
- Repeat Step 3 on the server S2.
- Configure the DNS server to resolve the SPN name to the virtual IP address of the service.