

The Barracuda Web Application Firewall for AWS provides proven application security and data loss prevention for your applications on Amazon Web Service (AWS), including:
- Detecting and blocking attacks including SQL injections, Cross-Site Scripting, malware uploads, and volumetric or application DDoS.
- Authentication and access control allowing organizations to exercise strong user control.
- Scanning of outbound traffic for sensitive data, with admin control of masking or blocking information to prevent data leakage.
- Built-in load balancing and session management, allowing organizations to manage multiple applications behind a single instance of the Barracuda Web Application Firewall.
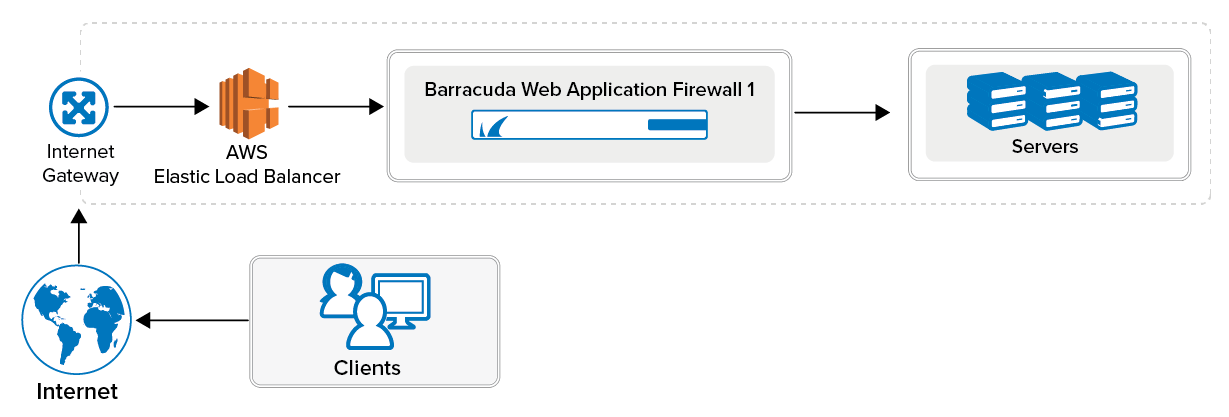
The Barracuda Web Application Firewall on Amazon Web Services protects your applications in the cloud.
To meet a variety of performance requirements, the M3 Medium, M3 Large, M3 Extra Large, and M3.2 Extra Large instance types are supported. Depending on the instance type, you can have:
- Up to 8 vCPUs.
- Up to 30 GB of memory.
- Up to 30 private IP addresses per network interface. To ensure that services are available over the Internet, you can allocate a public IP address, or Elastic IP address (EIP), to each private IP address.
The Barracuda Web Application Firewall is available hourly in the AWS Marketplace or you can bring your own license (BYOL).
Licensing Options
The Barracuda Web Application Firewall AMI is available on Amazon Web Services with the following options:
- Bring Your Own License (BYOL)
- Pay-As-You-Go/Hourly (PAYG)
- Usage Based/Metered
Models and Instance Types
For BYOL, PAYG, and Usage Based/Metered, Barracuda Networks offers four models. The table below lists each model, the corresponding Instance Type to be used in Amazon Web Services, the default CPU and Memory for the instance, and the number of Private IP addresses that can be associated per ENI.
If you want to increase the performance of a license that you have already purchased, you can buy additional cores from Barracuda and reconfigure your VM for a larger instance type.
| Barracuda Web Application Firewall Model | Supported Instance Type in Amazon Web Services |
|---|---|
| Level 1 | m3.medium |
| Level 5 | t2.medium |
| t2.large | |
| m4.large | |
| m5.large | |
| m5a.large | |
| c4.large | |
| c5.large | |
| Level 10 | t2.xlarge |
| t3.xlarge | |
| t3a.xlarge | |
| m4.xlarge | |
| m5.xlarge | |
| m5a.xlarge | |
| c4.xlarge | |
| c5.xlarge | |
| Level 15 | t2.2xlarge |
| t3a.2xlarge | |
| m4.2xlarge | |
| m5.3xlarge | |
| m5a.2xlarge | |
| c4.2xlarge | |
| c5.2xlarge |
Bring Your Own License (BYOL)
With the Bring Your Own License (BYOL) option, you are required to get the Barracuda Web Application Firewall for AWS token, either by:
- Providing the required information for a free evaluation at https://www.barracuda.com/purchase/evaluation OR
- Purchasing online at https://www.barracuda.com/purchase.
With this license option, there will be no Barracuda Web Application Firewall Software charges, but Amazon Elastic Compute Cloud (Amazon EC2) usage charges on Amazon will apply.
PAYG/Hourly
With the Pay-As-You-Go (PAYG)/Hourly licensing option, you complete the evaluation and purchase of the Barracuda Web Application Firewall entirely within the AWS Marketplace. After the Barracuda Web Application Firewall instance is launched from the marketplace, it is licensed provisioned automatically. You are charged hourly (per instance) for both the Barracuda Web Application Firewall Software and Amazon Elastic Compute Cloud (Amazon EC2) usage on Amazon. For pricing information, refer to the AWS Marketplace: Barracuda Web Application Firewall (WAF) – PAYG, Barracuda Web Application Firewall (WAF) – BYOL and Barracuda Web Application Firewall (WAF) – Metered.
Usage Based/Metered
The licensing of the Usage Based/Metered option is same as Hourly/PAYG licensing option i.e. the evaluation and pricing of the Barracuda Web Application Firewall is done entirely within the AWS Marketplace. After the instance is launched, it is licensed automatically.
The Barracuda Web Application Firewall Usage Based instance has two pricing components:
- Charges based on the total bandwidth consumed across all deployed Barracuda Web Application Firewall instances.
- Standard Amazon Elastic Compute Cloud (EC2) charges per instance.
Before You Begin
Before you deploy the Barracuda Web Application Firewall on Amazon Web Services, choose the licensing option (Bring Your Own License (BYOL) or Hourly / Metered). Then set up an Amazon Virtual Private Cloud (VPC).
A Virtual Private Cloud (VPC) is an isolated virtual network on Amazon Web Services (AWS) Cloud where you can launch AWS resources, such as Amazon EC2 instances. When creating a VPC, the IP address(es) should be in the form of Classless Inter-Domain Routing (CIDR) block (for example, 10.0.0.0/16). In a VPC, you can select your own IP address range, create subnets, configure routing tables and network gateways.
For more information about CIDR notation, refer to Classless Inter-Domain Routing on Wikipedia. For information about the number of VPCs that you can create, refer to Amazon VPC Limits.
To set up a VPC, complete the following steps. If you have already configured a VPC for the Barracuda Web Application Firewall, you can skip the steps below and continue with "Deploying the Barracuda Web Application Firewall on Amazon Web Services".
Step 1 - Create the Amazon VPC Cloud
Perform the steps below to create a VPC:
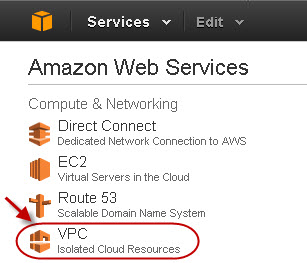
- Go to the AWS Management Console.
- In the Compute & Networking section, click VPC:
- From the VPC Dashboard, select Your VPCs under VIRTUAL PRIVATE CLOUDS.
- Click Create VPC.
- In the Create VPC dialog box, do the following:
- Enter the IP address in the CIDR Block field.
- Select Default from the Tenancy drop-down list:
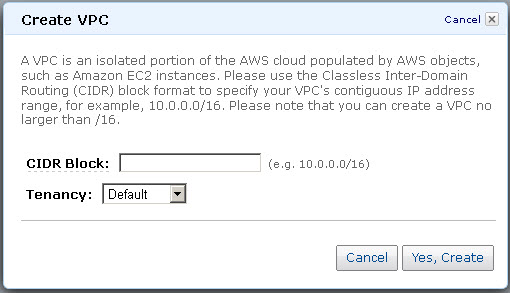
- Click Yes, Create.
Step 2 - Add an Internet Gateway to the VPC
By default, the instances launched on the Virtual Private Cloud (VPC) cannot communicate with the internet until an Internet Gateway is created and attached to the VPC.
Perform the following steps to add an internet gateway to your VPC:
- From the VPC Dashboard, select Internet Gateways under VIRTUAL PRIVATE CLOUDS.
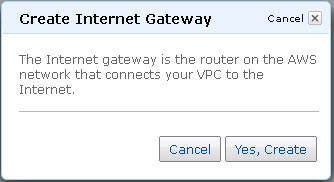
- Click Create Internet Gateway.
- In the Create Internet Gateway dialog box, click Yes, Create:
- Select the internet gateway created in the above step, and then click Attach to VPC:
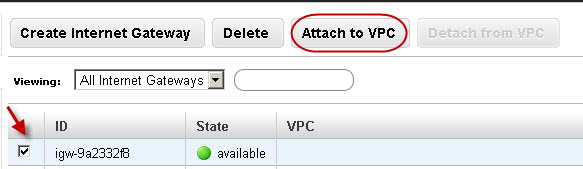
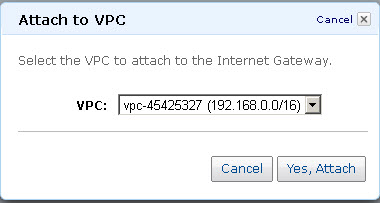
- Select the VPC that you created in Step 1, and then click Yes, Attach:
Step 3 - Add a Subnet to the VPC
Perform the following steps to add a subnet to your VPC:
- From the VPC Dashboard, select Subnets under VIRTUAL PRIVATE CLOUDS.
- Click Create Subnet.
- In the Create Subnet dialog box, do the following:
- Select the created VPC from the VPC drop-down list.
- Select the availability zone that your VPC resides from the Availability Zone drop-down list.
- Specify the IP address(es) in the CIDR Block field:
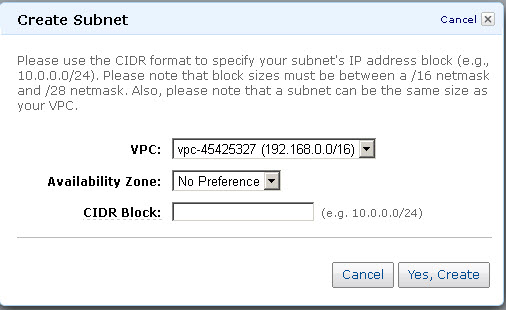
- Click Yes, Create.
Step 4 - Attach the Internet Gateway to the Route Table
Attach the internet gateway created in Step 2 - Add an Internet Gateway to the VPC to the route table by following the steps below:
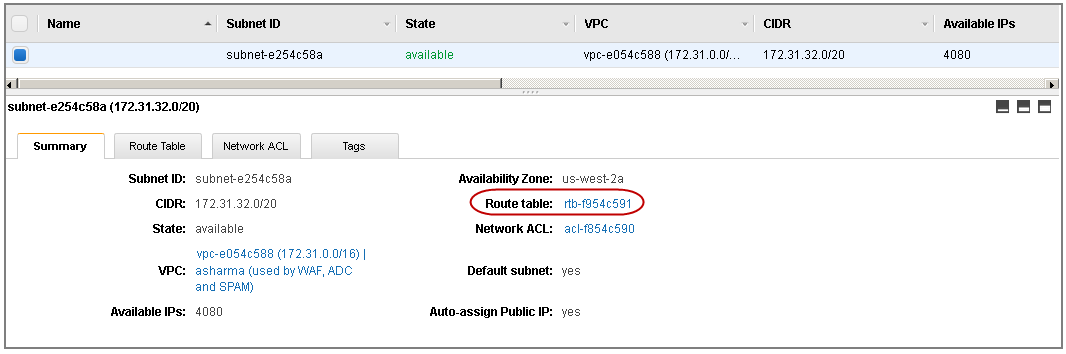
- From the VPC Dashboard, select Subnets under Virtual Private Cloud.
- In the Subnets list, select the subnet you created in Step 3 - Add a Subnet to the VPC , and note the Route table entry:
- Now, select Route Tables under Virtual Private Cloud.
- In the Route Tables list, select the route that you noted down in step 2 above.
- In the Routes tab, click Edit and specify the following values:
- Destination – 0.0.0.0/0
- Target – Should be the internet gateway created in Step 2 - Add an Internet Gateway to the VPC :
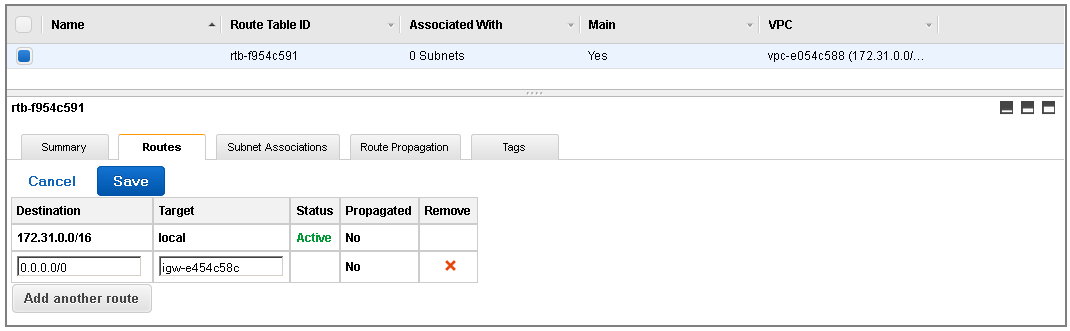
- Click Save.
Next Step
Now that you have set up a VPC for the Barracuda Web Application Firewall, you can continue with Barracuda Web Application Firewall Deployment and Quick Start Guide for Amazon Web Services . If you encounter network connectivity issues, see Troubleshooting the Barracuda Web Application Firewall on Amazon Web Services.