

This guide walks you through the steps to load balance traffic across multiple instances of the Barracuda Web Application Firewall deployed in Amazon Web Services.
In this article
- Step 1 - Deploy Multiple Barracuda Web Application Firewall Instances in Amazon Web Services
- Step 2 - Set Up Load Balancing on the Barracuda Web Application Firewall Instances
- Step 3 - Set Up a High Availability Environment with the Barracuda Web Application Firewall
Step 1 - Deploy Multiple Barracuda Web Application Firewall Instances in Amazon Web Services
Follow the steps in Deploy the Barracuda Web Application Firewall on Amazon Web Services to deploy multiple Barracuda Web Application Firewall instances. To license and configure your virtual machine, continue with Barracuda Web Application Firewall Deployment and Quick Start Guide for Amazon Web Services . In this example, there are two Barracuda Web Application Firewall instances where Barracuda-WAF1 is the first unit and Barracuda-WAF2 is the second unit.
Step 2 - Set Up Load Balancing on the Barracuda Web Application Firewall Instances
Load Balance the Service on Multiple Barracuda Web Application Firewall Instances Using the Application Load Balancer
- Log into the Amazon EC2 Management Console.
- From the EC2 dashboard, select Load Balancers under Load Balancing.
Click Create Load Balancer. The Select load balancer type page opens.
On the Select load balancer type page, click Create under Application Load Balancer.
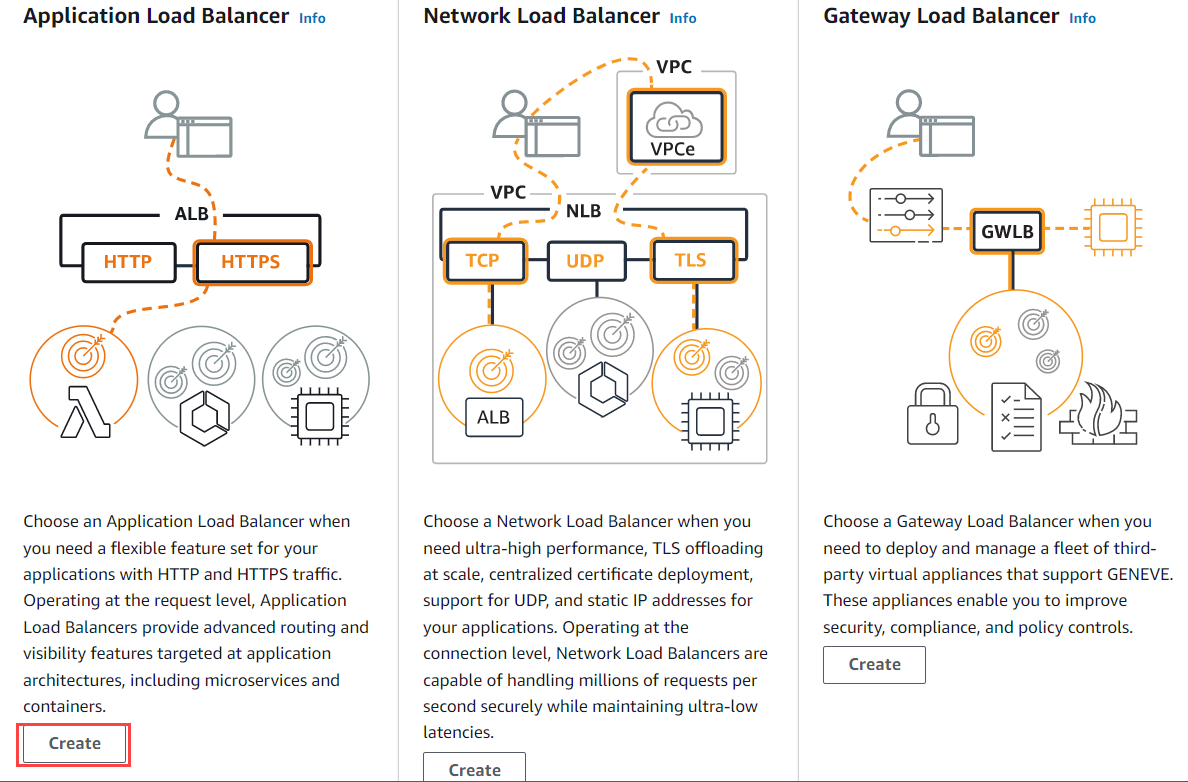
On the Create Application Load Balancer page:
Basic Configuration
Load Balancer name - Enter a name for the load balancer.
Scheme - Select the scheme to route the client requests to the server.
Internet-facing: Routes client requests over the Internet.
Internal: Routes requests using the private IP addresses.
IP address type - Select the IP address type (IPv4 or dualstack) to communicate with the load balancer.
IPv4: Accepts only IPv4 traffic.
Dualstack: Accepts IPv4 and IPv6 traffic.
Network mapping
VPC – Select the VPC.
Mappings - Select the availability zones and subnets for the VPC load balancer.
Security groups
Security groups - Select an existing security group from the drop-down list and assign it to the load balancer, or choose Create new security group to create a new group.
Listeners and routing
Listener – Configure the following:
Protocol – Select the protocol (HTTP or HTTPS).
Port – Specify the port number.
Default action – Select an existing target group from the drop-down list, or click Create target group to register your targets (services). The load balancer routes the traffic to registered targets (services) using the port and protocol specified for the target group. See the section Create a Target Group.
Click Add Listener.
Tags (optional)
Specify a key and a value for the tag. Click Add tag to add tags.
Summary
Review your settings before creating the load balancer, and then click Create load balancer.
Create a Target Group
You must create a target group and register the Barracuda Web Application Firewall instances or IP addresses for which the traffic needs to be load balanced. The load balancer routes the traffic to the registered targets using the specified port and protocol. For detailed information, refer to the AWS documentation.
- Log into the Amazon EC2 Management Console.
- From the EC2 dashboard, select Target Groups under Load Balancing.
- On the Target groups page, click Create target group.
- On the Step 1 Specify group details page, configure the following:
- Basic configuration
- Choose a target type - If the Barracuda Web Application Firewall instances have created the service using the system IP address, select Instances. If the Barracuda Web Application Firewall instances have services with multiple IP addresses, select IP addresses.
- Target group name - Specify a name for the target group.
- Protocol - Select the protocol
- Port - Specify the port number.
- VPC - Select the VPC with the instances that need to be included in the target group.
- IP address type - (Available only when the target type is IP addresses) Select the IP address type for the IP addresses. Note: The target group may include only the selected IP address type targets (services).
- Protocol version - Select the protocol version.
- Health checks – Modify the default settings as needed.
- Tags (Optional) – Expand the tags section, and add the tags with key and value pair.
- Click Next.
- On the Register targets page, do the following:
- If the target type is Instances:
- Select the instances to which the traffic needs to be load balanced and click Include as pending below.
- If the target type is IP addresses:
- Select a network VPC from the list.
- Specify the IP addresses. You can add up to five IP addresses at a time.
- Specify the port number to route the traffic to specified IP addresses.
- Click Include as pending below.
- If the target type is Instances:
- Review the targets and click Create target group.
Load Balance the Service on the Barracuda Web Application Firewall Instances Using the Classic Load Balancer
- Log into the Amazon EC2 Management Console.
- From the EC2 dashboard, select Load Balancers under Load Balancing.
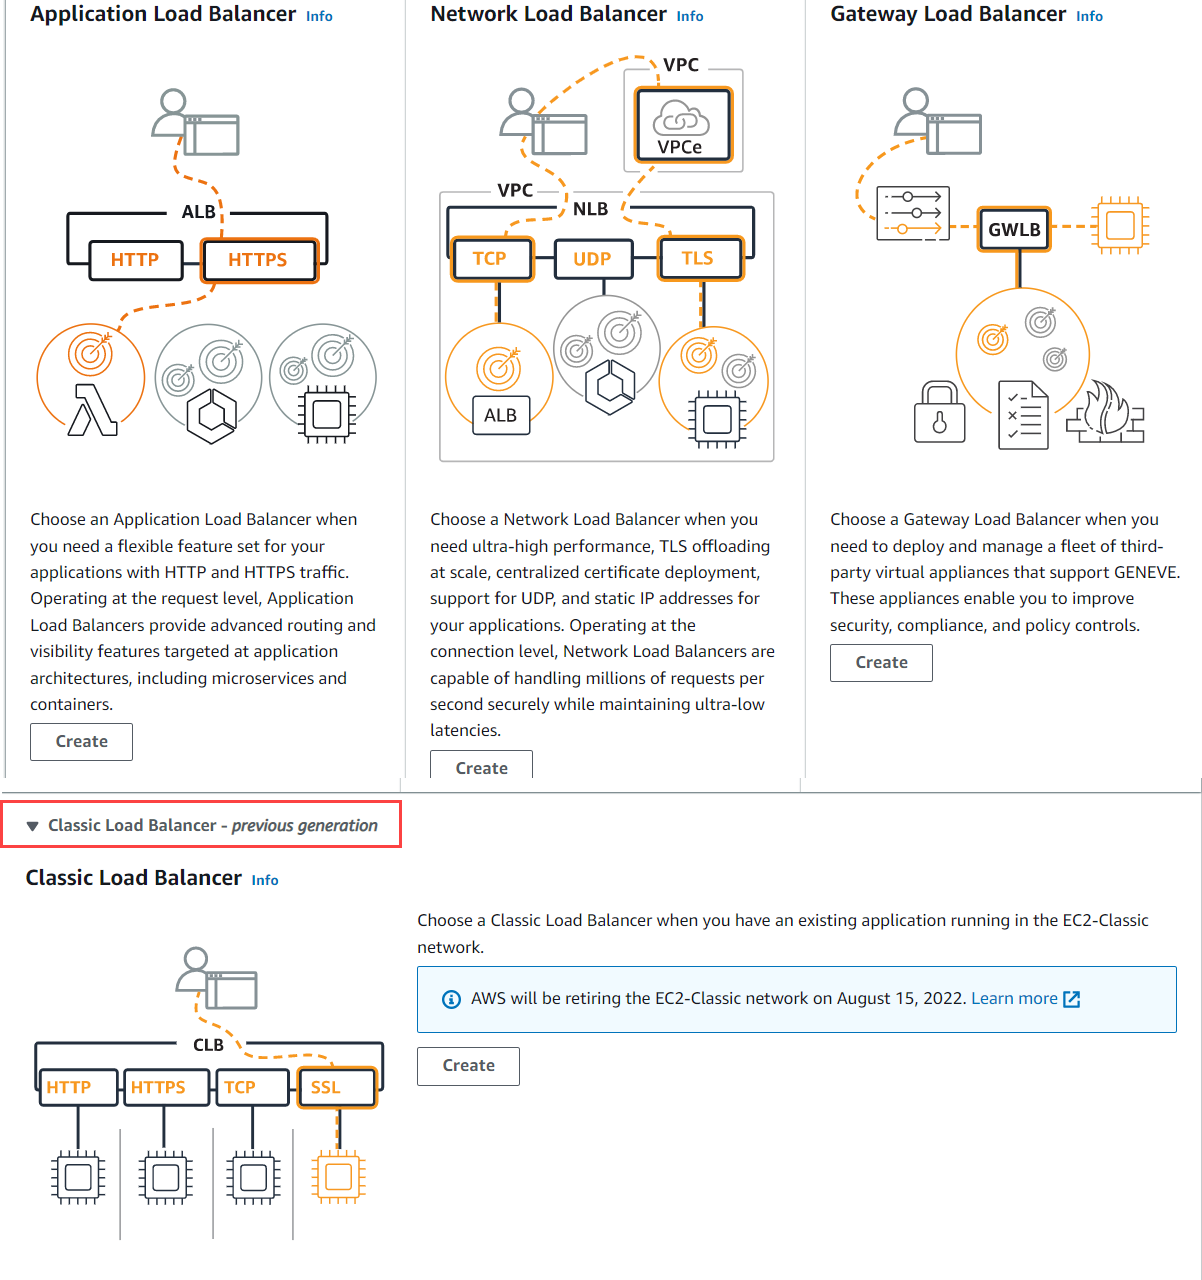
Click Create Load Balancer. The Select load balancer type page opens.
In the Select load balancer type page, click Create under Classic Load Balancer.
On the Step 1: Define Load Balancer page:
Load Balancer Name – Enter a name for the load balancer.
Create LB Inside – Select the VPC ID under which the Barracuda Web Application Firewall instances are launched.
Leave Create an internal load balancer set to the default value.
Select the Enable advanced VPC configuration check box.
Listener Configuration - Add the ports where services are created requiring load balancing.
Select the subnets for the VPC load balancer.
Click Next: Assign Security Groups.
On the Step 2: Assign Security Groups page, choose Select an existing security group to select and assign the security group(s) from an existing list, or choose Create a new security group to create a new group. Click Next: Configure Security Settings.
Note on the Step 3: Configure Security Settings: Applicable only if load balancer is listening to HTTPS traffic.
Select Certificate
Certificate Type: Select the certificate type.
Certificate: Select a certificate from the drop-down list.
Select Cipher
Predefined Security Policy: Select a security policy from the drop-down list.
Click Next: Configure Health Check.
In the Configure Health Check page:
Ping Protocol – Keep the default value, i.e., HTTP.
Ping Port – Set to
8000. By default, the Barracuda Web Application Firewall listens on port 8000. If you are using a different port for the Barracuda Web Application Firewall, specify that port number.Ping Path – Enter
/cgi-mod/index.cgi.In the Advanced Details section, specify required values and click Next: Add EC2 Instances.
On the Step 5: Add EC2 Instances page, select the instances to be added to this load balancer and click Next: Add Tags.
On the Step 6. Add Tags page, specify a key and a value for the tag and click Review and Create.
On the Step 7: Review page, review your settings before creating the load balancer, and then click Create.
The Load Balancers table displays the created load balancer details.
The services configured should be accessed using the DNS name of the created load balancer. For example, in the above example, the DNS name of the load balancer is waf-lb1-334799786 and the HTTP service created on port 80 can be accessible via http://waf-lb1-334799786 / http://waf-lb1-334799786:80.
Step 3 - Set Up a High Availability Environment with the Barracuda Web Application Firewall
Follow these steps to cluster your Barracuda Web Application Firewall virtual machines in Amazon Web Services:
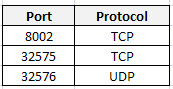
Before clustering your Barracuda Web Application Firewall virtual machines, ensure the following ports are open in the Security Group assigned to the Barracuda Web Application Firewall virtual machines:
- Install each system and ensure that each Barracuda Web Application Firewall is running the same firmware version. Each Barracuda Web Application Firewall in a cluster must have the same model number and firmware version.
- Make a backup of each Barracuda Web Application Firewall configuration.
- No processes should be running on any virtual machine when you link them together. To be sure, go to the ADVANCED > Task Manager page of each Barracuda Web Application Firewall and verify that no processes are running.
- From the ADVANCED > High Availability page of Barracuda-WAF1, enter a Cluster Shared Secret password, and click Save Changes.
- From the ADVANCED > High Availability page of Barracuda-WAF2, do the following:
- Enter the same Cluster Shared Secret password, and click Save Changes. Both units in a cluster must have the same Cluster Shared Secret to communicate with each other.
In the Clustered Systems section, enter the WAN IP address of Barracuda-WAF1, and click Join Cluster. Never cancel the join cluster task when the join is in progress.
- On each Barracuda Web Application Firewall, refresh the ADVANCED > High Availability page, and verify the following:
- Each system's hostname, serial number, and WAN IP address appears in the Clustered Systems list.
- The identity of the system (self or peer) displays in the Type field.
- The Status is green for all virtual machines in the cluster.
- View the Cluster Status from the BASIC > Dashboard page, under Performance Statistics.
To add more units to the existing cluster, repeat Steps 1 to 5.a., and then do the following:
- From the ADVANCED > High Availability page of the Barracuda Web Application Firewall you are adding to the cluster, enter the WAN IP address of any system in the cluster in the Peer IP Address field and click Join Cluster. Verify the following:
- The configuration of the cluster automatically propagates to the newly added system.
- The new unit information propagates to all other units in the cluster.