

Overview
The learned structure of an application is called a profile of the website. Website profiles are made up of profiles for URLs and profiles for parameters of those URLs. A URL profile lists allowed fields like HTTP methods, names and types of each parameter, query strings, length-based restrictions, etc. A parameter profile defines the allowed format for each parameter, using either a negative or positive security model, and includes length restrictions. Website profiles can be defined manually or can be automatically generated using Adaptive Profiling or Exception Profiling.
Website profiles allow you to create specific rules to fine-tune the security settings of a service. They do not modify the default security policy settings, but fine-tune security settings specific to a service. For a service, a website profile is applied if Use Profile is set to Yes. In other words, the request must be validated against configured URL and parameter profiles of that service. Initially, no URL or parameter profiles exist for a service. To use website profiles, the administrator must manually create them for the service, or create them automatically by enabling learning.
Enable Learning
- Go to the WEBSITES > Website Profiles page.
- In the Service section, select the service you want to learn from the Website list.
- Click Start Learning.
When Learning is enabled for a service, the default settings for the service to validate requests/responses include the following:
- Use Profile – Yes
- Strict Profile – Yes
- Mode – Learning
- Adaptive Profiling is enabled automatically for the service by setting Status to On in the WEBSITES > Adaptive Profiling page. For more information on adaptive profiling, see Configuring Adaptive Profiling.
Modify the Default Settings of a Service
To modify the default settings of a service, follow the steps below:
- From the WEBSITES > Website Profiles page, select the service whose settings you want to modify from the Website list.
- Click the Edit button. The Edit Website Profile window appears. Specify values for the following fields if required:
- Mode – Set to Learning when the application is in Learning mode. Change the mode if required.
- Learning – Learns the requests and responses for the selected service.
- Passive – Validates the requests against the URL profiles and parameter profiles settings, and logs request errors/violations on the BASIC > Web Firewall Logs page.
- Active – Validates the requests against the URL profiles and parameter profiles settings, blocks request violations, and logs the corresponding violations on the BASIC > Web Firewall Logs page.
- Allowed Domains – Enter the domain or IP address of the service whose requests/responses should be validated against the URL and parameter profiles. If you wish to allow multiple subdomains under a main domain, then Allowed Domain should be set as *maindomain. For example, "world.com" might have pages at "india.world.com," "america.world.com," and "japan.world.com." By default, if a web page on "india.world.com" is configured under Allowed Domains, only pages on "india.world.com" are allowed. If the user wants all subdomains in the "world.com" domain to be allowed, then specify "*world.com".
- Exclude URL Patterns – Enter the list of URL patterns to be excluded from the URL profile validations. These URLs are exempted from learning even if the Learning is On. Examples: *.html,*.htm,*.jpg, *.gif,*.css,*.js
- Include URL Patterns – Enter the list of URL patterns to be included in the URL profile validations even when listed in Exclude URL Patterns.
- Mode – Set to Learning when the application is in Learning mode. Change the mode if required.
- Click Save to save the settings.
URL Profiles
URL profiles can be created manually by the administrator, or automatically generated by enabling Learning for a service. URL profiles are validated against the requests for the service based on the Mode setting of the URL profile. To enable learning, see Steps to Enable Learning.
Manually Create a URL Profile
To manually create a URL profile, follow the steps below:
- Go to the WEBSITES > Website Profiles page.
- Select the desired service from the Website drop-down list.
- In the URL Profiles section, click Add URL. The Create URL Profile window appears. Specify values for the following fields:
- URL Profile Name – Enter a name for the URL profile.
- Status – Set to On if you want to enforce checks on requests/responses for the service using this profile.
- URL – Enter a URL to be compared to the URL in the request. The URL should start with a "/" and can have at most one " * " anywhere in the URL. The value of “/*” means all URLs in the service are matched against the URL in the request.
- Extended Match – Specify an expression, a combination of HTTP headers, and/or query string parameters that you want used to match the special attributes in the HTTP headers or query string parameters in the requests. Use '*' to denote "any request". That is, do not apply the Extended Match condition. For information on how to write extended match expression, see Extended Match Syntax Help.
To build an expression, click Edit and specify values for the following fields: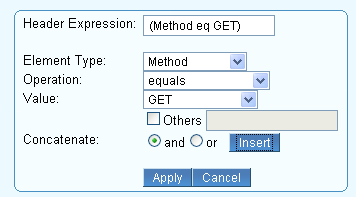
- Header Expression – Expression gets populated when the values for other fields are specified and inserted.
- Element Type – Select the element type to compare in the request.
- Operation – Select the operator for comparison of the element type in the request.
- Value – Enter the value of the element to be compared. Some element types have predefined values, e.g., Method, HTTP-Version, etc. In case the value is not listed in the predefined list, select the Others check box and specify the value.
- Concatenate – Use this if you wish to join another expression. and matches if both the expressions are true; or matches if either expression is true.
- Click Insert and then Apply to apply the expression. Click Cancel if you wish to cancel the expression.
- Extended Match Sequence – Enter a number to indicate the order in which the extended match rule will be evaluated in for requests.
- Mode – Set the mode for this URL profile.
- Learning – Starts learning the URL profile and corresponding parameter profile(s) if the service is in Learning mode.
- Passive – Validates the requests by comparing them to the URL profile and corresponding parameter profile(s) settings and logging request errors/violations on the BASIC > Web Firewall Logs page.
- Active – Validates the requests by comparing them to the URL profile and corresponding parameter profile(s) settings, blocking request violations and logging the corresponding violation on the BASIC > Web Firewall Logs page.
- Allow Query String – Set to Yes to allow parameters and its values along with the URL.
- Hidden Parameter Protection – Specify whether to protect hidden parameters in the forms and URLs. When the Hidden Parameter Protection is configured, the Barracuda WAF encrypts the parameter values inside a new entity that is injected into the outbound responses. On subsequent requests, the WAF decrypts the values and matches them against the plain-text values in the request to detect tampering.
- Forms – Protects the hidden parameters in the post body of forms.
- Forms and URLs – Protects the hidden parameters in the post body of forms and query string of the URLs.
- None – No protection to hidden parameters in forms and URLs.
- CSRF Prevention – Specify whether to prevent cross-site request forgery attack on the forms and URLs.
- Max Content Length – Enter the maximum content length to be allowed for POST request body.
- Max Parameter Name Length – Enter the maximum length of the parameter name. The allowed length is 1 to 1024 bytes. No value (empty) implies unlimited.
- Max Upload Files – Enter the maximum number of files that can be uploaded in one request. If the value is set to two (2), then the third (3) file upload is denied. The Passive mode logs every uploaded file that exceeds the max count.
- Blocked Attack Types – Select the attack types that needs to be matched in the requests/responses. Attack Types are specifications of malicious patterns. If the value of a parameter matches one of the specified attack types, an intrusion is detected and logged on the BASIC > Web Firewall Logs page.
Attack types are defined with groups of regular expression patterns. Attack types for SQL injection, cross-site scripting, and system command injection attacks are provided by default, and one or more of these can be enabled for matching against request parameters. - Custom Blocked Attack Types – Select the custom attack types that need to be matched in the requests/responses.
- Click Add.
- Click Edit next to the created URL profile to specify values for the following fields:
- Allowed Methods – Enter the methods to be allowed in the request. The Barracuda Web Application Firewall uses this to decide whether to allow or disallow the methods.
- Allowed Content Types – Enter the content types to be allowed for this URL profile.
- Referrers for the URL Profile – Enter the address (URI) of the resource from which the request URI was obtained. In case of Adaptive Profiling, the referrers are learned as the profile sources. This referrer is not same as the “Referrer” in CSRF protection. Note: This is used only for information purpose, and no security checks are enforced by the Barracuda Web Application Firewall.
- Exception Patterns – Enter the patterns to be allowed as exceptions even if part of a malicious pattern group. The configuration should be the exact pattern name as found on the ADVANCED > View Internal Patterns page, or as defined during the creation of a new group through the ADVANCED > Libraries page. The pattern name can also be found in a Web firewall log when a false positive occurs due to a potential exception pattern. For example, if the parameter value matched "sql-comments" regex pattern under "sql-injection medium" attacks on the ADVANCED > View Internal Patterns page, then adding "sql-comments" to this list will allow "sql-comments" in future.
- Click Save to save the above settings.
Parameter Profiles
Parameter profiles can also be created manually or automatically. Parameter profiles are compared to the requests for the service based on the mode setting of the corresponding URL profile.
Add a Parameter Profile
Perform the following steps to create a parameter profile:
- Go to WEBSITES > Website Profiles page.
- Select the desired Service from the Website drop-down list.
- In the URL Profiles section, select the desired URL profile where you want to add the parameter profile.
In the Parameter Profiles section, click Add Param. The Create Parameter Profile window appears. Specify values for the following fields:
- Parameter Profile Name – Enter a name for the parameter.
- Status – Set to On to validate the requests coming to the service using this parameter profile.
- Parameter – Enter the name of the parameter to be validated in requests/responses. The parameter names with the special characters like &pathinfo and &sessionid and wildcard (*) should be manually specified, they are not learned automatically.
- Type – Select the type of parameter to be validated in requests/responses. Note: If two or more parameters of different type have the same name, then parameters are considered as Input and bound to one of the standard parameter classes, and the value of the parameter Max Instances is updated. The types of parameters:
- Input – The parameter other than File Upload, Global Choice, Read Only, Session Choice, and Session Invariant is treated as Input.
- Read Only – All hidden parameters in the form and query parameters in the URL are learned as Read Only. If an exception occurs while learning, then the type is updated to Input. This type makes the parameter session specific.
- Session Choice – If the parameter from a response form and the drop-down list is different across different sessions or same session, it is treated as Session Choice.
- Global Choice – Input parameters like check boxes, radio buttons, and menu parameters in a form are treated as Global Choice.
- Session Invariant – Select this if the parameter value is the same across multiple requests from the same session. For example: session-id. This type of parameter is not learned automatically.
- File Upload – The parameter of the type file upload in forms is treated as File Upload.
- Values – Define a fixed set of strings to match against the parameter's value if the parameter type is Global Choice.
- Parameter Class – Select a parameter class to be compared to the parameters sent in the requests/responses.
- Custom Parameter Class – Select the custom parameter class to be compared to the parameters sent in the requests/responses. This is applicable only when Parameter Class is set to CUSTOM.
- Max Value Length– Set the maximum allowable length for the value of the parameter. Example: The parameter "param" set to 0, which means:
p1=v1¶m=&p2=v2 : allowed
p1=v1¶m=v&p2=v2 : not allowed
- Required – Set to Yes if the parameter must always be present in the request.
- Ignore – Set to Yes if the parameter must be ignored completely, that is, never validate the value of the parameter at all.
- Maximum Instances – Specify the maximum number of times the parameter should be allowed in the request/response.
Base64 Decode Parameter Value - Set toYes to apply base64 decoding to the parameter values. If the parameter value adheres to the data URI scheme, the base64 decoding is applied on the parameter value regardless of whether Base64 Decode Parameter Value is set to Yes or No. If not, the base64 decoding is applied to the parameter value only when Base64 Decode Parameter Value is set to Yes. Once the decoding is successful, other parameter checks are enforced as per the policy settings.
- Allowed File Upload Type – Select Extensions to allow the files uploaded with extensions specified in File Upload Extensions.
Select Mime Types to identify the content in the files before allowing to be uploaded with the mime types specified in File Upload Mime Types. - File Upload Extensions – Define the extensions to be allowed in file upload. ‘.' is a special extension that indicates no extension, and * is a wildcard that indicates any extension is allowed.
- File Upload Mime Types– Define the mime types that are to be allowed as uploaded files. Use a "." to indicate a file with unknown mime type, and use a * to indicate any kind of mime type.
- Click Add to save the above settings.
Understanding Request and Response Learning
The table below provides the list of elements that are learned through request and response learning.
| Profiler Type | Elements Learned During the Learning Phase |
|---|---|
| URL Profile | Allowed Query String, Allowed Methods, Allowed Content Types, Max Content Length, Max Parameters, Max Upload Files, Max Parameter Name Length, Referrers. |
| Parameter Profile | Type, Allowed Meta-Characters, Max Parameter Value Length, Required, Ignore, Max Instances, File Upload Extensions, Max Upload File Size. |
The initial values of these elements are taken from the applicable security policies displayed under Policy Overview on the SECURITY POLICIES > Policy Manager page.
For example, when a new URL profile is generated, the parameter Max Content Length is set to 32k if the service uses the default security policy. If the profiler receives a successful request with a content length of 35k, the new value of Max Content Length is set to 35k for the request URL.
Other security policy elements for the service specified for the website (e.g., Advanced Security elements, Allow/Deny rules, etc.) and those inherited from the associated security policy (e.g., cookie security, normalization, etc.) continue to apply during the learning phase. This maintains protection from application attacks even during the profile development phase. Whether attacks are blocked or just logged during this phase depends on the service’s mode setting.
The following URL and parameter profile configuration elements are not learned. They continue to be applied even during the learning phase.
| Profile Type | Elements Not Learned During the Learning Phase |
|---|---|
| URL Profile | Blocked Attack Types, Custom Blocked Attack Types |
| Parameter Profile | Blocked Attack Types, Custom Blocked Attack Types |
The following table describes different types for a parameter profile. Read Only, File Upload, Global Choice, and Input parameter types are automatically learned by the profiler. Session Choice and Session Invariant need to be manually specified.
| Parameter Type | FORM Attribute Used for | Description | Allowed Values |
|---|---|---|---|
| Read Only | type=hidden | All hidden FORM parameters are learned as Read Only. Known by the <type=hidden> attribute in the HTML response content, the value of the parameter is learned on a per-session basis. | When profile mode is Active: Allowed value for the parameter in a request is exactly equal to that learned from the response. When profile mode is Learning: If the value varies in requests during the learning stage, the type updates to Input. |
| File Upload | type=file | The parameter of type file upload in FORM is treated as File Upload type. | |
| Global Choice | type=checkbox|radio|submit | The input type parameters like check boxes, radio buttons, and menu parameters in a FORM are treated as Global Choice type. | The system constructs an aggregated list of values learned by observing the values in responses across sessions. |
| Session Choice | NA | Must be specified manually. Similar to Global Choice, but values are learned on a per-session basis. | The system constructs an allowed list of values learned by observing the values on a per-session basis. |
| Session Invariant | NA | Must be specified manually. If the parameter value should be constant across multiple requests from the same session, it can be set as Session Invariant type. For example: session-id. | The unique value learned for a parameter per session. |
| Input | Any parameter not of the above types is treated as Input type. | All values allowed by the regex for Comments Data Type element on ADVANCED > View Internal Patterns. |
Response Learning
If Response Learning is On for a URL space, the system inspects HTTP responses in that space and learns the following from it:
FORM parameters – Parameter profiles are created based on their FORM attribute type as described in the table above. The system will also learn the maximum length for the parameter if specified (using the “maxlen” attribute in the HTML). Note that these parameter profiles are created for the action URL specified in the FORM, and not for the request URL that generated this response.
Embedded URLs – The profiler parses all the hyperlinks in the response body and generates URL profiles for them. Note that this is only done for those hyperlinks that match one of the URL profile learn rules specified on WEBSITES > Adaptive Profiling. To add an adaptive profiling rule, refer Adding an Adaptive Profiling Rule .
Embedded URL query parameters – For the embedded URLs found above in the response content, the profiler also generates parameter profiles for the query parameters, if any. By default, these parameters are learned as Read Only parameters. If they differ in a subsequent request while the URL space is still being learned, their type changes to Input.
Request Learning
When the profiler sees an incoming GET request, it generates profiles for the URL and its query parameters (assuming they do not match any of the navigation parameters for the relevant URL space).
For a POST request, the profiler may have already learned the FORM and query parameters from a prior response. For example, client-side scripting may introduce additional parameters in the POST request for url1 that were not present in the url2 response. These are learned as Input type parameters. If the client-side scripting modifies a parameter learned as Read Only from an earlier response, the profiler will update the parameter type to Input when Request Learning is On for this URL and the profile is learning. When Request Learning is Off, and the profile is learning, the request is allowed, but the parameter type is not changed. When the profile is Active (learning is turned Off), the request is blocked.
Example:
The following example shows a request response scenario with the corresponding profiles generated by the profiler at each step.
1. Initial request for a.cgi containing two query parameters
Request: a.cgi?q1=abc&q2=def
| URL Profile | Parameter Profile |
|---|---|
| a.cgi | Query Params {q1, q2} |
2. Response for a.cgi containing an embedded FORM with action URL= b.cgi
Request: a.cgi?q1=abc&q2=defsdfsdf
<FORM action="b.cgi?q3=userinfo" method="post">
<INPUT type="text" id="firstname"><BR>
<INPUT type="text" id="lastname"><BR>
<INPUT type="checkbox" id="married" value=""> Married<BR>
<INPUT type="submit" value="Send"> <INPUT type="reset">
</FORM>
When the user fills in values for the fields and clicks submit, the values are sent to the URL defined in the action field. In this example, the URL is b.cgi?q3=userinfo
| URL Profile | Parameter Profile |
|---|---|
| a.cgi | Query Params: {q1, q2} |
| b.cgi | Form Params: {firstname, lastname, married} Query Params: {q3} |
3. User submits the FORM; Client-side injects additional parameters
Request: b.cgi?q3=userinfo
Client-side javascript: If Married, inject FORM param: spousename
| URL Profile | Parameter Profile |
|---|---|
| a.cgi | Query Params: {q1, q2} |
| b.cgi | Form Params: {firstname, lastname, married, spousename} Query Params: {q3} |
Viewing Newly Generated Profiles
The newly generated profiles from the Adaptive Profiler module are displayed in red color on the WEBSITES > Website Profiles page. To view, select the website and directory. The URL/parameter profiles are displayed in red as shown in the figure below.

One measure of the maturity of a security profile is the number of hits, or matching requests, that it has encountered. If Hits is small, the profile will reflect only that small number of requests or responses it has encountered and not reflect the spectrum of potential requests and responses.
Filter the list of profiles by selecting Profiles not reviewed or URLs with Params not reviewed. Keep track of viewed profiles with the Mark Read option from More Actions. The profile will be listed in black font the next time it is viewed. This way the administrator can track which learned profiles still need review.
Enforcing Learned Profiles
Once satisfied with generated profiles, select them and lock profiles using More Actions to begin their enforcement. The system now considers violations to these profiles as attacks, no longer learning from them. The Mode setting for these URLs determines how attacks are handled.
To assist in this transition, the system displays as Hits on WEBSITES > Website Profiles the number of successful requests matching the generated URL profiles after the last update. The number of hits to a profile is a good indicator of the profile maturity. The higher the number of hits, the more mature the profile is.
Using Use Profile and Strict Profile Checks
When configuring a website profile, set Use Profile to Yes to validate the incoming requests to that service against the URL Profiles and Parameter Profiles. To enforce strict profile validation, set Strict Profile Check to Yes. Strict Profile Check cannot be modified when Adaptive Profiling is On.The following table describes how a website profile functions with Use Profile and Strict Profile Check.
| Use Profile | Strict Profile Check | Behavior |
|---|---|---|
| Yes | Yes |
|
| Yes | No |
|
| No | Yes, No | The incoming requests to that service are validated against the global security policy (URL Protection and Parameter Protection). |
Using the Use Profile and Strict Profile Check, you can enforce the positive or negative security model. For administrators who want to enforce a strict rule of "deny unless allow", set Use Profile to Yes and Strict Profile Check to Yes. This setting ensures the requests with no matching profiles are dropped, thus enforcing a positive security model.
For administrators who prefer a negative security model, set Use Profile to Yes and Strict Profile Check to No. This setting ensures the requests that do not match any profile use the service's global security policy. If there are any exceptions, they can be handled by adding relevant profiles.
Recommended Way to Use the Learning Feature
- From the WEBSITES > Website Profiles page, select the Website and then click Start Learning.
- Either manually browse through the application (recommended), or crawl the application.
- Let Adaptive Profiling populate the URL and parameter profiles automatically.
- View the created profiles to review them. If satisfactory, click Stop Learning to stop the profiling for the service. Select a subset of the profiles and enforce them by selecting Lock Profiles when desired.
- The profile mode is initially in Passive mode. Look for any false positives using BASIC > Web Firewall Logs. Examine the Hits statistic on WEBSITES > Website Profiles, under URL Profiles. If satisfactory, select Lock all Profiles from the More Actions drop-down list to turn all profiles to Active.
- Enabling Exception Profiling fills in missing URL spaces not sufficiently profiled during Adaptive Profiling.
- If possible, manually combine the learned profiles to optimize the configuration.
- If the backend application, or a portion of it, has changed, revise the profiles accordingly using Resume Learning from More Actions for the URL.