

This guide will walk you through the steps to load balance traffic across multiple instances of the Barracuda Web Application Firewall deployed in the new Microsoft Azure Management Portal.
Configuring a Load-Balanced Set Using the Azure Resource Manager Model
Follow the steps below to configure a load-balanced set using the Resource Manager model in the new Microsoft Azure Management Portal:
- Step 1. Create a Resource Group
- Step 2. Create a Load Balancer for the Resource Group
- Step 3. Create an Availability Set for the Resource Group
- Step 4. Deploy and Provision the Barracuda Web Application Firewall VM(s) Using the Resource Manager
- Step 5. Configure the Barracuda Web Application Firewall VMs and Add them to the Cluster Setup
- Step 6. Add the Clustered Barracuda Web Application Firewall Instances to the Load Balance Set
Step 1. Create a Resource Group
- Log into the Microsoft Azure Management Portal.
- Click Resource groups on the left panel.
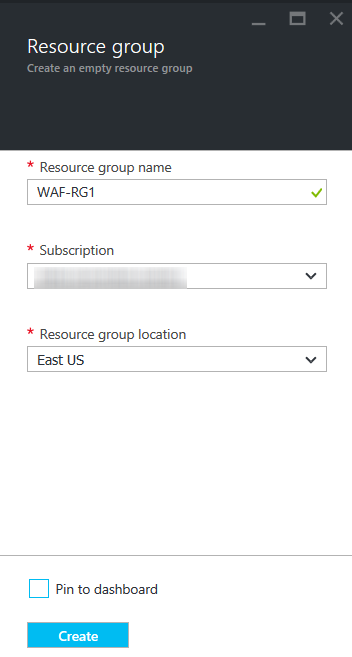
- In the Resource groups page, click Add and specify values for the following:
- Resource group name: Enter a name for the resource group.
- Subscription: Select the subscription from the drop-down list.
- Resource group location: Select the location for the resource group.
- Click Create.
- The created resource group gets displayed in the Resource groups list.

Step 2. Create a Load Balancer for the Resource Group
- In the Microsoft Azure Management Portal, click Resource groups on the left panel.
- In the Resource group list, locate and click on the resource group created in Step 1. Create a Resource Group.
- Click Add in the Resource group page, and enter
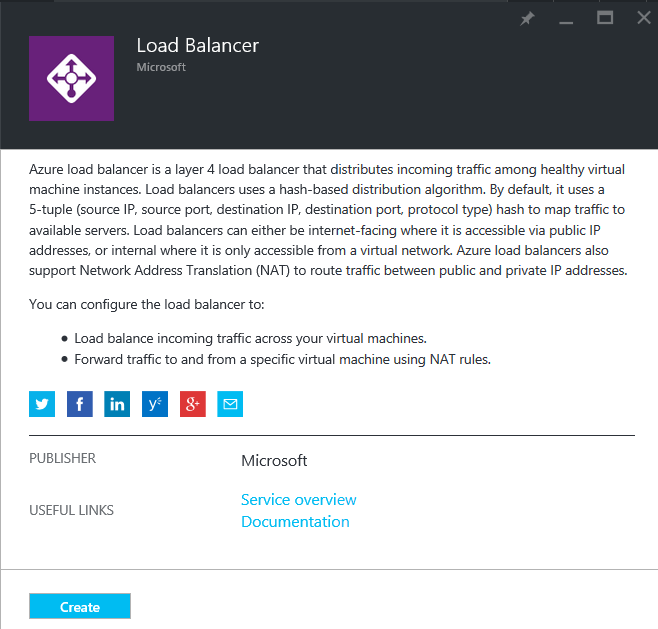
Load Balancerin the search field. - In the search results, select the Microsoft Load Balancer.
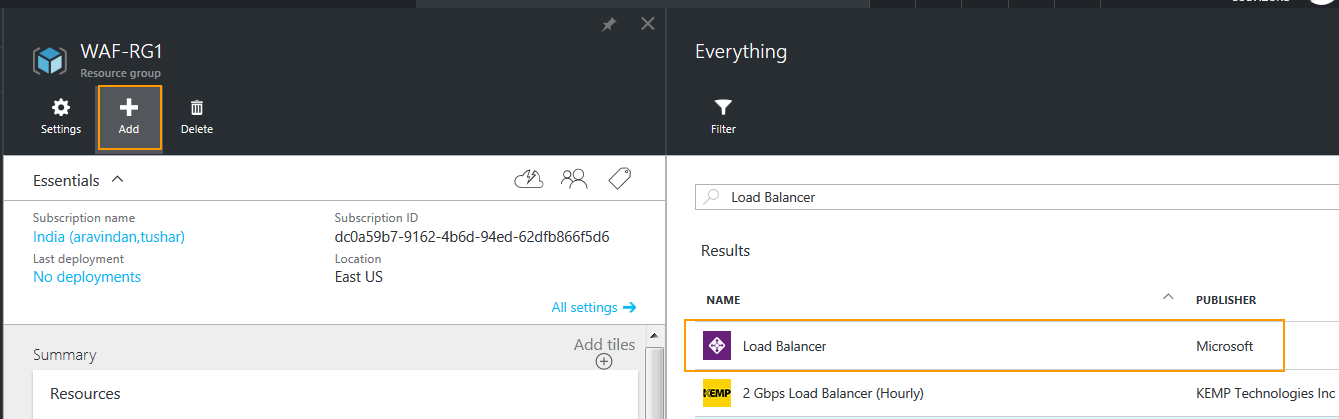
- Click Create.
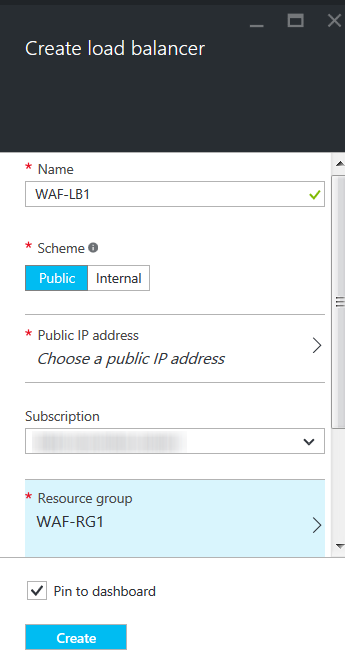
- On the Create load balancer page, specify values for the following:
- Name: Enter a name for the load balancer.
- Scheme: Select Public.
- Public IP address: Assign a new public IP address, or select a public IP address from the existing list.
- Subscription: Select the subscription where you want to deploy the load balancer.
- Resource group: Select the resource group created in Step 1. Create a Resource Group.
- Location: Select a location for the load balancer. Note: Ensure that the location of the resource group and the load balancer is same.
- Click Create.
Step 3. Create an Availability Set for the Resource Group
- In the Microsoft Azure Management Portal, click Resource groups on the left panel.
- In the Resource group list, locate and click on the resource group created in Step 1. Create a Resource Group from the existing Resource group list.
- Click Add in the Resource group page, and enter
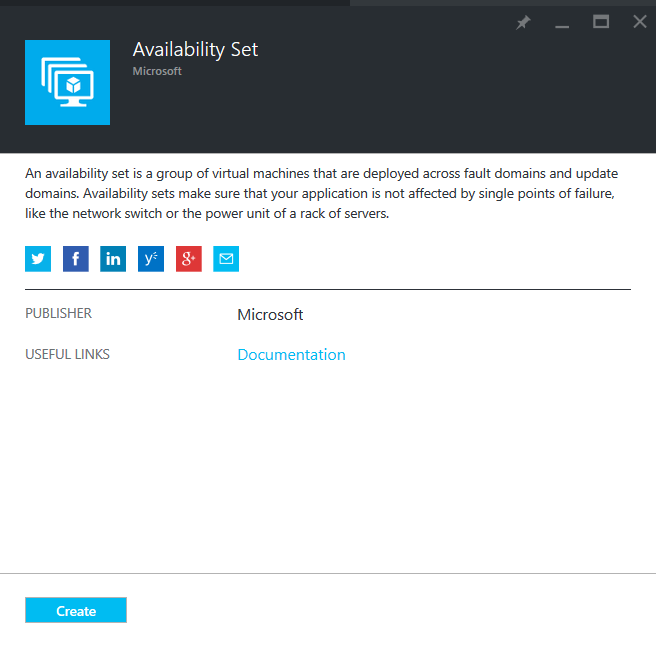
Availability Setin the search field. - In the search results, select the Microsoft Availability Set.
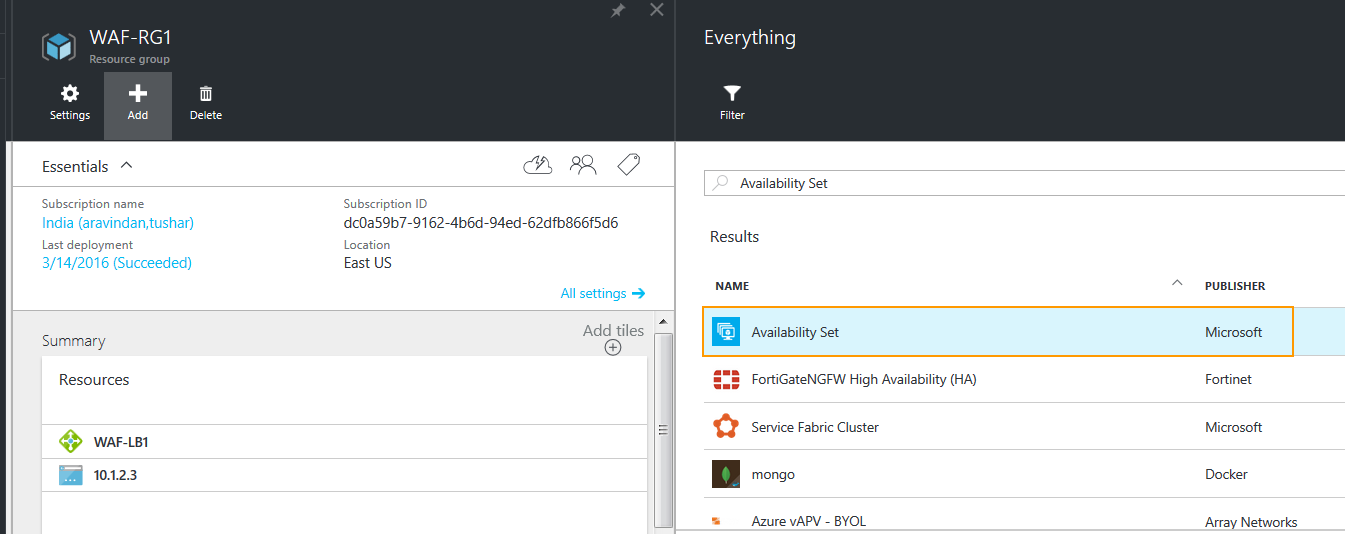
- Click Create.
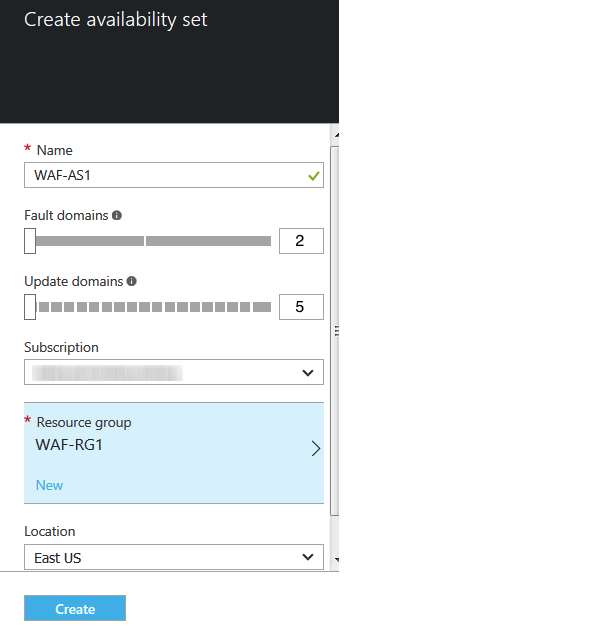
- In the Create availability set page, specify values for the following:
- Name: Enter a name for the availability set.
- Fault domains: Use the default value.
Update domains: Use the default value.
- Subscription: Select the subscription where you want to deploy the availability set.
- Resource group: Select the resource group created in Step 1. Create a Resource Group from the existing Resource group list.
- Location: Select a location for the availability set. Note: Ensure that the location of the resource group and the availability set is same.
- Click Create.
Step 4. Deploy and Provision the Barracuda Web Application Firewall VM(s) Using the Resource Manager
To load balance the traffic between the Barracuda Web Application Firewall virtual machines (VMs), deploy and provision the Barracuda Web Application Firewall instances in the resource group created in Step 1. Create a Resource Group (which includes load balancer and availability set created in Step 2. Create a Load Balancer for the Resource Group and Step 3. Create an Availability Set for the Resource Group respectively). Perform the following steps to deploy and provision the Barracuda Web Application Firewall VMs:
- In the Microsoft Azure Management Portal, click Resource groups on the left panel.
- In the Resource group list, locate and click on the resource group created in Step 1. Create a Resource Group.
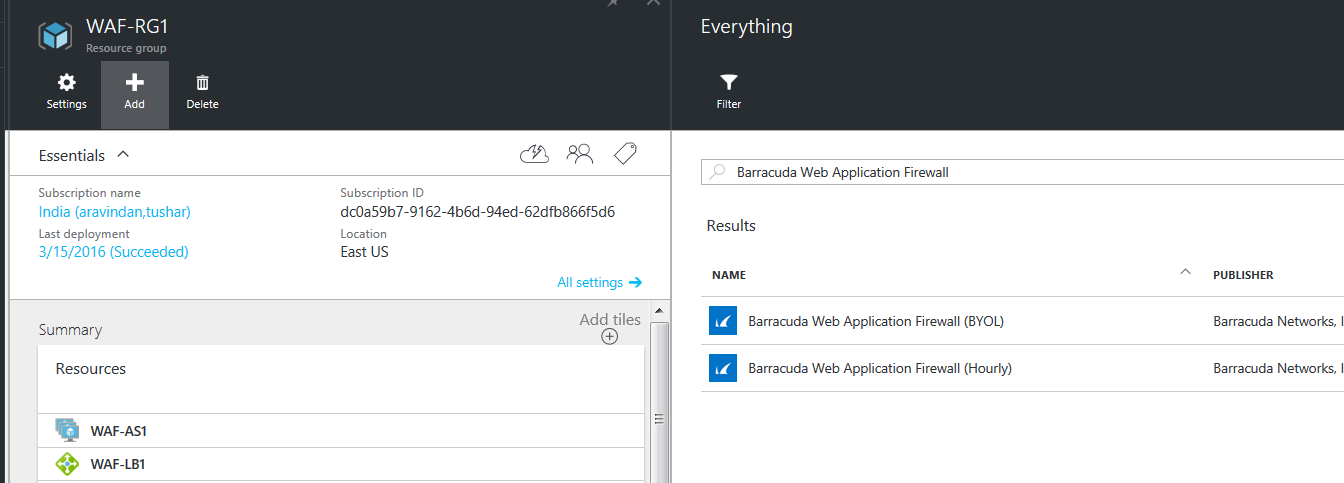
- Click Add in the Resource group page, and enter
Barracuda Web Application Firewall for Azurein the search field.
- In the search results, select Barracuda Web Application Firewall for Azure (BYOL or Hourly as per your requirement).
- Follow the steps mentioned in the Deploying and Provisioning the Barracuda Web Application Firewall Using Resource Manager in the New Microsoft Azure Portal article to deploy the Barracuda Web Application Firewall VM. When deploying the Barracuda Web Application Firewall VM, ensure that you do the following:
- Select the resource group created in Step 1. Create a Resource Group from the existing resource group list.
- Select the same location as that of the resource group created in Step 1. Create a Resource Group.
- Select the availability set created in Step 3. Add an Availability Set to the Resource Group from the existing Availability set list.
- Repeat Step 5 to deploy multiple Barracuda Web Application Firewall VMs into the same load balance set.
If you have deployed the Barracuda Web Application Firewall VM(s) with the “Bring Your Own License (BYOL)” option, license the VM(s) by following the steps mentioned under "Licensing the Barracuda Web Application Firewall on Microsoft Azure" in the Barracuda Web Application Firewall Quick Start Guide – Microsoft Azure article.
If the Barracuda Web Application Firewall VM(s) is deployed with the “Hourly” option, the VM(s) is licensed automatically.
Step 5. Configure the Barracuda Web Application Firewall VMs and Add Them to the Cluster Setup
- Log into the Barracuda Web Application Firewall web interface using the public IP address of the VM with port 8000 (for HTTP), or using only the public IP address (for HTTPS).
- Verify the configuration on the BASIC > IP Configuration page, and change the system password on the BASIC > Administration page. For more information, see the "Verify Configuration and Change the Password" section in the Barracuda Web Application Firewall Quick Start Guide - Microsoft Azure.
- Perform the cluster by following the steps mentioned under "Step 2. Set Up a High Availability Environment with the Barracuda Web Application Firewall" in the Configuring a Load-Balanced Set Using the Classic Model section.
- Repeat Step 3 to add the remaining Barracuda Web Application Firewall VMs into the cluster setup.
Step 6 - Add the Clustered Barracuda Web Application Firewall Instances to the Load Balance Set
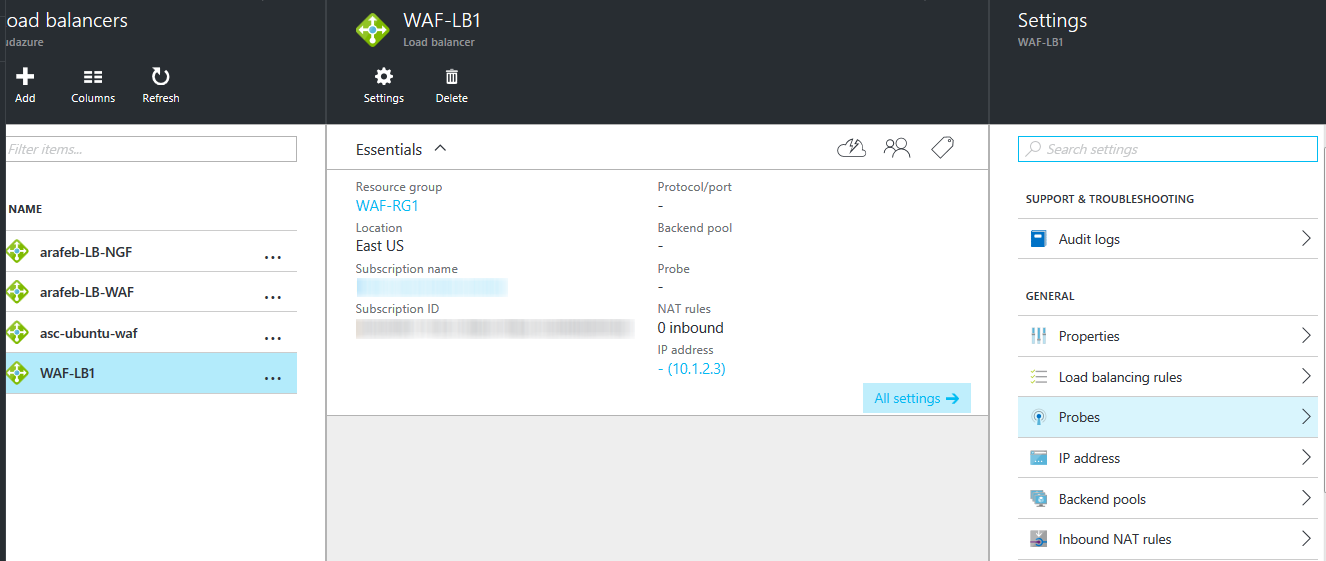
- In the Microsoft Azure Management Portal, click Browse at the bottom of the screen on the left panel and select Load Balancers.
- On the Load balancers page, select the load balancer created in Step 2. Add a Load Balancer to the Resource Group.
- On the Settings page, select Probes.
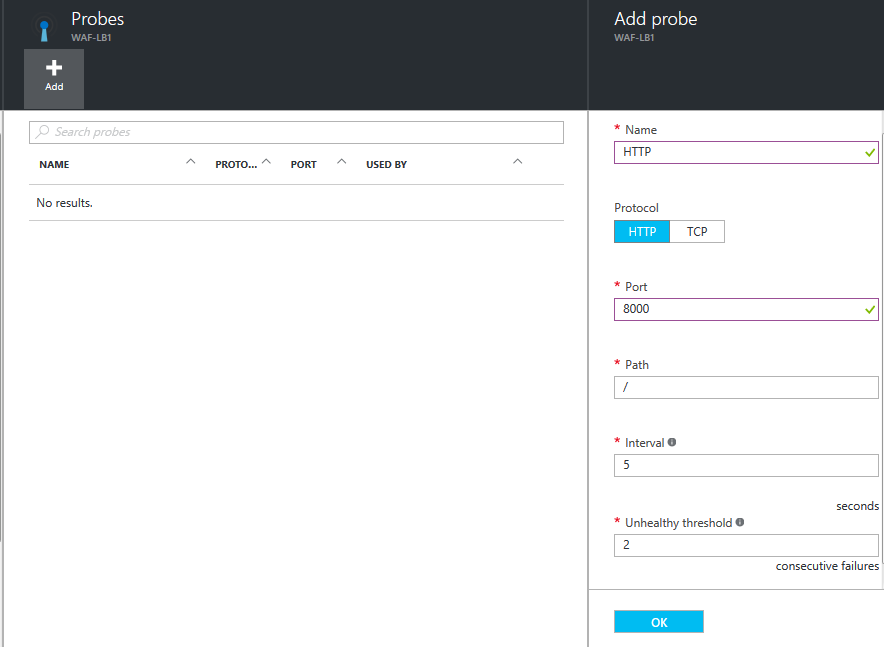
- On the Probes page, click Add and specify values for the following in the Add probe page:
- Name: Enter a name for the probe.
- Protocol: Select HTTP.
- Port: Enter 8000.
- Interval: Enter the interval time (in seconds) between probes sent by the Microsoft Azure to the Barracuda Web Application Firewall virtual machine to determine the health status. Note: It is recommended to keep the default values.
- Unhealthy threshold: Enter the number of probe failures that are allowed before marking the virtual machine as unhealthy. Note: It is recommended to keep the default values.
- Click OK.
- On the Settings page, click Backend pools.
- On the Backend address pools page, click Add.
- On the Add backend pool page:
- Name: Enter a name for the backend pool.
- Virtual machines: Click Add a virtual machine.
- On the Choose virtual machines page:
- Click Availability set and select the availability set created in Step 3. Create an Availability Set for the Resource Group.
- Click Virtual machines, select the Barracuda Web Application Firewall VMs you added in Step 5. Configure the Barracuda Web Application Firewall VMs and Add them to the Cluster Setup on the Choose virtual machines page, and click Select.
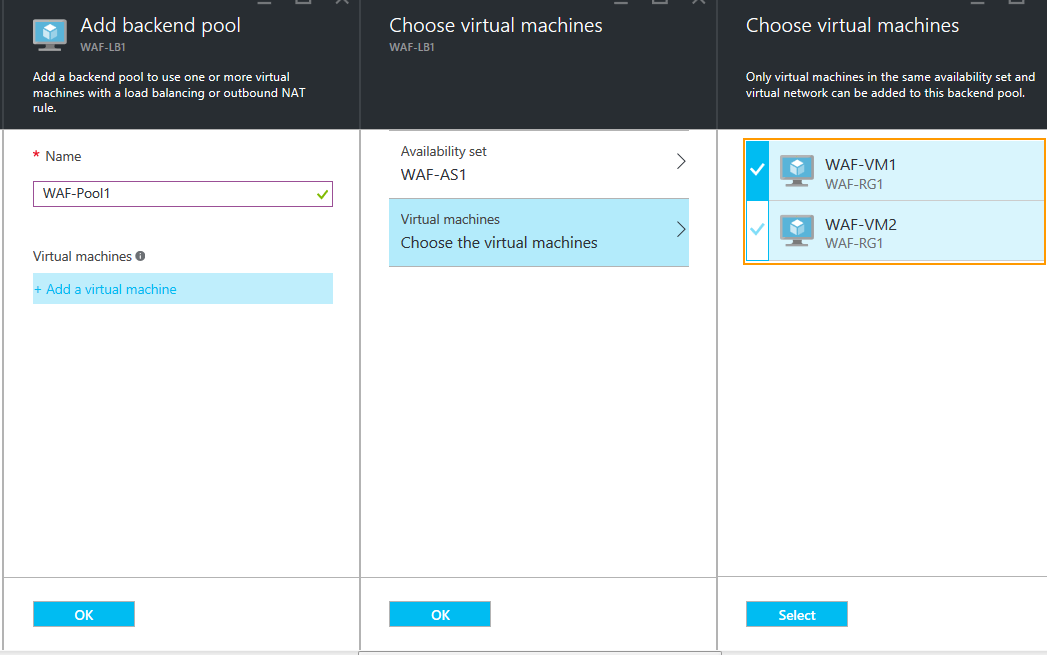
- Click OK on the Choose virtual machines page, and on the Add backend pool page.
- On the Settings page, click Load balancing rules.
- On the Load balancing rules page, click Add and specify values for the following in the Add load balancing rule page:
- Name: Enter a name for the load balancing rule.
- Protocol: Select TCP.
- Port: Enter the port on which you want to receive the traffic on the Load Balancer to load balance the traffic between the Barracuda Web Application Firewall.
- Backend port: Enter the port on the Barracuda Web Application Firewall to which you want to distribute the traffic.
- Backend pool: Select the backend pool created in Step 7 in the Step 6. Add the Clustered Barracuda Web Application Firewall Instances to the Load Balance Set section.
- Probe: Select the probe created in Step 4 in the Step 6. Add the Clustered Barracuda Web Application Firewall Instances to the Load Balance Set section.
- Session persistence: Select the persistence as per your requirement.
- Idle timeout (minutes): Keep the default value.
- Floating IP (direct server return): Select Disabled.
- Click OK.
Now, any requests coming to the load balancer public IP address/DNS configured in Step 6.c in the Step 2. Create a Load Balancer for the Resource Group section will be distributed between the specified Barracuda Web Application Firewalls.
Configuring a Load-Balanced Set Using the Classic Model
Follow the steps below to configure a load-balanced set using the Classic model in the new Microsoft Azure Management Portal:
- Step 1. Deploy the Barracuda Web Application Firewall Instances in Microsoft Azure
- Step 2. Set Up a High Availability Environment With the Barracuda Web Application Firewall
- Step 3. Set Up Load Balancing on the First Barracuda Web Application Firewall Instance
- Step 4. Add Other Barracuda Web Application Firewall Instances to the Load-Balanced Set
Step 1. Deploy the Barracuda Web Application Firewall Instances in Microsoft Azure
- Follow the steps in Deploying and Provisioning the Barracuda Web Application Firewall in the New Microsoft Azure Management Portal . To license and configure your virtual machine, continue with Barracuda Web Application Firewall Quick Start Guide - Microsoft Azure. In these instructions, the newly configured virtual machine is called Barracuda-WAF1.
- Verify that Barracuda-WAF1 is accessible through port 8000 (for HTTP) and port 8443 (for HTTPS).
- Add new ports for HTTP and HTTPS to Barracuda-WAF1 in ENDPOINTS (for example, port 8001 for HTTP and port 8444 for HTTPS).
- In the web interface of Barracuda-WAF1, do the following:
- Enter the HTTP port number you configured in Step 3 into Web Interface HTTP Port under Web Interface Settings on the BASIC > Administration page.
- Enter the HTTPS port number you configured in Step 3 into Web Interface HTTPS/SSL Port on the ADVANCED > Secure Administration page.
- Verify that you can access Barracuda-WAF1 using the HTTP and HTTPS ports specified in Step 4a. and 4b. .
- In Microsoft Azure, delete port 8000 and port 8443 from the listed ENDPOINTS for Barracuda-WAF1.
To deploy another Barracuda Web Application Firewall (called Barracuda-WAF2) in Microsoft Azure, follow the instructions in the Deploying and Provisioning the Barracuda Web Application Firewall in the New Microsoft Azure Management Portal article.
- Continue with Barracuda Web Application Firewall Quick Start Guide - Microsoft Azure to license and configure your virtual machine.
- By default, the Barracuda-WAF2 is configured with port 8000 (for HTTP) and port 8443 (for HTTPS).
Now, Barracuda-WAF1 is accessible through port 8001 for HTTP and port 8444 for HTTPS, and Barracuda-WAF2 is accessible through port 8000 for HTTP and port 8443 for HTTPS.
Step 2. Set Up a High Availability Environment With the Barracuda Web Application Firewall
Follow these steps to cluster your Barracuda Web Application Firewall virtual machines in Microsoft Azure:
- Install each system and ensure that each Barracuda Web Application Firewall is running the same firmware version. Each Barracuda Web Application Firewall in a cluster must have the same model number and firmware version.
- Make a backup of each Barracuda Web Application Firewall configuration.
- No processes should be running on any virtual machine when you link them together. To be sure, go to the ADVANCED > Task Manager page of each Barracuda Web Application Firewall and verify that no processes are running.
- From the ADVANCED > High Availability page of Barracuda-WAF1, enter a Cluster Shared Secret password, and click Save.
- From the ADVANCED > High Availability page of Barracuda-WAF2, do the following:
- Enter the same Cluster Shared Secret password, and click Save. Both units in a cluster must have the same Cluster Shared Secret to communicate with each other.
- In the Clustered Systems section, enter the WAN IP address of Barracuda-WAF1, and click Join Cluster. Make sure that the join cluster task is not cancelled when the join is in progress.
- On each Barracuda Web Application Firewall, refresh the ADVANCED > High Availability page, and verify the following:
- Each system's Hostname, serial number and WAN IP address appears in the Clustered Systems list.
- The identity of the system (Self or Peer) displays in the Type field.
- The Status is green for all virtual machines in the cluster.
- View the Cluster Status from the BASIC > Dashboard page, under Performance Statistics.
To add more units to the existing cluster, repeat Steps 1 to 5.a. and then do the following:
- From the ADVANCED > High Availability page of the Barracuda Web Application Firewall you are adding to the cluster, enter the WAN IP address of any system in the cluster in the Peer IP Address field and click Join Cluster. Verify that the following occurs:
- The configuration of the cluster automatically propagates to the newly added system.
- The new unit information propagates to all other units in the cluster.
Step 3. Set Up Load Balancing on the First Barracuda Web Application Firewall Instance
- Log into the Microsoft Azure Management Portal.
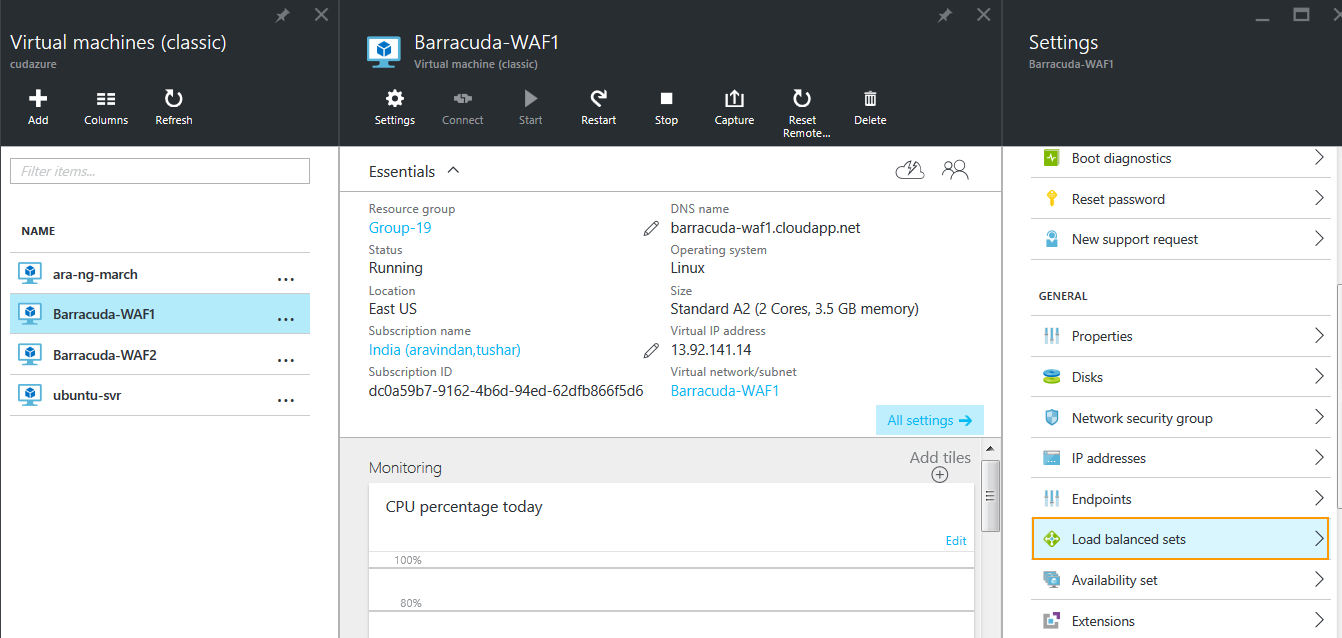
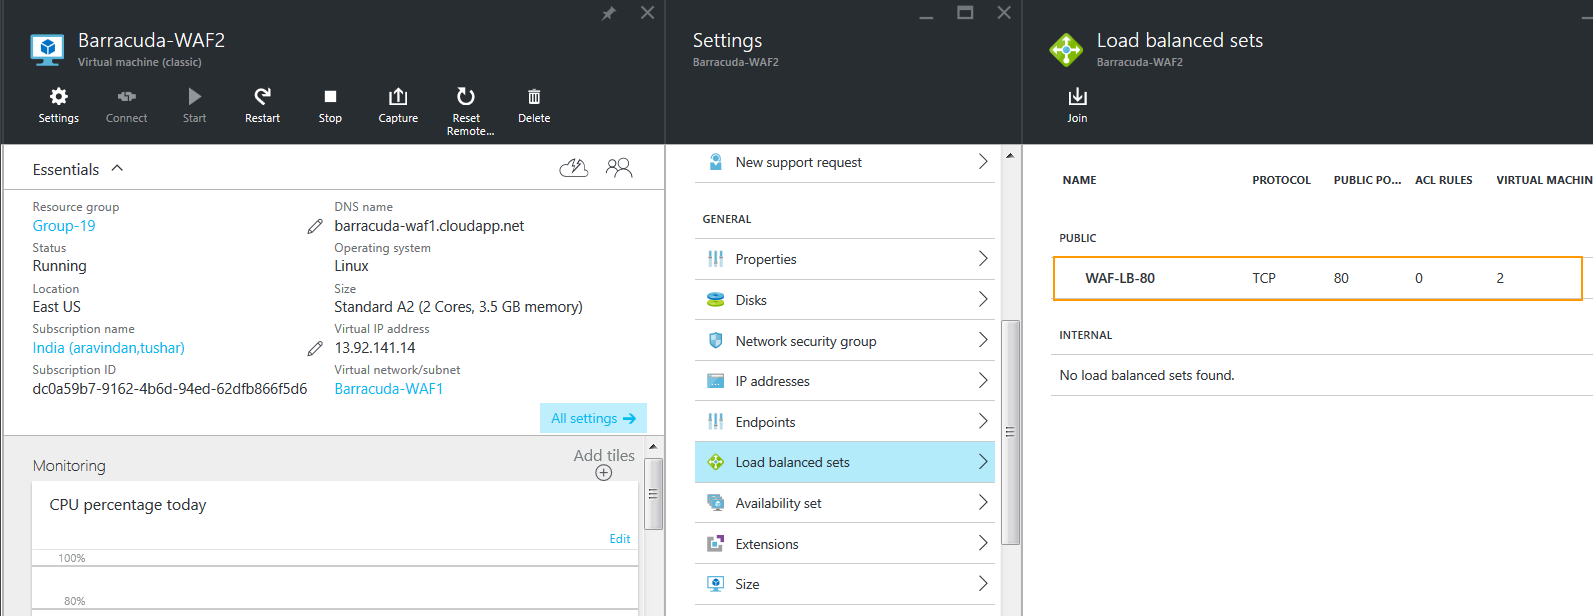
- On the Microsoft Azure Home page, select Virtual machines (classic) on the left panel.

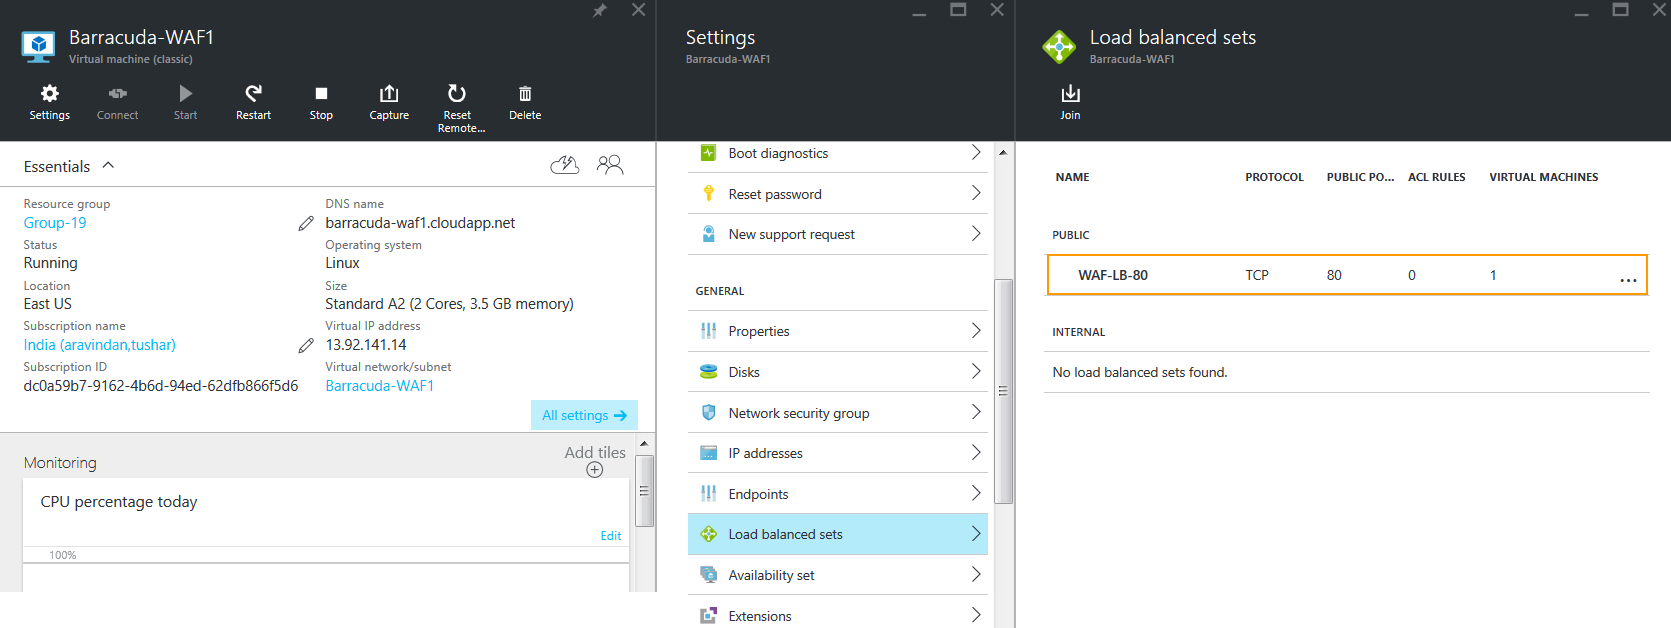
- On the Virtual machines (classic) page, select Barracuda-WAF1.
- In the Essentials section, click All Settings, and select Load balanced sets.
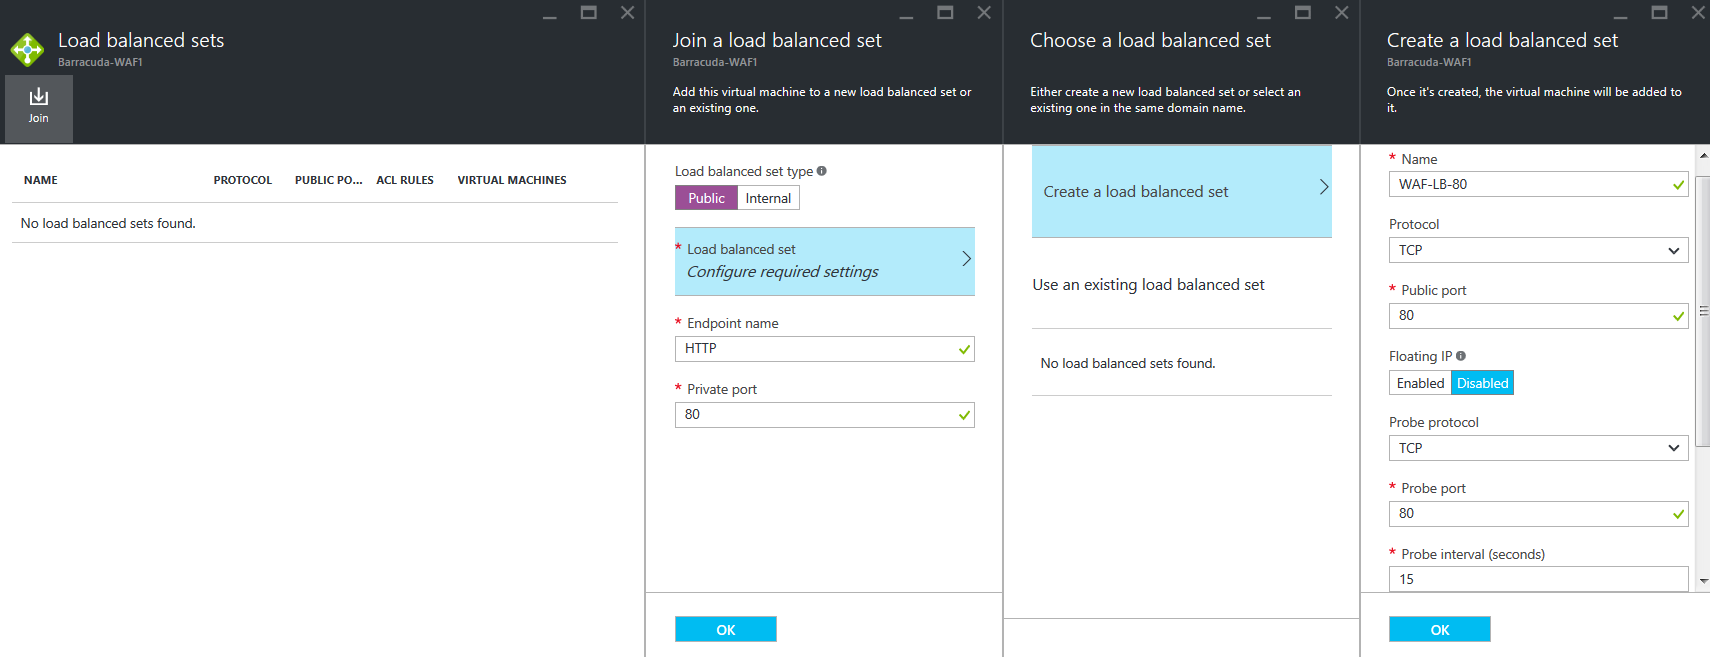
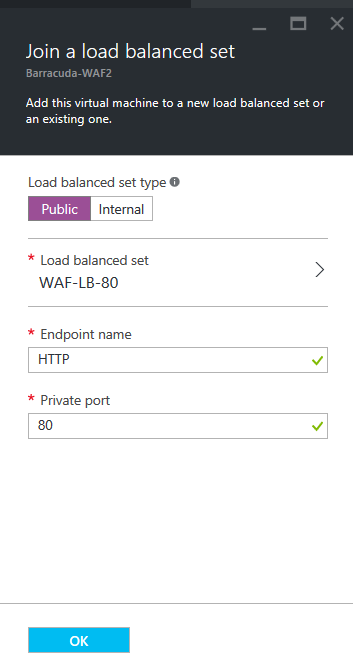
- On the Load balanced sets page, click Join and specify values for the following fields in the Join a load balanced set page:
- Set the Load balanced set type to Public
- Endpoint Name: Enter a name for the endpoint. Example: HTTP
- Private Port: Enter the internal port that should listen to traffic on the endpoint. Example: 80.
- Click Load balanced set Configure required settings, and select Create a load balanced set.
- On the Create a load balanced set page, specify values for the following fields:
- Name: Enter a name for the load-balanced set. Example: WAF-LB-80
- Protocol: Select TCP from the list.
- Public Port: Enter the port number of the service you are load balancing. Example: Port 80 for HTTP traffic.
- Set Floating IP to Disabled.
- Select the Protocol to be used for probing, enter values for Port, Interval (seconds) and Number of retries as required, and click OK.
- Now, click OK under Join a load balanced set. This will create the load balanced set and join it to Barracuda-WAF1.
- Click OK to set up the load-balanced set.
- Repeat the process to add more ports to the load-balanced set.
Step 4. Add Other Barracuda Web Application Firewall Instances to the Load-Balanced Set
After you create the load-balanced set for Barracuda-WAF1, add other Barracuda Web Application Firewall virtual machines to the set. Example: Barracuda-WAF2
- Log into the Microsoft Azure Management Portal.
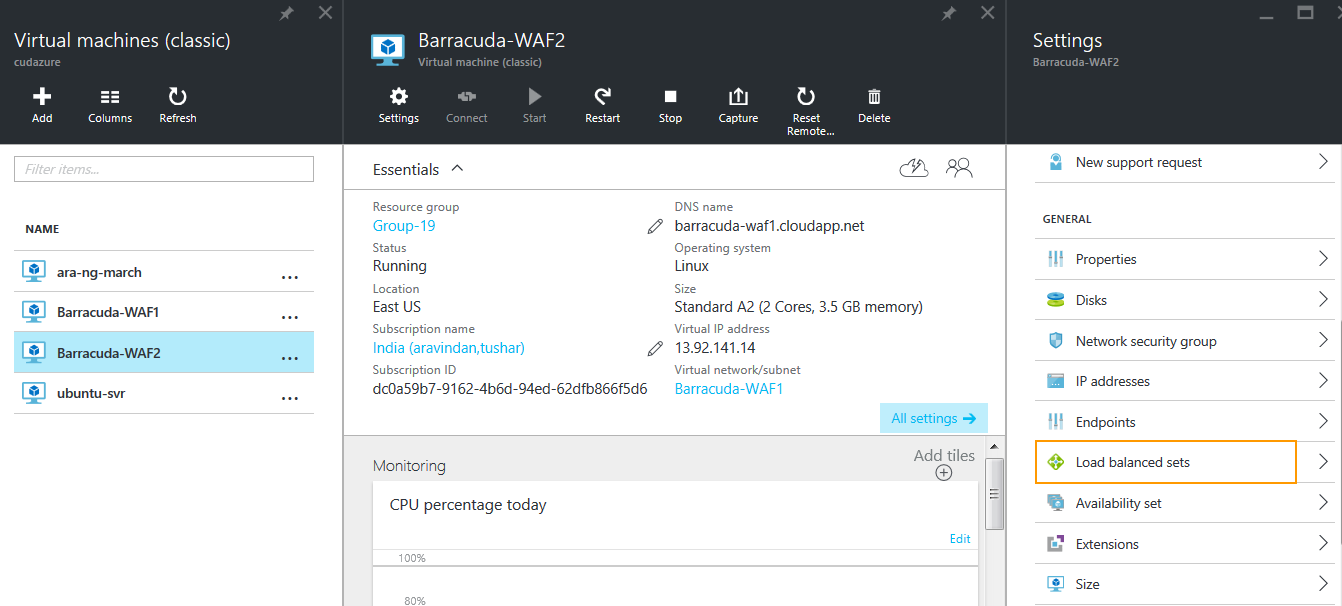
- On the Microsoft Azure Home page, select Virtual machines (classic) on the left panel.
- On the Virtual machines (classic) page, select Barracuda-WAF2.
- In the Essentials section, click All Settings, and select Load balanced sets.
- On the Load balanced sets page, click Join and specify values for the following fields in the Join a load balanced set page:
- Set the Load balanced set type to Public.
- Click Load balanced set Configure required settings.
- On the Choose a load balanced set page, select the load-balanced set you created in Step 6 under Step 3. Set Up Load Balancing on the First Barracuda Web Application Firewall Instance.
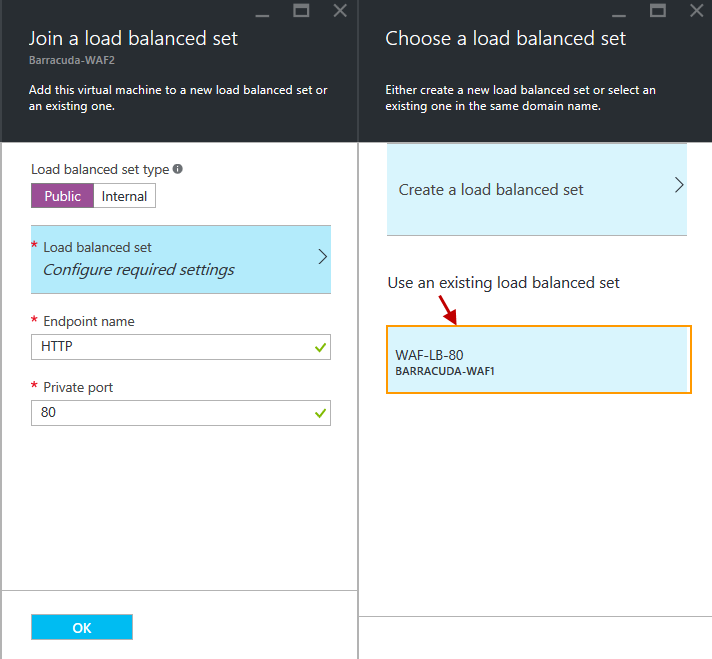
- On the Join a load balanced set page, you will see the load-balanced set associated with the Barracuda-WAF2 instance.
- Click OK to add the Barracuda-WAF2 instance to the load-balanced set.
- Repeat the process to add more Barracuda Web Application Firewall virtual machines to the load-balanced set.