

You can deploy the Barracuda Web Application Firewall instance(s) with Single NIC and Multi IP or Multi NIC and Multi IP on Microsoft Azure using the Azure Resource Manager (ARM) template. To deploy the Barracuda Web Application Firewall instance with multiple NICs, see Configuring the Barracuda Web Application Firewall with Multiple NICs.
This article provides information on how to configure services with multiple IP addresses in the Barracuda Web Application Firewall.
Perform the following steps to enable and use multiple IP feature in the Barracuda Web Application Firewall:
- Enable Multi IP and Allow Barracuda Web Application Firewall to Authenticate to Microsoft Azure
- Create the Service(s) Using the Multi IP Addresses
Enable Multi IP and Allow Barracuda Web Application Firewall to Authenticate to Microsoft Azure
After deploying the Barracuda Web Application Firewall instance with single NIC or multiple NICs, continue with Step 2. Licensing the Barracuda Web Application Firewall on Microsoft Azure till Step 4. Update the Firmware in the Barracuda Web Application Firewall Quick Start Guide - Microsoft Azure article.
To enable multiple IP feature on the Barracuda Web Application Firewall, perform the following steps:
- Log into the Barracuda Web Application Firewall web interface.
- Go to the BASIC > Azure Configuration page.
- In the Multi IP Configuration section, set Enable Multi IP Configuration to Yes.
- In the Azure Configuration section, specify values for the following:
- Subscription ID: Enter the ID of the Microsoft Azure subscription under which your Barracuda Web Application Firewall is deployed.
- Resource Group: Enter the resource group under which your Barracuda Web Application Firewall instance is deployed.
Authentication Method: Select the authentication method to authenticate to Azure Active Directory (AAD).
- AD UserPassword - Provide the user ID and password to authenticate to Azure Active Directory.
- User ID: Enter the user name.
- Password: Enter the password associated with the user.
- Application ID: Enter the ID of the application in the Azure Active Directory.
- Service Principal - Provide the service principal details to authenticate to the Azure Active Directory application. See the "Creating Service Principal Credentials" section.
- Authentication Key: The authentication key generated during the creation of application.
- Application ID: The ID of the application in Azure Active Directory.
- Tenant ID: The ID of the Active Directory tenant.
- Azure Managed Identity: Provide the client ID to authenticate to the Azure Active Directory application.
Client ID: The client ID for the user-managed identity created on Azure Cloud. Note that when you are using 2-factor authentication, it is recommended to use the Service Principal/Azure Managed Identity authentication method. For more information about Managed Identities, see Manage user-assigned managed identities in the Microsoft Azure Documentation.
- AD UserPassword - Provide the user ID and password to authenticate to Azure Active Directory.
- Click Test Configuration to test the configuration.
- Click Save.
Creating Service Principal Credentials
You can create service principal credentials either through the Azure portal or by using the helper software.
- To create service principal credentials through the Azure portal, refer to Use portal to create an Azure Active Directory application and service principal that can access resources in the Microsoft Azure Documentation.
- To generate service principal credentials using the helper software, refer to the azure-credentials article.
Create the Service(s) Using the Multiple IP Addresses
After enabling Multi IP in the BASIC > Azure Configuration page, you can create services with different IP addresses. When Multi IP Enable is set to Yes, you can create a service by:
- Using an existing service IP address with a different port number.
- Using the IP address that belongs to the configured subnet on Microsoft Azure.
- Using the IP address that is already configured on the Microsoft Azure interface.
- Allowing Microsoft Azure to allocate a new IP address.
For detailed instructions on configuring a service, go to the BASIC > Services page and click Help.
Below is the example to create an HTTP service:
- Go to the BASIC > Services page.
- In the Add New Service section, specify values for the following:
- Service Name - Enter a name for the service.
- Type - Select HTTP. For more information on service types, see Services.
- Virtual IP Address - Assign the IP address to the service either by using the IP address that belongs to the configured subnet on Microsoft Azure, or allow Microsoft Azure to allocate a new IP address.
To manually enter the IP address, select Enter IP Address and specify the IP address in the text field.
To allow Microsoft Azure to allocate a new IP address, select Allocate New IP.
Also, you can create a new service using the existing service IP address with a different port.
- Port - Enter the port number on which the web server responds.
- Real Servers - Enter the IP address of the server that hosts the service. This is the back-end server that is protected by the Barracuda Web Application Firewall.
- Service Groups – Select the group under which the service needs to be added.
- Click Add.
How Multi IP Address Works in Stand-Alone System
If a service is created using an IP address other than the existing service IP address, the private IP address gets added automatically under the WAN interface of the instance on the Microsoft Azure portal. The private IP address should be assigned with a public IP address for the service to be accessible from the external network (internet). For example, if service_1 (10.83.1.5) and service_2 (10.83.1.6) are created using port 80, the IP addresses should be assigned or mapped to the public IP address on Microsoft Azure. In this example, service_1 (10.83.1.5) is mapped with the public IP: 54.67.1.32 and service_2 (10.83.1.6) is mapped with the public IP: 63.56.14.5.
Now, the users can access both the services (service_1 and service_2) using the same port 80 via two different public IP address. Also, these public IP addresses can associated with the Domain Name Server (DNS) so that the applications can be accessed using the DNS names. For example, if 54.67.1.32 is mapped to www.abc.com and 63.56.14.5 is resolved to www.xyz.com, the applications can be accessed using the DNS names (abc.com and xyz.com respectively).
How Multi IP Address Works in Clustered Systems
If a service is created using the IP address other than the existing service IP address, the private IP address gets added automatically under the WAN interface of the instance on the Microsoft Azure portal. The private IP address should be assigned with a public IP address for the service to be accessible from the external network (internet).
If the Barracuda Web Application Firewall instances are in cluster, the following should be manually configured in the Load Balancer to which the instances are associated with:
- Frontend IP configuration
- Backend pools
- Health probes
- Load balancing rules
Frontend IP configuration
Frontend IP address is the public address assigned to the private IP address of a service. The public IP address should be configured in Frontend IP configuration of the Load Balancer, so that the requests from the external network (internet) are forwarded to the service.
Backend pools
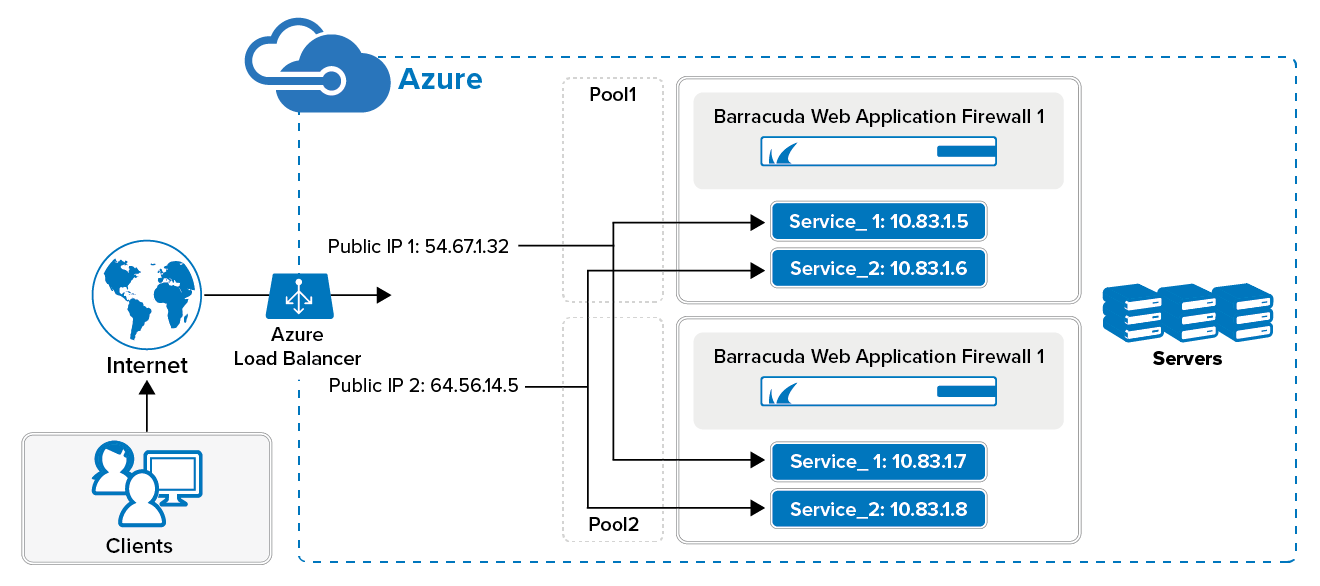
Using Backend pools, create the pools and add the services to the pools that needs to be load balanced. Example:
- Pool_1 that includes Service_1 configured in Barracuda Web Application Firewall_1 and Barracuda Web Application Firewall_2.
- Pool_2 that includes Service_2 configured in Barracuda Web Application Firewall_1 and Barracuda Web Application Firewall_2
Health probe
Configure the probe to monitor health of the servers associated with the service.
Load balancing rules
Configure the load balancing rule to distribute the traffic to the services specified in the back-end pool across the clustered instances. For example, requests to Service_1 are distributed between Barracuda Web Application Firewall_1 and Barracuda Web Application Firewall_2.
In this section, the load balancer configuration is explained with an example. Consider Barracuda Web Application Firewall_1 and Barracuda Web Application Firewall_2 are the two instances that are in a cluster. Barracuda Web Application Firewall_1 is configured with Service_1: 10.83.1.5 and Service_2: 10.83.1.6, and the same services are displayed with different IP addresses in Barracuda Web Application Firewall_2 i.e. Service_1: 10.83.1.7 and Service_2: 10.83.1.8. The public IP addresses assigned to Service_1 and Service_2 are 54.67.1.32 and 63.56.14.5 respectively.
How to Restore Azure Multi-IP Backup
Few sensitive parameters such as "Azure AD User/Password" and "Service Principal Details" configured under the BASIC > Azure Configuration page are excluded in the backup file. This is done as a security measure to prevent any accidental leakage of the data. It is therefore always recommended to configure these parameters on the Barracuda Web Application Firewall User Interface after restoring the backup file. If you fail to configure these parameters, certain operations, such as service creation and service deletion, will also fail.