Let’s Encrypt is a certificate authority that provides free signed certificates that are valid for 90 days. The certificates are accepted by most of the browsers.
The Barracuda Web Application Firewall provides integration with Let’s Encrypt to generate, sign, install, and renew certificates for their domains running on the Barracuda Web Application Firewall.
Before You Begin
- Create a HTTP service and also ensure that the service is in the ACTIVE mode.
- The backend server used by the HTTP service must respond 200 OK for the Fully Qualified Domain Name (FQDN).
- Ensure that the FQDN can be resolved in an external DNS (e.g. Google 8.8.8.8) and the VIP for the HTTP service is accessible by the FQDN over the Internet on TCP port 80 (IP Reputation policy must also not block the US, Sweden, and Singapore).
- Ensure that the FQDN can be resolved by the WAF and the management interface is also able to access the HTTP service on TCP port 80 (If internal DNS points directly to the backend server add a Host Map entry for the FQDN and service VIP).
- Ensure that the domain is accessible over the internet on TCP port 80.
- Ensure that the domain is accessible to the HTTP service that you created above.
- Allow outbound access to https://acme-v02.api.letsencrypt.org on the firewall.
- Ensure that the Public IP of the domain maps the barracuda service IP.
- Ensure that the "Allow Administration Access" for WAN is set to Yes for UI to successfully create a Let's Encrypt certificate.
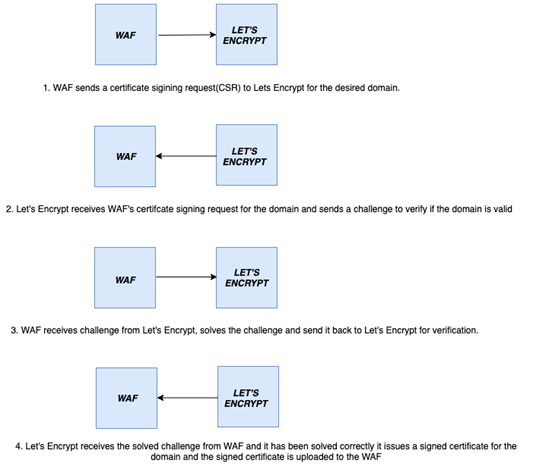
Certificate Generation – High level Flow

Challenges Initiated by the Let's Encrypt Service
Refer https://letsencrypt.org/docs/challenge-types/
To generate the certificate from Let’s Encrypt CA:
Navigate to BASIC > Certificates and then click the Let’s Encrypt button from the Certificate Generation section. The Get Certificate from Let's Encrypt dialog box opens.
- Specify values for the following fields:
- Certificate Name - Enter a name to identify this certificate.
- Key Type - Select Key Type as RSA
- Common Name - Enter the domain name (DN) of the web server for which you want to generate the certificate. For example: "barracuda.domain.com".
Subject Alternative Names (SAN) - Enter Subject Alternative Names (SAN) that needs to be associated with the certificate. Select DNS attribute from the drop-down list, and provide the appropriate value. For example: For DNS, the DNS domain name is specified. Example : barracuda.yourdomain.com.
- Services - Click the drop-down list and then select the service on which this domain is listening. HTTP and HTTPS that have a redirect service will be listed here.
- Renew Automatically - Select Yes if you want the signed certificates to get automatically renewed after the validity period. Click the drop-down list and select the number of days after which you want the certificate to be renewed.
- Click Generate Certificate . You can view the created certificate in the Saved Certificates section.
