

Checklist for Unpacking
Before installing your Barracuda Web Security Gateway, make sure you have the following equipment:
- Barracuda Web Security Gateway (check that you have received the correct model)
- AC power cord
- Ethernet cables
- Mounting rails and screws (available for the Barracuda Web Security Gateway 610, 810, and 910 only)
- VGA monitor (recommended)
- PS2 keyboard (recommended)
Install the Barracuda Web Security Gateway
- If you have a desktop Barracuda Web Security Gateway, you do not need to install it in a rack, but if you wish to do so, use the rack-mount kit (sold separately) for Rack Installation.
- Fasten the Barracuda Web Security Gateway to a standard 19-inch rack or other stable location. Do not block the cooling vents located on the front and rear of the unit or, for the Barracuda Web Security Gateway 210, the top of the unit.
Connect a CAT6 Ethernet cable from your network switch to the LAN port on the back of your Barracuda Web Security Gateway 210, or to the front of your Barracuda Web Security Gateway 310 and higher, as shown in the following figure. While a CAT5 Ethernet cable works well for most configurations, Barracuda Networks recommends a CAT6 3 meter Ethernet cable for best connectivity across devices, and for better performance in cases where troubleshooting is necessary.
Figure 1:Connecting the Barracuda Web Security Gateway 310 and higher to your network.
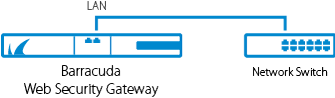
The Barracuda Web Security Gateway supports 10BaseT, 100BaseT and, on the 610 and higher, 1xGigabit Ethernet.Do not connect any other cables to the unit. The connectors on the back panel are for diagnostic purposes.
- Connect the following hardware to your Barracuda Web Security Gateway:
- Power cord
- VGA monitor
- PS2 or USB keyboard
- Press the Power button located on the front of the unit. The login prompt for the administrative console displays on the monitor and the power light on the front of the Barracuda Web Security Gateway turns on.
Configure the IP Address and Network Settings
The Barracuda Web Security Gateway is assigned a default IP address of 192.168.200.200. You can change the address in one of two ways:
- Use the Barracuda Web Security Gateway web interface as described in To set a new IP address from the web interface below.
- Use the administrative console as described in To set a new IP address from the administrative console below.
To set a new IP address from the web interface:
- Connect the LAN port of the Barracuda Web Security Gateway to an unmanaged switch, and connect the same switch to a computer configured with an IP address in the same range, for example, 192.168.200.202.

In a browser on the connected computer, log in to the default web interface http://192.168.200.200:8000. Use admin for the username and, for the password:
- If your appliance serial number is higher then 1311431, then the default administrator password is the numeric portion of the serial number. For help finding the serial number of your appliance, see Serial Number for Hardware and Virtual Appliances.
- If your serial number is 1311431 or lower, then the default administrator password is admin.
- Go to the BASIC > IP Configuration page. In the TCP/IP Configuration section, enter the new IP Address, Subnet Mask and Default Gateway. Choose an IP address that is on the same subnet as the devices that will be connected to the WAN and LAN ports of the Barracuda Web Security Gateway when it is deployed. The Default Gateway is the IP address of the next outbound hop from the Barracuda Web Security Gateway. The Barracuda Web Security Gateway sends all egress traffic to the default gateway via the WAN port on the front (or back, depending on the model) of the appliance.
- In the DNS Configuration section, enter the Primary DNS and Secondary DNS server IP addresses. These fields are required to resolve to Barracuda support servers upon initial setup to activate the appliance and receive software updates.
- In the Domain Configuration section, set the Default Host Name and Default Domain.
- Click Save, and then reboot the Barracuda Web Security Gateway.
- Connect the LAN port of the Barracuda Web Security Gateway to an unmanaged switch, and connect the same switch to a computer configured with an IP address in the same range, for example, 192.168.200.202.
To set a new IP address from the administrative console:
- With your keyboard and monitor connected directly to the Barracuda Web Security Gateway, at the barracuda login prompt, enter admin for the login and, for the password:
- If your appliance serial number is higher then 1311431 , then the default administrator password is the numeric portion of the serial number. For help finding the serial number of your appliance, see Serial Number for Hardware and Virtual Appliances.
- If your serial number is 1311431 or lower, then the default administrator password is admin. - Using the arrow keys, select TCP/IP Configuration from the menu and then Tab over to the TCP/IP Configuration submenu.
- Enter the new IP Address and Subnet Mask for your Barracuda Web Security Gateway. For proper Default Gateway setup, note that the Default Gateway is the IP address of the next outbound hop from the Barracuda Web Security Gateway, which sends all egress traffic to this gateway via the WAN port. For Forward Proxy deployment, use the same Default Gateway that is used by hosts on the network. Your firewall must be on the same subnet as the Barracuda Web Security Gateway.
- The Primary DNS and Secondary DNS fields are required to resolve to Barracuda Networks support servers upon initial setup to activate the appliance and receive software updates.
- Select Save to enter your changes.
- Select Exit.
The new IP address and network settings are applied to your Barracuda Web Security Gateway.
Configure Your Corporate Firewall
For maximum security, Barracuda Networks recommends placing your Barracuda Web Security Gateway behind a corporate firewall. If your Barracuda Web Security Gateway is located behind the firewall, refer to the table below for the ports that need to be opened on your corporate firewall to allow communication between the Barracuda Web Security Gateway and remote servers. See also Required Outbound Connections for Barracuda Networks Appliances.
| Port | Direction | Protocol | Description |
|---|---|---|---|
| 22 | In/Out | TCP | Remote diagnostics and technical support services |
| 25 | Out | TCP | Email and email bounces |
| 53 | Out | TCP/UDP | DNS (Domain Name Server) |
| 80 | Out | TCP | Virus, spyware, category definition updates, and firmware updates |
| 123 | In/Out | UDP | NTP (Network Time Protocol) |
| 8000 | In/Out | TCP | To access web interface. |
8002 | In/Out | TCP | Synchronization between linked systems. For more information, see High Availability - Clustering the Barracuda Web Security Gateway |
| 23557 | In/Out | TCP | The Barracuda Web Security Gateway defaults to port 80 when using Barracuda Cloud Control. However, Barracuda Cloud Control also listens on port 23557 which may also be used to communicate, and should be allowed if you plan to use Barracuda Cloud Control or cloud backups. |
In addition to the ports listed above, you may have to configure your corporate firewall to allow the Barracuda Web Security Gateway to email system alerts and reports. Some organizations create firewall rules that only allow emails to be sent from the IP address of their email server. In this case, you should configure your corporate firewall to allow emails to be sent from the Barracuda Web Security Gateway as well.
If your Barracuda Web Security Gateway is located in a DMZ, you may need to configure your corporate firewall to allow the Barracuda Web Security Gateway to send notifications to your internal email server. In this case, if your email server requires credentials for authentication, configure the Username and Password in the Email Notifications section of the BASIC > Administration page in the Barracuda Web Security Gateway web interface.
Continue with Step 3 - Configure the Barracuda Web Security Gateway.