

For more information about SOAR, see Setting up SOAR.
The documentation below outlines the requirements for the Barracuda XDR Security Orchestration, Automation, and Response (SOAR) for the Palo Alto Firewall. When you've set this up, all required data is uploaded to the Customer Security Dashboard in the SOAR Settings > Firewalls section.
The following are the procedures in setting up SOAR for Palo Alto Firewall:
Create an admin role
Create an administrator user
Generate the API Key
Create an Address Group for XDR Blocked IPs
Create a Security Policy to ensure the traffic from malicious IPs gets blocked on the Firewall
Add a Security Rule to translate requests coming from Tines on port 4433 to port 443
Create a NAT Rule that has Outside to Outside for the Zones
Enable SOAR in XDR Dashboard
Create an XDR Administrator User for API Access
Create a separate administrative account for XDR that will allow us to implement IP blocking on the firewall via API. First, create a custom Admin Role to assign to the admin user created for XDR. Admin Roles are custom roles that define the access privileges and responsibilities of administrators. The roles assigned to an administrator control which areas of the management interface the administrator can view or make changes.
Create an Admin Role
Select Device > Admin Roles and click Add.
Enter a Name to identify the role.
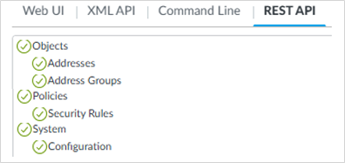
Under REST API, make sure the following areas are enabled (nothing else is required for XDR):
Objects > Addresses
Objects > Address Groups
Policies > Security Rules
System > Configuration
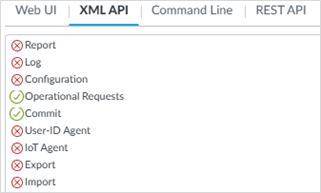
Under XML API, make sure the following areas are enabled (nothing else is required for XDR):
Operational Requests
Commit
To save the profile, click OK.
Create an Administrator User
Select Device > Administrators.
Click Add an account.
Enter a Name for the user. (Example: xdradmin)
For the Authentication Profile, select None (default) and enter a Password.
For the Administrator Type, select Role Based and select the admin role profile you previously created for the admin user.

Click OK.
Generate the API Key
To use the API, generate the API key required for authenticating API calls.
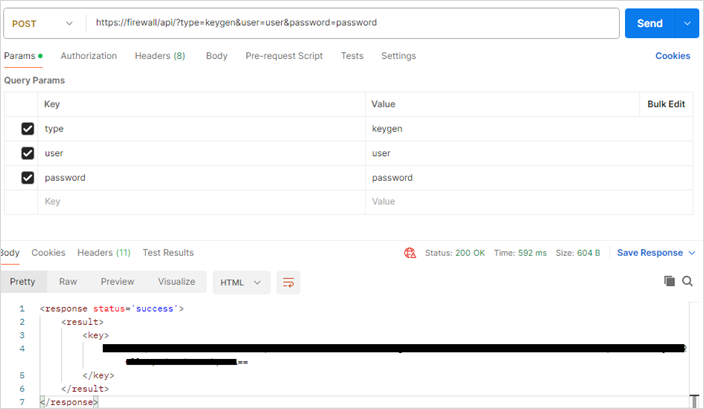
To generate the API key, use the following cURL command to make a POST request to the firewall’s IP address or hostname using the credentials for the XDR admin user. (This can be done through Postman or another RESTAPI client.)
curl -v --http1.1 -X POST --location "https://firewallIP/api/?type=keygen&user=user&password=password" -H 'Content-Type: application/json'
NOTES
A successful API call returns status="success" as well as the API key within the key element.
When you retrieve your API Key, use the key in its entirety, including any symbols, such as equal signs.
(Example screenshot using Postman)
Create an Address Group for XDR Blocked IPs
XDR uses this Group to keep track of the IPs we block on the firewall. Add this group to any preexisting security policies that were created to block traffic to/from anomalous IP addresses. If no security policy exists, please see step 4 for creating a security policy.
Navigate to Object > Address Groups, then click Add.
Enter a Name for the address group.
NOTE Don’t include a space in the address group name or SOAR won’t function properly. We highly recommend using Barracuda_XDR_Blocked_IPs.Select Static as Type.
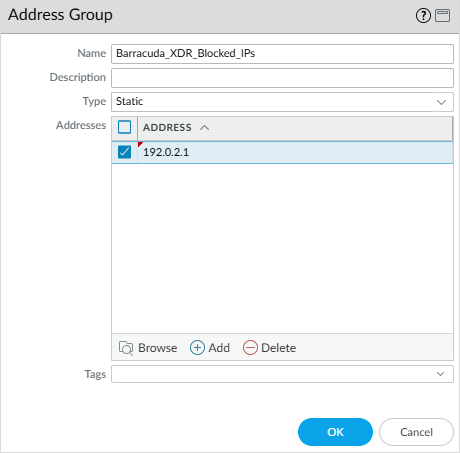
Click OK.
Click Commit.
Create a Security Policy to Block Malicious IP Traffic on the Firewall
For XDR to successfully block IPs on the firewall, you must add the address group to a security policy that blocks this type of traffic. If you don't have a preexisting policy in place, create one and add the address group to the firewall policy.
Select Policies > Security and Add a new rule.
Create a policy like the example shown below. Depending on the use case, you might need to create two different policies where the Address Group is used as the source and destination.

Once created, click Commit to save the security rule(s) to the running configuration on the firewall.
Add a Security Rule to translate requests coming from Tines on port 4433 to port 443
Select Policies > Security and Add a new rule.
Create a security rule to use the outside to inside zones for source and destination. For the Destination, use firewall’s Public IP for the address.
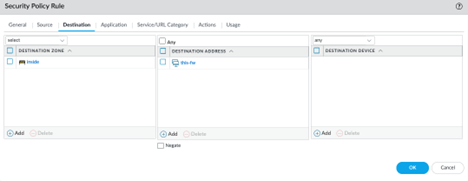
Allow the following Tines IPs to be allowed through this policy:
35.155.74.247
44.239.173.232
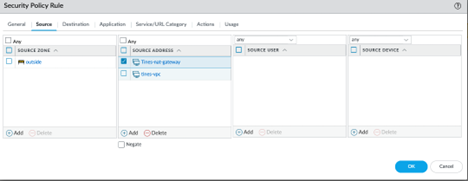
For Services, only allow TCP port 4433 and 443.
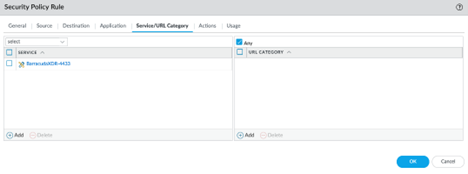
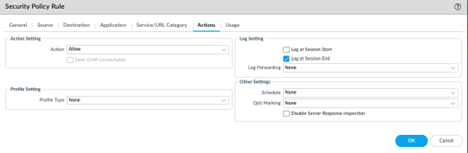
Do a simple allow for this rule.
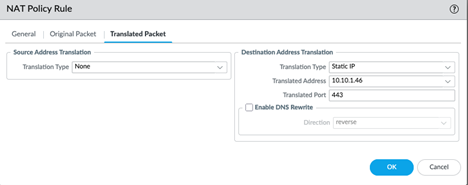
Create a NAT Rule that has Outside to Outside for the Zones
Create a NAT rule and do the following:
Use the Public IP address.
Create the Service (BarracudaXDR-4433) to use TCP 4433 for destination port only
In the translated Packet create a destination NAT for the internal IP of the MGMT Address for Palo Alto.
Translate the port to use 443.
Enable SOAR in XDR Dashboard
Upload all Automated Threat Response data to the Customer Security Dashboard.
Navigate to the SOAR Settings > Firewalls section.
In the Firewalls table, click the Palo Alto Firewall row.
Click Edit Config.
Enter the following data:
External IP
Credential (API Key)
Group Name (Address Group Name)

Click Save.