Barracuda XDR retrieves Audit Logs, Sign In Logs, and Activity Logs from Microsoft Azure. These items are read from the Azure Event Hub.

Videolink:
https://campus.barracuda.com/Requirements
One of the following licenses is required:
Microsoft Entra ID P1
Microsoft Entra ID P2 or
Microsoft Entra Suite
You also need a subscription that enables you to create event hubs. For more information, see https://azure.microsoft.com/en-us/pricing/details/event-hubs/.
For more information, see https://learn.microsoft.com/en-us/entra/fundamentals/licensing.
Integrating Microsoft Azure requires you follow these procedures, below:
Part 1: Setting Up Azure Event Hub
To create Event Hub Namespaces
Part 2: Configuring Storage Accounts
To initialize Storage Accounts
To set up Event Hub Entities
To set up an Event Hub Shared Access Policy
Part 3: Updating Diagnostic Settings
To update diagnostic settings for the sign in log
To update diagnostic settings for for the audit log and activity log
To set up Microsoft Defender for Cloud
Part 4: Barracuda XDR Dashboard Setup for Azure
Part 1: Setting Up Azure Event Hub
To create Event Hub Namespaces
Navigate to the Azure Event Hub.
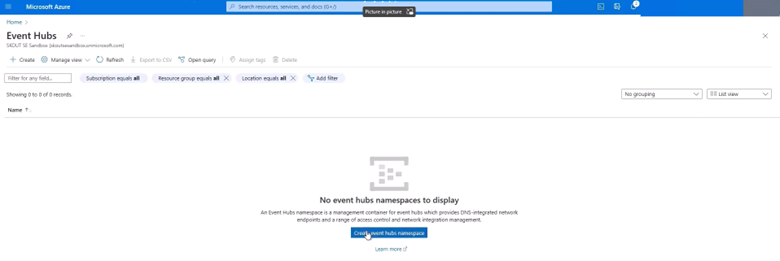
Create three event hub namespaces dedicated to each of the following:
Activity Logs
Audit Logs
Sign In Logs
WARNING
The Event Hub Namespace Name must:Contain at least eight characters.
Only contain lowercase letters, numbers, and dashes.
In Pricing Tier, select Basic.
In Networking, select Public Access.
NOTES
We recommend the following naming convention:xdr-azure-activity-logs
xdr-azure-audit-logs
xdr-azure-sign-in-logs
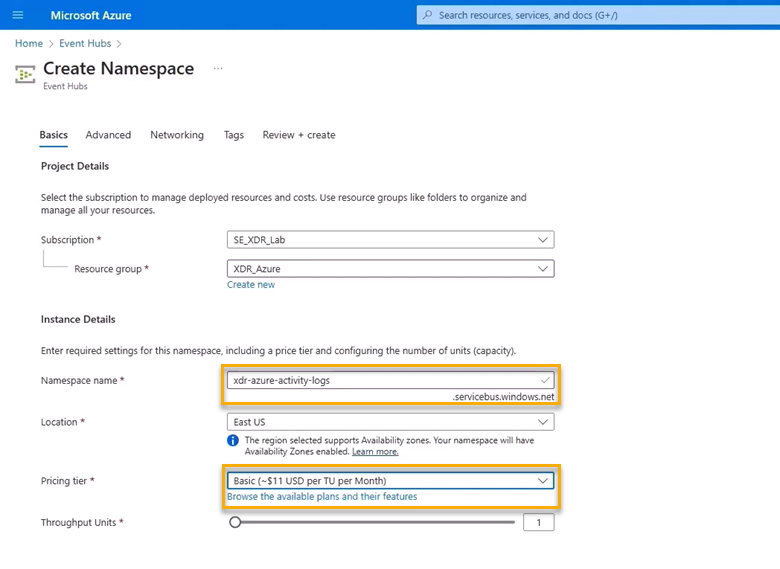
Click Review and Create.

Part 2: Configuring Storage Accounts
Configuring storage accounts requires the following procedures, below:
To initialize Storage Accounts
To set up Event Hub Entities
To set up an Event Hub Shared Access Policy
To initialize storage accounts
Navigate to Storage Accounts.
Audit Logs
Sign In Logs
Activity Logs
NOTES
We recommend the following naming convention:xdr-azure-activity-logs
xdr-azure-audit-logs
xdr-azure-sign-in-logs

Select your Region.
Click Review and Create.
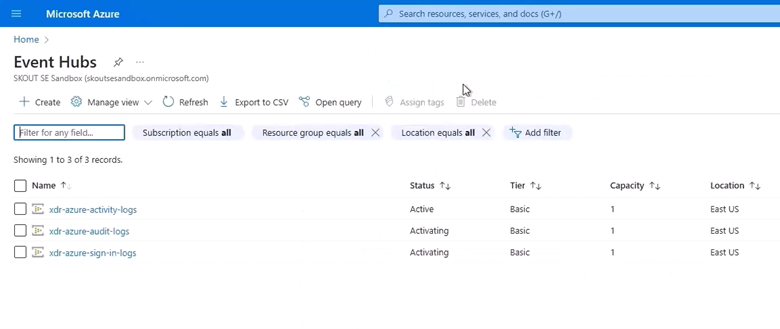
To set up Event Hub Entities
In Microsoft Azure, navigate to Event Hubs.
In Event Hubs, select the check box of an Event Hub Namespace that you created in the previous procedure.
NOTEWe recommend the following naming convention:
xdr-azure-activity-logs
xdr-azure-audit-logs
xdr-azure-sign-in-logs
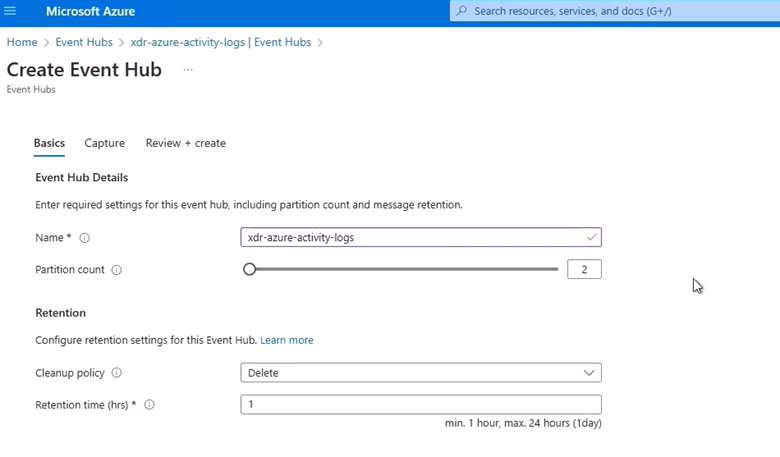
Click Create Event Hub.
Repeat steps 2-3 for the rest of the namespaces.
Click Review and Create.
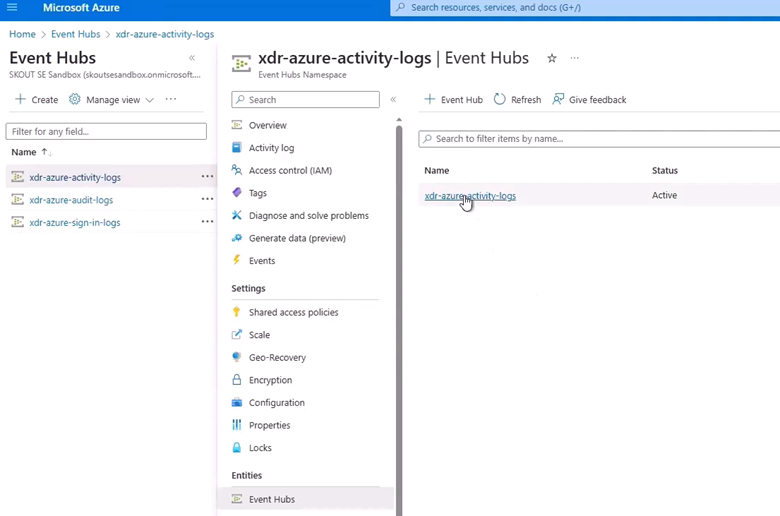
To set up an Event Hub Shared Access Policy
In Event Hubs, on the right, click the link Event Hub Namespace that you created in the previous procedure.
WARNING
Do not click Shared Access Policies under Settings.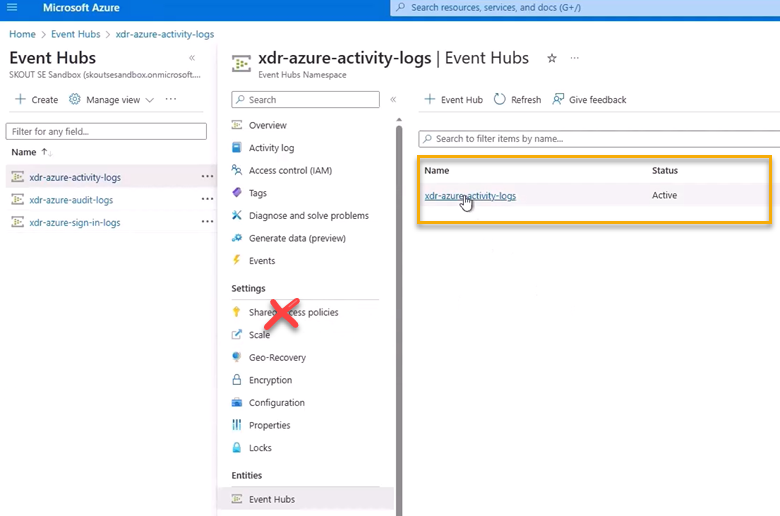
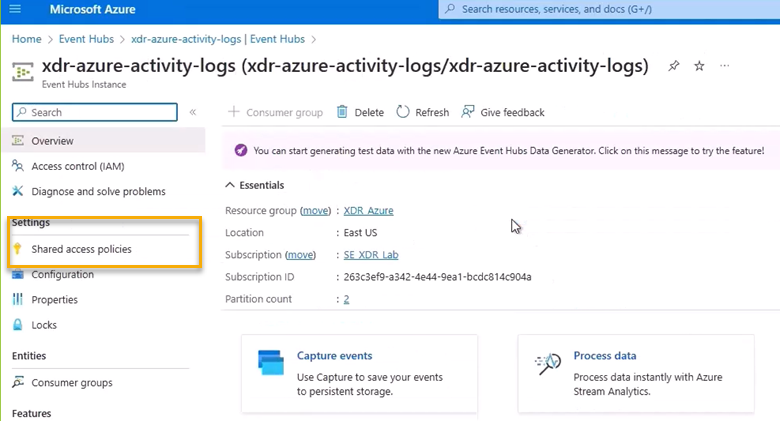
Click Shared Access Policies.
Click Add.

In Add SAS Policy, in Policy Name, type the name of the namespace.
Select the Manage checkbox.
Repeat steps 1-5 for the rest of the namespaces.
Part 3: Updating Diagnostic Settings
To update diagnostic settings for the sign in log
Navigate to Microsoft Entra ID.
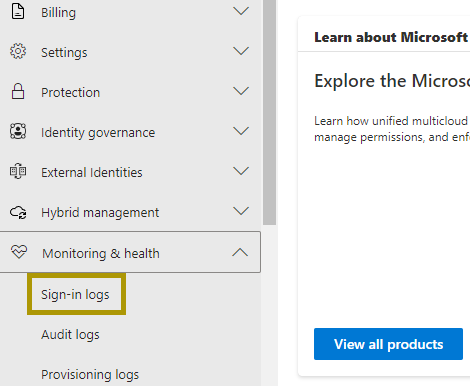
In the Monitoring and Health section, click Sign-in logs.
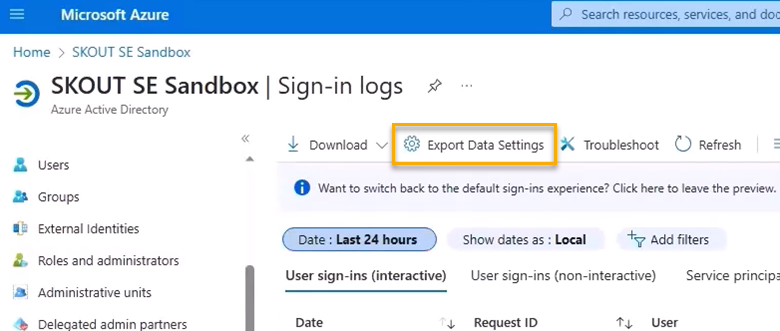
Click Export Data Settings.
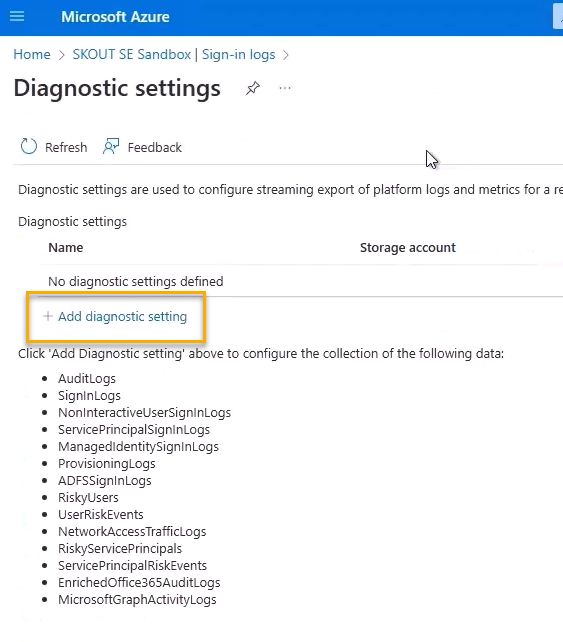
Click Add diagnostic setting.
Do the following:
In Diagnostic setting name, type the name of your sign in log.
Select the following checkboxes:
SignInLogs
NonInterctiveUserSignInLogs
ServicePrincipleSignInLogs
ManagedIddentitySignInLogs
Stream to an event hub
Select the correct Subscription and Event hub namespace (Ex: xdr-azure-sign-in-logs).
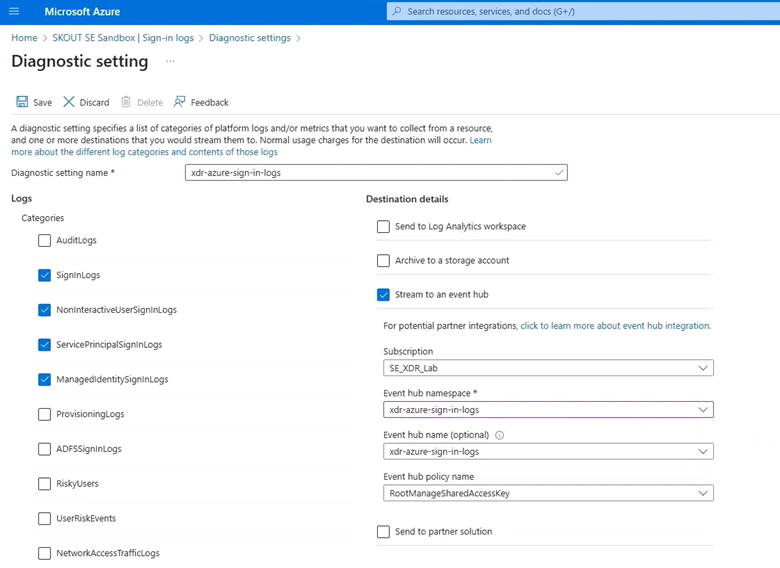
Click Save.
To update diagnostic settings for for the audit log
Navigate to Microsoft Entra ID.

In the Monitoring and Health section, click Audit logs.
Click Export Data Settings.

Click Add diagnostic setting.

Do the following:
In Diagnostic setting name, type the name of your audit log namespace.
Select the following checkboxes:
AuditLogs
Stream to an event hub
Select the correct Subscription and Event hub namespace (Ex: xdr-azure-audit-logs).
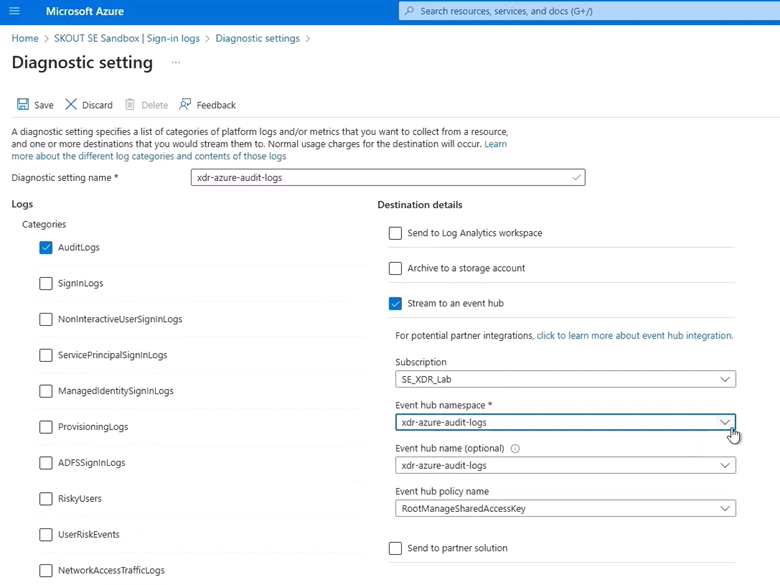
Click Save.
Continue to the following procedure.
To update diagnostic settings for for the activity log
After performing the previous procedure, click the Sign-in Logs link in the navigation at the top of the page.
Click Export Data Settings.

Click the Add diagnostic setting link.
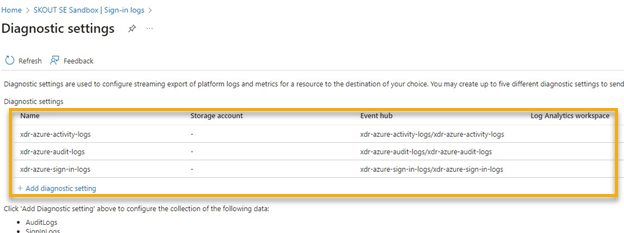
Do the following:
In Diagnostic setting name, type the name of your activity log namespace.
Select the following checkboxes:
ProvisioningLogs
ADFSSignInLogs
RiskyUsers
UserRiskEvents
Stream to an event hub
Select the correct Subscription and Event hub namespace (Ex: xdr-azure-activity-logs).
.png)
Click Save.
To set up Microsoft Defender for Cloud (Optional)
Navigate to Microsoft Defender for Cloud.
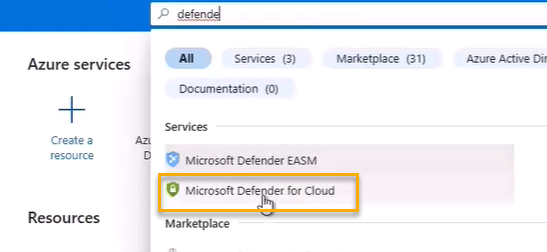
Under Management, click Environment settings.
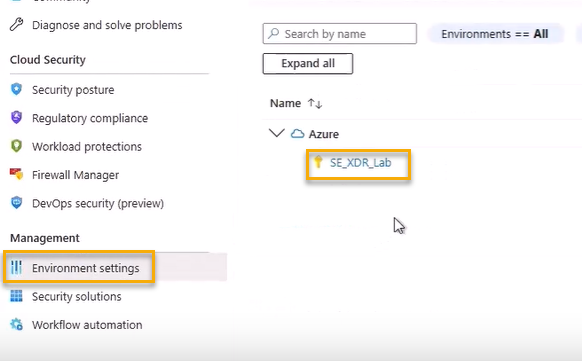
Select your subscription.
If you're setting up for the first time, set Severs and Storage to On, then click Save.
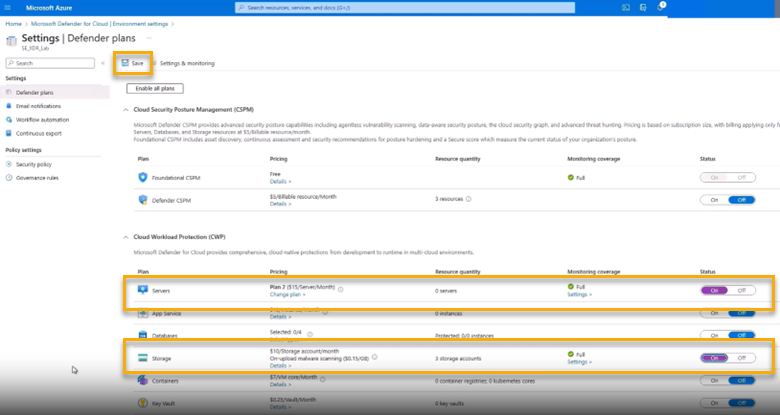
WARNING
Enabling Microsoft Defender for Servers while another EDR is active can lead to performance issues.Under the Settings section, click Continuous Exports.
Do the following:
Select the Security recommendations checkbox, and select All recommendations.
In Security Alerts, select Low, Medium, High, Informational.
Turn Streaming Updates on.
Turn Snapshots off.
In Export configuration, select your subscription.

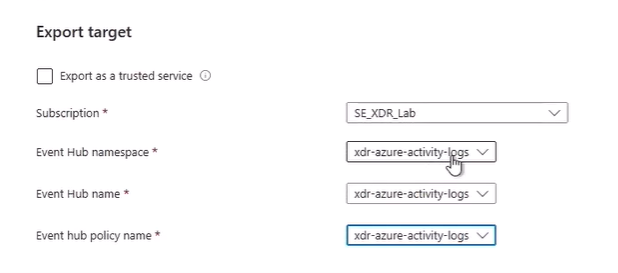
In Export Target, do the following:
In Subscription, select your subscription
In Event Hub namespace, select the name of your activity log.
In Event Hub name, select the name of your activity log.
In Event hub policy name, select the name of your activity log.
Click Save.
Part 4: Setting up Barracuda XDR Dashboard
Open two browser windows/tabs:
In one window, open Azure.
In the other window, open Barracuda XDR Dashboard.
In Barracuda XDR Dashboard, click Setup > Integrations.
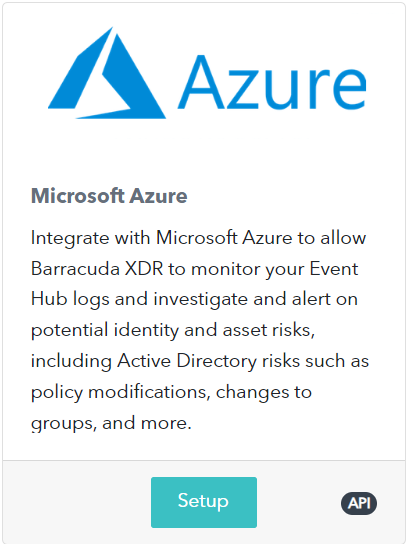
On the Microsoft Azure card, click Setup.
In the XDR Dashboard window, select the Enabled checkbox.
In the Azure window, in the left navigation menu, click the name of the XDR Azure Activity log.
NOTE If you followed the naming convention, the name is xdr-azure-activity-logs.
Under Entities, click Event Hubs.
Copy the Event Hub Name from the Azure window and paste it into the XDR Dashboard window, in the Activity Logs area, in the Event Hub Name field.
In the Azure window, in Event Hubs list in the center of the screen, click the name of the activity log.
NOTE If you followed the naming convention, the name is xdr-azure-activity-logs.On the activity log page, in Settings in the left navigation menu, click Shared access policies.
WARNING If you are on the correct page, Shared access policies is in the navigation menu on the extreme left of your screen. If Shared access policies is in a menu closer to the center of your screen, ensure you clicked the name of the activity log in the previous step.
On the Shared access policies page, click the name of the Shared access policy.
NOTE If you followed the naming convention, the name is xdr-azure-activity-logs.Copy the Connection string-primary key and paste it into the XDR Dashboard window, in the Connection String field, in the Activity Logs area.
NOTE The Connection String must be from the event hub within the entity of the namespace. If the Connection String is from the event hub within the entity of the namespace, it ends with "EntityPath=[EventHubName]" where[EventHubName]is the exact name of the event hub.In the Azure window, click Home. Then click the Storage accounts icon. Then click the xdrazureactivitylogs link. Then copy the name of the log at the top of the page and paste it into the XDR Dashboard window, in the Storage Account field, in the Activity Logs area.
In the Azure window, in the left navigation menu, click Access keys. In the key1 area, in the Key field, click the Show button. Then click the Copy to clipboard icon and paste the key into the XDR Dashboard window, in the Activity Logs Storage Account Key field, in the Activity Logs area.
Repeat steps 5-14 for the following:
Audit Logs
Sign In Logs
In the Barracuda XDR window, click Save.
