To deploy Mimecast, do the following procedures (See below):
When a user's password is changed or the account is disabled, any set of Access Key and Secret Keys for that user will also be revoked. A new set of Access and Secret Keys will need to be generated to continue making API calls.
If new Access and Secret Keys need to be generated, remove the user from any administrative role. Re-add the user after new keys have been obtained.
Create an API application
Log into the Administration Console.
Navigate to Administration > Services > API and Platform Integrations.
Click the Your Application Integrations tab.
Click Add API Application.
Fill in the Details section as outlined below:
Application Name – Name for the application. For example, Barracuda XDR Log Collector.
Category – Select SIEM Integration.
Service Application – Enable the Enable Extended Session option checkbox. This is recommended for integrations with a valid access and secret key pair to call the API frequently using just authorization.
Description – Description of the application. For example, Barracuda XDR Managed Detection and Response provider.
Click Next.
Fill in the Settings section as outlined below:
Technical Point of Contact – Name of a person or group to contact if Mimecast needs to speak with the maintainer of this API application.
Email – Email address of person or group to contact if Mimecast needs to speak with the maintainer of this API application.
Opt-In – Select this option to receive updates on API changes.
Click Next.
Review the Summary page to ensure all details are correct.
Click Add. The application details will display in a slide-in panel.
Copy and paste the Application ID and Application Key to a safe place to use later in the process.
Note that it can take up to 30 minutes for this process to complete.While waiting for the application to go live, continue to the next step.
Create a Service Account User
Navigate to Administration > Directories > Internal Directories.
Click on the domain to add the user to.
Click New Address.
Complete the user's Email Address. For example, skout-siem-@yourdomain.tld.
Note: The service account user does not need a mailbox or access to mail flow to function unless MFA will be used.Enter a Password and Confirm Password. Remember this password to use later in the process.
Click Save.
Create a Profile Group
Navigate to Administration > Directories > Profile Groups.
Click on the + icon next to the Root folder.
Click on the new folder to open the Edit Group text box and rename the folder. For example, Barracuda XDR API Profile Group.
Press Enter to save the new name.
Click Build > Add Email Addresses.
Enter the service account user's email address in the Group Additions text box.
Click Save and Exit.
Create an API user Authentication Profile
Navigate to Administration > Services > Applications > Authentication Profiles.
Click New Authentication Profile, and then enter a profile name. For example, Barracuda XDR Authentication Profile.
If the service user does not have a mailbox, disable all the SAML and 2FA options.
Set the Authentication TTL to Never Expire.
Click Save and Exit.
Create Application Settings
Navigate to Administration > Applications.
Right-click Default Application Settings and select Clone Configuration. This will create a new application settings definition.
Assign the Profile Group and Authorization Profile you just created to this settings definition. This will apply the settings to the service account.
Click Save and Exit.
Create API keys
Navigate to Administration > Services > API Applications.
Click the new API Application from the application list.
Click Create Keys. The "Create Keys" wizard is displayed with the Account tab selected.
Enter the Email Address of your service account.
Click Next.
Complete the Authentication dialog with the following:
Type – Cloud.
Password– Enter the service account's password.
Click Next.
If prompted to verify the service account, follow the instructions on the screen, and then click Next.
The Keys tab is displayed with the generated keys hidden by default.Copy the Access Key and Secret Key.
Click on the Finish button to exit the wizard and return to the application list.
Granting API Service Account User Permissions
Navigate to Administration > Account > Roles.
Click New Role.
Enter a Role Name and Description. For example, Barracuda XDR Integration.
In the Application Permissions section, select the boxes for each of the following permissions to be used by the service user account:
Account | Logs | Read permission
Monitoring | Data Leak Prevention | Read permission
Monitoring | Attachment Protection | Read permission
Monitoring | Impersonation Protection | Read permission
Monitoring | URL Protection | Read permission
Services | Gateway | Tracking | Read permission
Click Save and Exit.
Locate the newly created role and click on the role name.
Click Add User to Role.
Click the email address of the API service user account.
Enable Enhanced Logging
Navigate to Administration > Account > Account Settings.
Expand the Enhanced Logging section and enable the following:
Enhanced inbound email logging
Enhanced outbound email logging
Enhanced internal email logging
Obtain the Base URL
Log into Mimecast and obtain your Base URL from Mimecast Data Centers and URLs.
Barracuda XDR Dashboard
In Barracuda XDR dashboard, click Administration > Integrations.
Click the Barracuda Incident Response card.

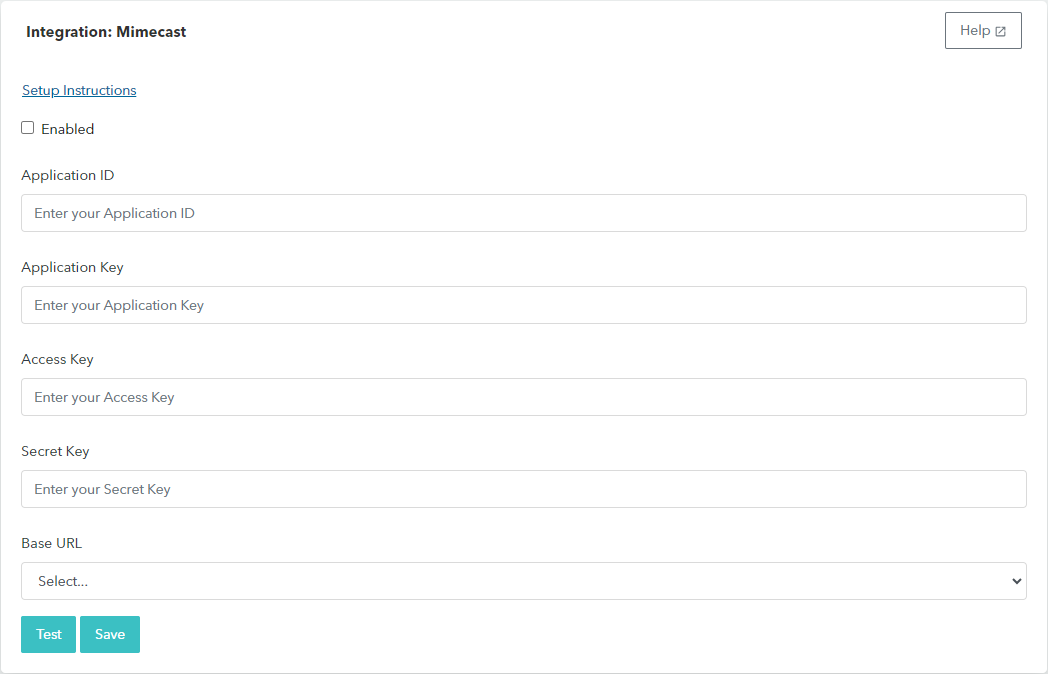
Enter the following values obtained from Mimecast into the Barracuda XDR Security Dashboard:
Application ID
Application Key
Access Key
Secret Key
Base URL

Click Test.
When the test passes, click Save.
