

Incident Response reports can be generated and delivered via email on the day and time you select. For example, you can choose to have the Threats Remediated report covering the last 24 hours run each morning and emailed to you and your IT department.
Create a New Schedule for Report Creation and Delivery
- In the main navigation at top-left, go to Reports > Scheduled reports.
- Click the New schedule button at top-right. The New schedule flyout opens.
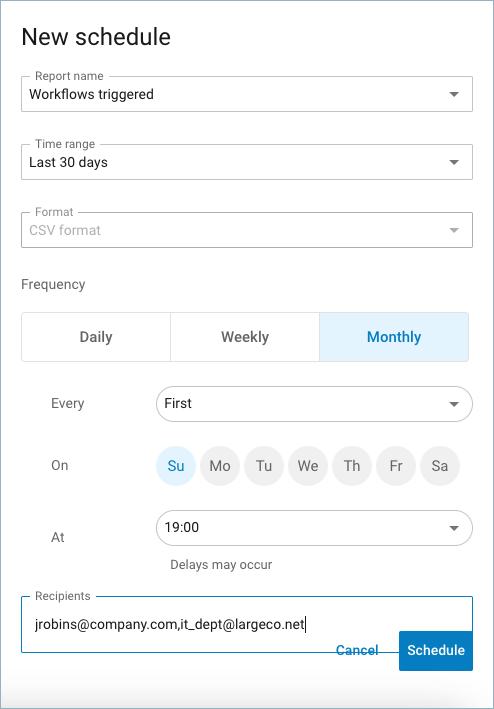
- Fill in the required fields.
- Report name – Select either one of the Barracuda's reports or a report you have saved under My reports. You can see these on the Reports page.
- Time range – Select the time period you would like the report to cover. Choose between Last day (last 24 hours), Last 3 days, Last 7 days, Last 30 days, Last 90 days, and Last 6 months.
- Format – Currently all reports are delivered in CSV (Comma Separated Values) format.
- Frequency – Choose to have the report generated and delivered either Daily, Weekly, or Monthly.
- Every – (Depending on the Frequency selected, this option may not appear.) Select the week of the month that the report will be generated and delivered. Options are First, Second, Third, Fourth or Last. You can also choose Specific date.
- On – (Depending on the Frequency selected, this option may not appear.) Choose the day of the week that the report will be generated and delivered. Options are Sunday-Saturday. Note: if Specific date is selected above, this option will be a day of the month (1st-31st or Last day of the month).
- At – Select the time of day that the report will be generated and delivered.
- Recipients – Enter the email addresses that will receive the report. To add more than one recipient, separate each email address with a comma and no spaces.
Edit an Existing Report Schedule
- In the main navigation at top-left, go to Reports > Scheduled reports. The current schedules are displayed.
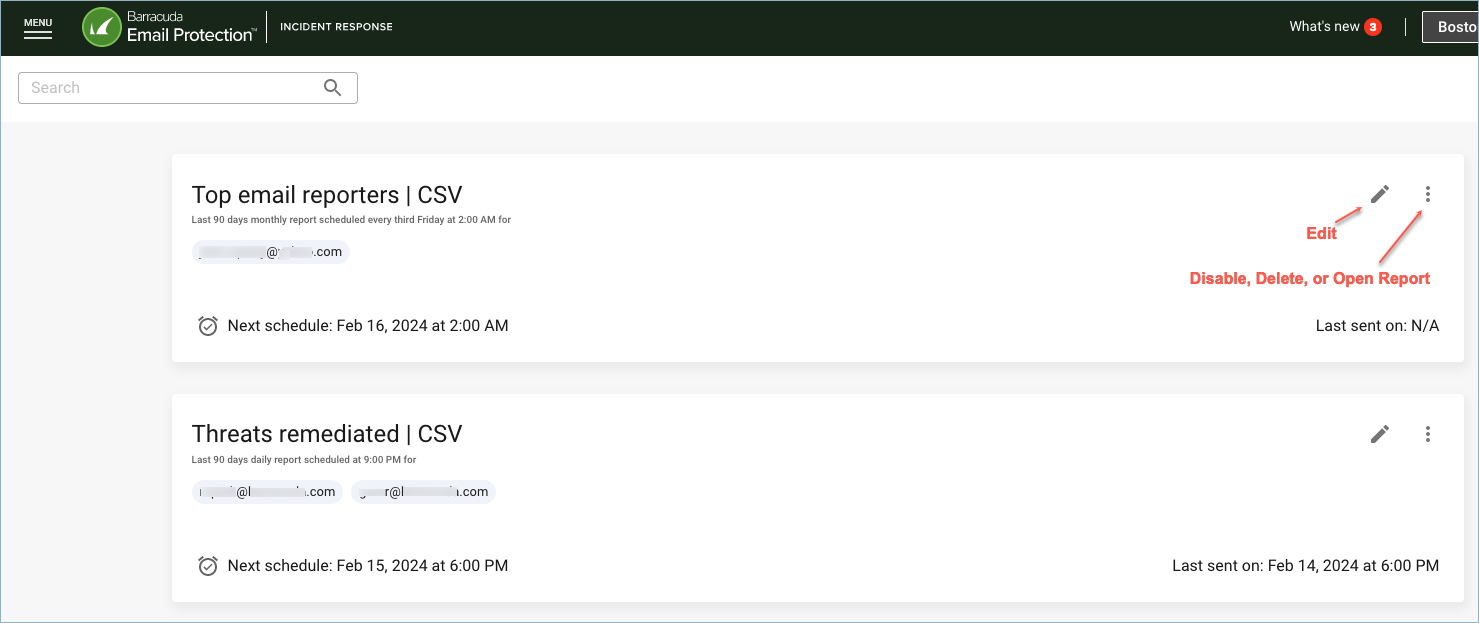
- Click on the pencil icon
 . The scheduling details flyout opens.
 - Change the details as needed. The report type (i.e. Top email reporters) cannot be changed. Create a new schedule if you need one for another type of report.
Other actions
Click the three dots![]() on the right side to do one of the following:
on the right side to do one of the following:
- Disable – The scheduled report will no longer be created or delivered until it is once again enabled.
- Delete – Completely removed the report creation and delivery schedule.
- Open Report – Open and view the generated report. See Incident Response Reports for a description of report details.