

The following VPN performance test method provides a guideline for creating a standardized VPN performance testing environment required by Barracuda Networks Technical Support that allows you to identify potential configuration improvements. Please note that the VPN throughput results can differ from the values published on the datasheet of CloudGen Firewall F models due to varying test methods and equipment used.
Before You Begin
To collect all relevant information for Barracuda Networks Technical Support, download the Word template form and fill in the required values as you go through the steps. Paste the output from each step into the text form and save the result. Include the completed form when contacting Barracuda Networks Support.
Make sure that clients driving the test are powerful enough. iperf3 is especially critical in that respect because it is inherently single-threaded.
VPN Performance Test Setup
Before You Begin
To rule out devices in the local and remote networks, as well as side effects of other services on the firewall, create the following setup:
Testing must be performed on dedicated clients on both ends. Do not run performance tests directly on the shell of the firewall unless specifically stated otherwise.
Connect the test clients directly to the firewall. If that is not possible, up to one switch between the firewall and the test client is acceptable.
Do not use wireless network connections to connect to the firewall.

Step 1. VPN Tunnel Configuration
Configure the VPN tunnel on both firewalls with the following settings:
Create a TINA site-to-site VPN tunnel with a single transport with the following encryption settings:
In the Basics tab, configure the following settings:
Transport – Select UDP.
Encryption – Select AES 128.
Authentication – Select NOHASH.
Compression – Select Disabled.
Use Dynamic Mesh – Clear check box.

In the SD-WAN Bandwidth Protection tab, configure the following settings:
Dynamic Bandwidth Detection – Select Disabled.
Bandwidth Policy – Select None.
Consolidated Shaping – Clear the check box.

In the Advanced tab, configure the following settings:
High Performance Settings (optional) – Select the check box.
WANOpt Policy – Select NO-WANOpt.

Configure the Local and Remote Networks.
Configure the Local and Remote IP addresses used by the VPN endpoint.
For more information, see How to Create a TINA VPN Tunnel between CloudGen Firewalls.
Step 2. Optimize Performance Settings for VPN
Go to CONFIGURATION > Configuration Tree > Box > Advanced Configuration > System Settings.
From the Interface CPU Assignment drop-down list, select Optimize-for-VPN.

Step 3. Access Rule Configuration
On both firewalls, configure access rules to allow the test traffic through the VPN tunnel.
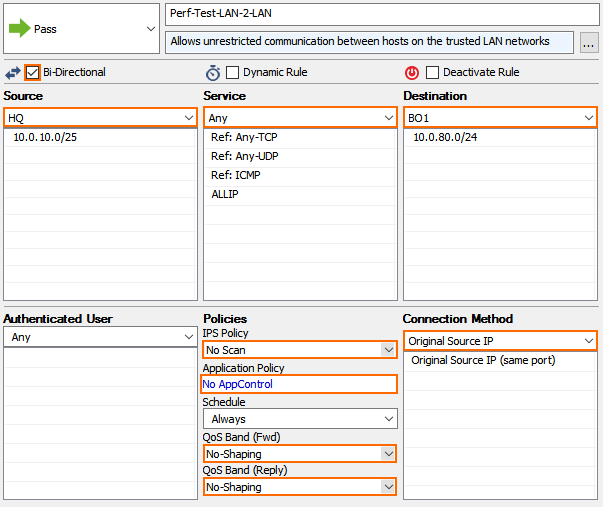
Create a Pass access rule:
Source – Select the IP address of the local test client.
Service – Select Any.
Destination – Select the IP address of the remote test client.
Bi-Directional – Select the check box.
IPS Policy – Select No Scan.
Application Policy – Select No AppControl.
QoS Band (Fwd) – Select No-Shaping.
QoS Band (Reply) – Select No-Shaping.
Step 4. Verify the Network Interface Is Using Full Duplex
On the CONTROL > Network page of both firewalls: Verify that the network interfaces used by the test client and the VPN tunnel are using full duplex:

Step 5. (Multi-Core Firewalls Only) Verify VPN Bypass Is Enabled
VPN bypass is a performance optimization for the VPN device queues on multi-core firewalls. The VPN bypass must be enabled.
Log into the firewall via SSH.
Enter the following command to check the VPN bypass state:
acpfctrl tune vpnbypass

If it is disabled, enable it with the following command:
acpfctrl tune vpnbypass on
Performance Testing
Perform the following tests to gather performance data for the VPN tunnel and the ISP connection.
ISP link speed
VPN tunnel throughput
Latency to the other firewall
(virtual only) Cryptographic hardware performance test
Collect System Information
Collect the following information from both firewalls.
Log into the firewall via SSH.
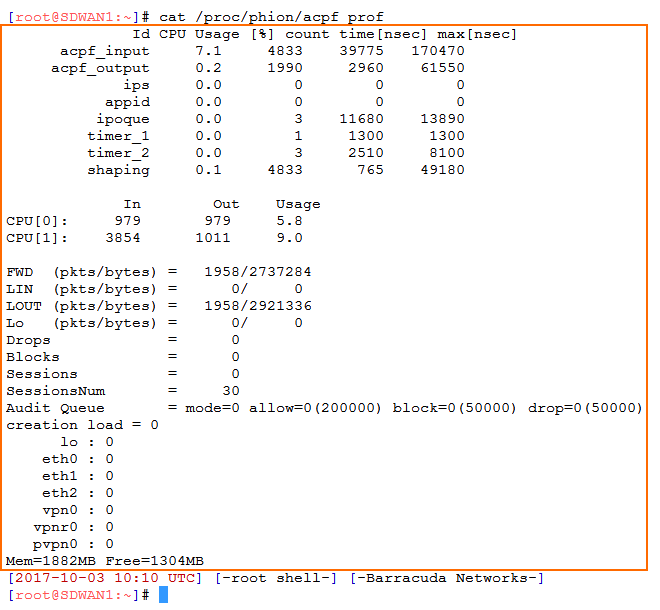
Copy the performance output for the firewall kernel module:
cat /proc/phion/acpf_prof
Copy the output from the VPN kernel module:
cat /proc/phion/ktina_prof

Collect the following values from the output:
acpf_prof output
ktina_prof output
Check SMP
Execute setsmp and collect the output.
Log into the firewall via SSH.
Run command:
setsmpCollect the output.
Check ISP Link Speed
Execute the speed test on both firewalls.
Log into the firewall via SSH.
Run command:
speedtest-cli
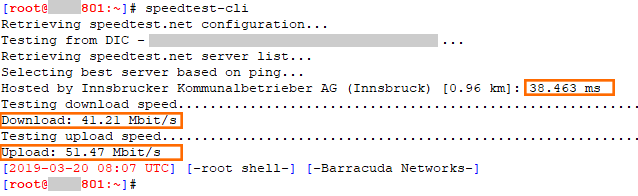
Collect the following the output from both firewalls:
Speedtest output
Ping Firewall to Firewall
Log into the firewall via SSH.
Enter
ping <public IP address of the remote firewall>
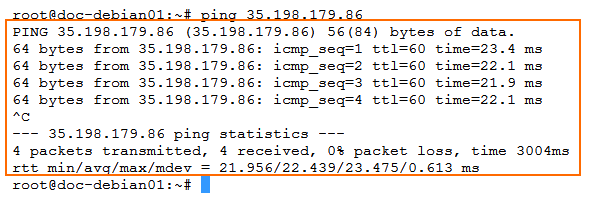
Collect the following values from the output:
Ping firewall to firewall
Ping Test Client to Test Client
Log into the test client.
Enter
ping <IP address remote test client>
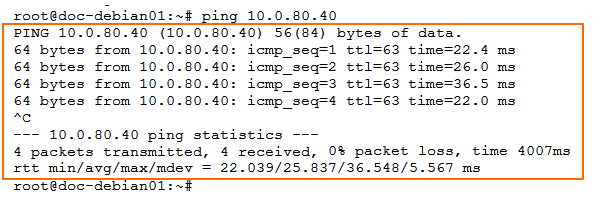
Collect the following values from the output:
Ping test client to test client
Test VPN Tunnel TCP Traffic Throughput
Log into the remote test client
Install iperf.
Start an iperf server:
iperf -sLog into the local test client.
Install iperf.
Test the VPN throughput for TCP traffic:
iperf -c <IP address remote test client> -P <2 x number of CPU cores> -e -m
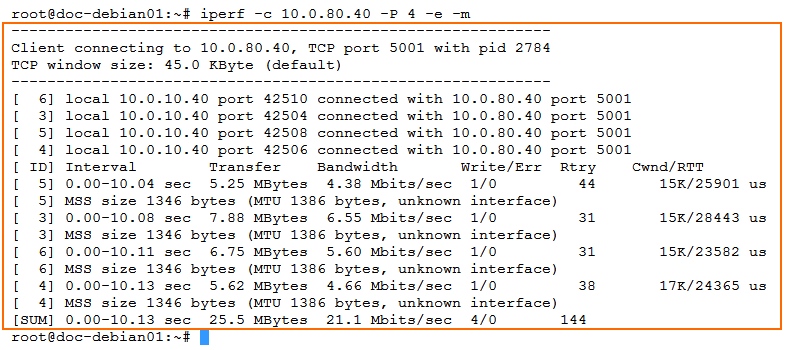
Repeat in the other direction.
Collect the following values from the output:
VPN TCP iperf (fw1 to fw2)
VPN TCP iperf (fw2 to fw1)
Test VPN Tunnel UDP Traffic Throughput
Log into the remote test client
Install iperf.
Start an iperf server:
iperf -s -uLog into the local test client.
Install iperf.
Test the VPN throughput for UDP traffic.
Specify a target bandwidth.
-b <expected throughput / argument provided to -PTest the VPN throughput.
iperf -c <IP address remote test client> -P <2 x number of CPU cores> -e -m -u
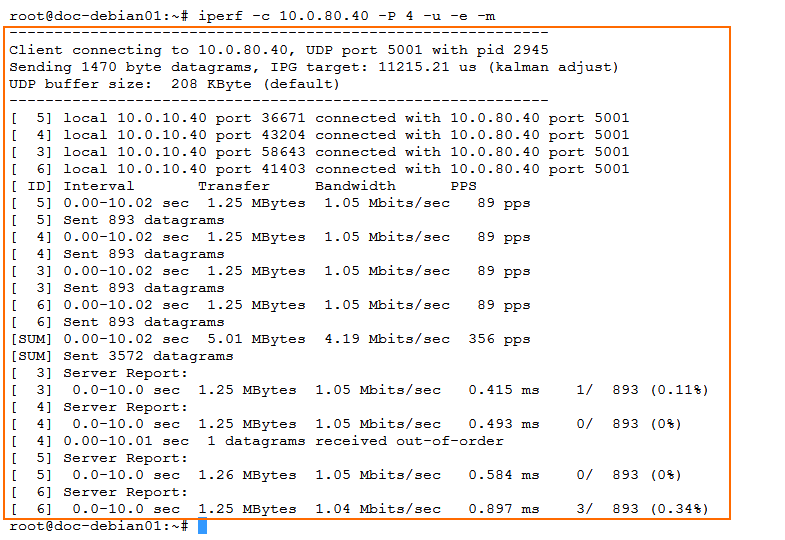
Repeat in the other direction.
Collect the following values from the output:
VPN UDP iperf (fw1 to fw2)
VPN UDP iperf (fw2 to fw1)
(Virtual and Public Cloud Only) Test Hardware Capabilities
Execute the following test to measure the hardware capabilities on virtual and public cloud firewalls.
Log into the firewall via SSH.
Enter
cryptoctrl perf all
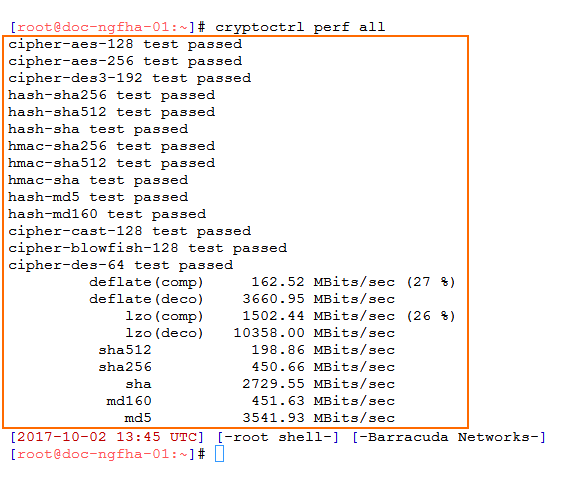
Collect the following values from the output:
Cryptoctrl output
Testing with SMB / CIFS Traffic
When testing performance with SMB/CIFS traffic an be difficult to receive reproducible results. When testing the same VPN tunnel with iperf and CIFS traffic, expect the transfer rate for the file transfer to be slower than the iperf value.
Calculate the theoretical TCP throughput to know the theoretical bandwidth of the connection: https://www.switch.ch/network/tools/tcp_throughput/.
If file transfer performance is very low, verify that you are not affected by issues with TCP receive windows scaling on Microsoft Windows. A quick search will offer troubleshooting steps and solutions for this problem.
C2S VPN Throughput Performance
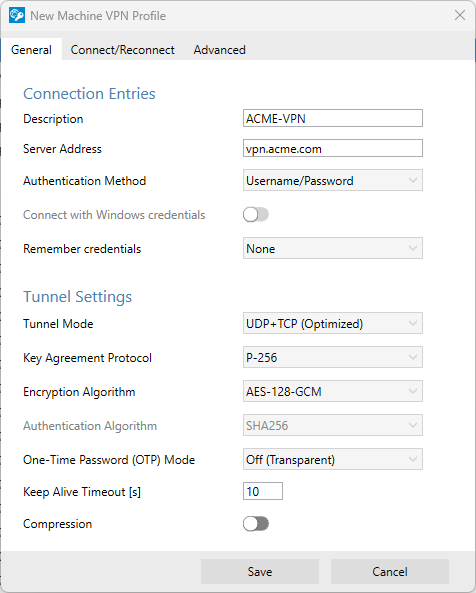
1. VPN Client Settings
To achieve optimal throughput performance, configure your VPN client with the following settings:
Tunnel Mode: Optimized
Ensures maximum performance by reducing protocol overhead and preventing TCP-over-TCP encapsulation, which can severely degrade throughput due to retransmission delays and congestion control conflicts.Encryption: AES-128-GCM (or AES-256-GCM depending on requirements)
AES-GCM provides both encryption and authentication in a single, efficient operation, making it ideal for high-speed connections.Compression: Off
Compression should only be enabled on metered network connections where reducing the amount of transmitted data is more important than throughput rates.
On high-speed network links, compression can actually reduce performance due to the additional processing overhead.
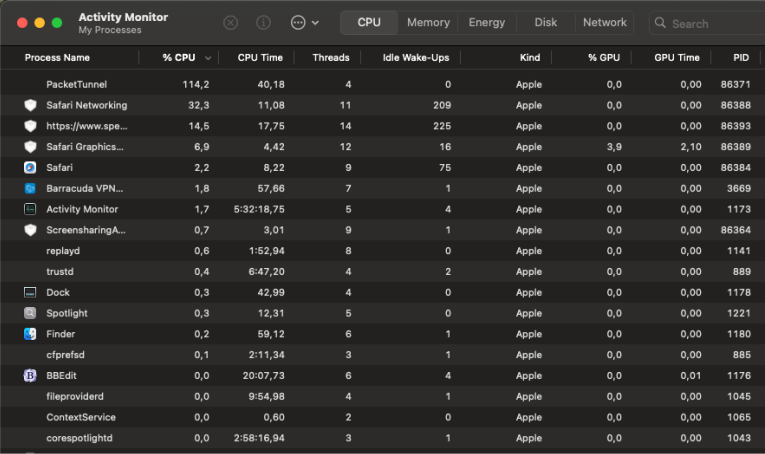
macOS:
On macOS, VPN Clients are built on Apple’s Packet Tunnel Provider API which is part of the Network Extension Framework. This API runs in a sandboxed user-space process with restricted access to CPU and memory resources.
Because it cannot fully utilize all available system resources—unlike kernel-level drivers on other platforms—packet processing throughput can be limited when compared to other OS platforms (e.g. Windows or Linux).
In order to check if these resource limits are being hit, you can use “Activity Monitor” on macOS to view the CPU load for the “PacketTunnel” process.
2. Troubleshooting Performance Issues
If your data rates are still lower than expected, it is recommended to:
Test the underlying network connection with
iperf
As described in the previous section,iperfcan be used to measure the performance between the VPN client and the VPN server.Check for UDP Packet Loss
For optimal VPN performance, the network connection should not show any UDP packet loss duringiperftesting against the Public IP of the VPN server.
Packet loss can only be seen on the receiver side.iperfhas the option-Rfor reverse mode, in which the server sends packets to the client.
Also for UDP the bandwidth must be specified for example-b 100Mfor 100MBit/sMTU Considerations
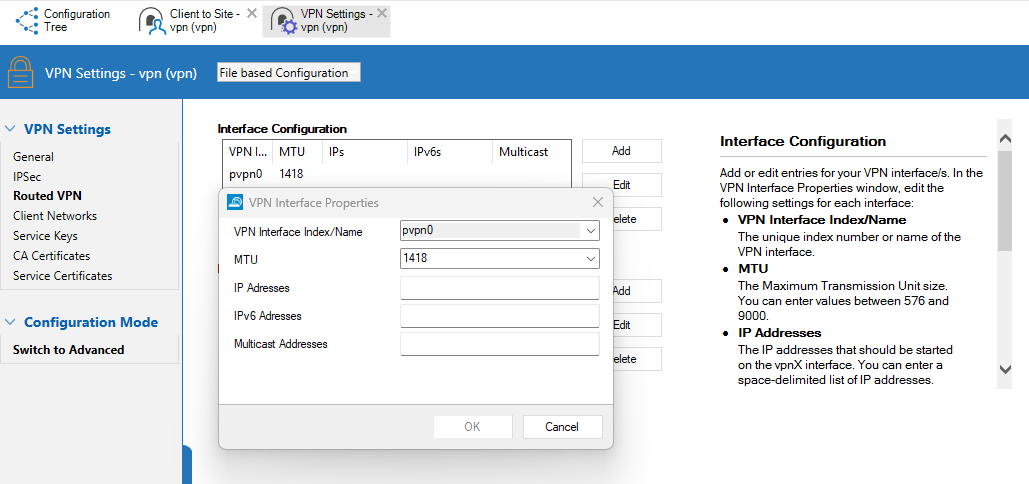
The TINA VPN protocol uses an MTU size of 1418 bytes for the inner payload by default. This value is chosen to avoid packet fragmentation in most common network environments.
In certain cases, further reducing the MTU can help improve throughput rates, especially if intermediate network devices or ISPs cause fragmentation or packet loss.
The MTU size for Client-to-Site VPN connections can be centrally managed on the CloudGen Firewall via FWAdmin.
Please make sure to select the pvpn0 interface under “VPN Interface Properties”:
Endpoint Protection
Endpoint Protection software and/or Personal Firewalls can negatively affect VPN throughput performance due to network packets being intercepted and/or being blocked completely based on configured policies.
We recommend temporarily disabling Endpoint Protection software and Personal Firewalls while performing VPN throughput tests. This helps ensure that the results reflect the VPN’s true performance without interference from security software.Test hardware
The CPU clock of the client computer, especially the single core performance is quite relevant for the VPN throughput that can be achieved.
The hardware model of the firewall is relevant as well, and in case of VMs the underlying VM type. Make sure that the firewall license matches the number of cores of the underlying VM type.
For 1000MBits/s UDP throughput, the firewall needs to have 4 cores (e.g., D4s_v3 in Azure), a Windows client around 4GHz (internal tests showed that a 2.8Ghz Xeon are necessary for 600MBits/s VPN throughput with UDP, or a 2.3GHz Xeon for 250MBits/s). The number of cores is not relevant for the client computer as the NAC client does not support multiple cores, yet.
Throughput of unencrypted / non VPN traffic can be a multiple of the VPN throughput depending on the number of cores on the client computer.