Routed bridging is used when the firewall must act as a layer 2 bridging and layer 3 routing device simultaneously. This is needed when the clients and servers in the bridged network must send data into another network. The bridged interfaces are assigned local IP addresses so the clients in the bridged networks can directly address the Barracuda CloudGen Firewall. Firewall rules forward traffic between the bridge interface groups and the external networks.

Step 1. Configure a Routed Layer 2 Bridge
Create a layer 2 bridge and add bridge IP addresses to allow the clients in the bridges networks to directly access the Barracuda CloudGen Firewall.
- Go to CONFIGURATION > Configuration Tree > Box > Network.
- In the left navigation, click on Layer 2 Bridging.
Click Lock.
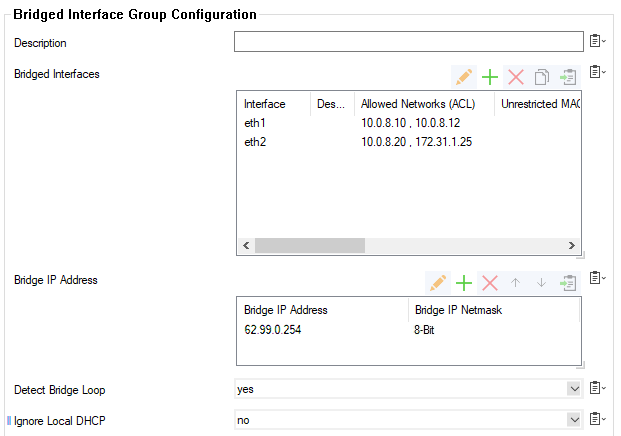
In the Bridged Interface Group table, click + to add an entry. For each interface group, you can edit the following settings:
- Bridged Interfaces – Add all interfaces to be bridged together in this group. For each interface enter the following settings:
- Interface –The exact network interface label, as listed in the network configuration. E.g., eth1
- Allowed Networks (ACL) – Networks that are allowed to communicate over the bridged interface. You can enter complete networks, individual client/server IP addresses, or network ranges.
- Unrestricted MACs – List of MAC address for which the Allowed Networks (ACL) does not apply.
- MAC Change Policy – Select Allow–MAC–Change to permit the MAC address of the interface to be changed, otherwise select Deny-MAC-Change.
Assign to RSTP Tree – Assign the interface to an existing RSTP tree by choosing it from the list.
RSTP Interface Priority – Assign a priority to the RSTP interface. This might affect the role the port will play in the calculated topology.
Active – Default is yes. Set to no to disable the setting to leave the interface within the configuration but prevent it from being used.
- Bridge IP Address – Add an entry or edit an existing entry for the gateway. In the entry, specify the following settings for the gateway:
Bridge IP Address – IP address for the gateway. E.g.,
62.99.0.254- Bridge IP Netmask – Netmask for the gateway.

RSTP Tree – Add RSTP trees to the bridged interface group so that a subset of its interfaces can be assigned to them.
- Bridged Interfaces – Add all interfaces to be bridged together in this group. For each interface enter the following settings:
Click OK.
- Click Send Changes and Activate.
Step 2. Create Access Rules
To allow network traffic to pass between the bridged interfaces, create Pass and Broad-Multicast access rules:
- Go to CONFIGURATION > Configuration Tree > Box > Assigned Services > Firewall > Forwarding Rules.
- Click Lock.
- Create a Pass access rule with the following settings:
- Bi–Directional – Yes
- Source – Select Any (0.0.0.0/0)
- Service – Select Any
- Destination – Select a network object containing all networks or IP addresses for the bridged interfaces. E.g.,
10.0.8.0/24and172.31.1.25 - Connection Method – Select Original Source IP.
- Create a Broad–Multicast access rule with the following settings:
- Source – Select a network object containing all networks or IP addresses for the bridged interfaces. E.g.,
10.0.8.0/24and172.31.1.25 - Service – Select Any
- Connection Method – Select Original Source IP.
Destination – Enter the destination networks/IP addresses. E.g.,
10.0.8.255Propagation List – Enter the network interfaces. E.g.,
eth0,eth0,brid01
- Source – Select a network object containing all networks or IP addresses for the bridged interfaces. E.g.,
- Rearrange the order of the firewall rules so the new rules can match incoming traffic.
Click Send Changes and Activate.
