The following article provides an overview of how to configure DHCP for an example environment. It provides steps and example settings to configure a DHCP service for an environment that contains two networks with three different IP pools.
Example Environment
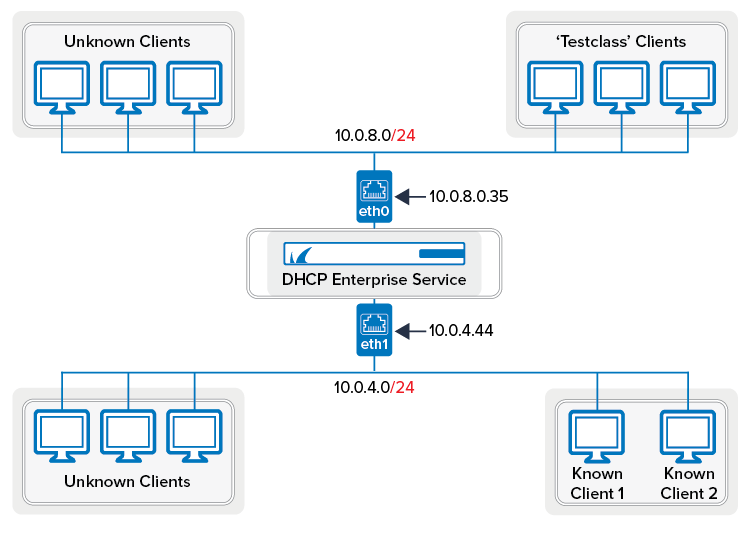
For the example environment that is displayed in the following figure, a DHCP service must configured for two networks with three different IP pools:
- Network 1 (10.0.8.0/24) – Contains two address pools: one pool for unknown clients and one pool for known clients (identified via their MAC addresses).
- Network 2 (10.0.4.0/24) – Contains one address pool for unknown clients and two known clients.

Example Environment Configuration
The DHCP service for the example environment can be configured with the following steps and settings:
| Step | Settings for Example Environment | ||||||||||
|---|---|---|---|---|---|---|---|---|---|---|---|
On the Box > Network page, click IP Configuration from the Configuration Mode menu in the left navigation pane. In the Shared networks and IPs section, click + and add the following addresses:
| |||||||||||
| Step 2: Create the DHCP service | By default, Service Availability for the DHCP service is set to All-IPs. | ||||||||||
| Step 3: Enable advanced DHCP settings. | To enable the advanced DHCP settings, you must be in the Advanced Configuration mode. On the DHCP Enterprise Configuration - Operational Setup page , click Switch to Advanced View from the Configuration Mode menu in the left navigation pane. Make sure that you select yes from the Use Advanced Pool Configuration list . | ||||||||||
| Step 4: Configure DHCP classes. | A DHCP class named testclass is created with the following settings:
| ||||||||||
| Step 5: Configure subnets and address pools. | Two separate subnets are created for Network 1 (10.0.8.0/24) and Network 2 (10.0.4.0/24).
| ||||||||||
| Step 6: Configure known clients. | Two client groups are created:
| ||||||||||
| Step 7: View real-time information for the DHCP service. | To view and modify lease and IP range information for the DHCP service, click the DHCP tab. |
