Use an IPsec IKEv2 client-to-site VPN to let mobile workers connect securely to your Barracuda CloudGen Firewall with a standard compliant IKEv2 VPN client.

Supported VPN Clients
Although any standard-compliant IPsec IKEv2 client should be able to connect via IPsec, Barracuda Networks recommends using the following clients:
- Windows 8.1/Windows 10 native IKEv2 IPsec VPN client
- Windows 10 Mobile 10.0.14393 or newer
- Native Android IPsec VPN Client
Before You Begin
- Set up the VPN certificates for external CA. For more information, see How to Set Up External CA VPN Certificates.
- Configure MS-Chapv2 authentication. For more information, see How to Configure MS-CHAP Authentication. For RADIUS-based authentication, this step is not required.
- Identify the subnet and gateway address to use for the VPN service in your network (e.g.,
192.168.6.0/24and192.168.6.254). - Identify the IPv4 and IPv6 addresses the VPN service is listening on. If you are using a dynamic WAN IP, see How to Configure VPN Access via a Dynamic WAN IP Address.
Step 1. Prepare VPN Certificates
Get the corresponding root certificate (or create a new one) that should be used to issue a VPN server certificate.
- Create a new VPN server certificate by using the CA from above with the following requirements:
- Hostname of the VPN server that is entered on the client must be contained in the subjectAltName field of the certificate.
- Required Key Usage fields:
- Non-Repudiation, Digital Signature, Key Encipherment
- Required EKU fields:
- IP Security IKE Intermediate / IP Security End Identity in xCA (OID 1.3.6.1.5.5.8.2.2)
- Server Authentication (OID 1.3.6.1.5.5.7.3.1)
You should now have a root certificate in CER or PEM format and a VPN certificate in PKCS12, CRT, or PEM format.
Step 2. Add Certificates to VPN Settings
Go to CONFIGURATION > Configuration Tree > Box > Assigned Services > VPN-Service > VPN Settings.
- Click Lock.
- In the left menu, select Root Certificates.
- Right-click the table and click Import CER from File or Import PEM from File, depending on the format of your root certificate.
- Select and upload the root certificate created in Step 1.
- In the left menu, select Service Certificates.
- Right-click the table and click the Import Certificate menu item matching your VPN server certificate.
- Select and upload the VPN certificate created in Step 1.
- In the left menu, select Service Keys.
- Right-click the table and select New Key.
- Enter a Key Name.
- Select the Key Length.
- Click OK.
- Click Send Changes and Activate.
Step 3. Create the VPN Client Network
All VPN clients will receive an IP address from the VPN client network with a static gateway. You can choose the gateway IP address freely from the subnet.
- Go to CONFIGURATION > Configuration Tree > Box > Assigned Services > VPN-Service > VPN Settings.
- Click Lock
- In the left menu, select Client Networks.
- Right-click the table and select New Client Network. The Client Network window opens.
- In the Client Network window, configure the following settings:
- Advertise Route – Select check box to include the VPN network in the OSPF or BGP network.
Name – Enter a descriptive name for the network.
Network Address – Enter the base network address for the VPN clients.
Gateway – Enter the gateway network address.
Type – Select routed (Static Route). VPN clients are assigned an address via DHCP (fixed or dynamic) in a separate network reserved for the VPN. A static route on the firewall leads to the local network.
- Click OK.
- Click Send Changes and Activate.
Step 4. Configure IKEv2 Phase 1 and 2
- Go to CONFIGURATION > Configuration Tree > Box > Assigned Services > VPN-Service > Client to Site.
- Click Lock.
- Click the External CA tab.
- Clear the Hide Advanced Configuration check box.

- Click the IPsec sub-tab.

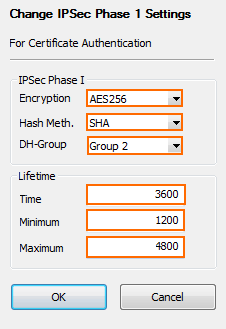
- In the IKEv2 Phase 1 (default) section, double-click on the Phase 1 encryption settings. The Change IPsec Phase 1 window opens.
- Configure the IPsec Phase I encryption settings:
- Encryption – Select AES256.
- Hash Meth – Select SHA.
- DH-Group – Select Group 2.
- (optional) Set the IPsec Phase 1 Lifetime settings:
- Time – Enter
3600 - Minimum – Enter
1200 - Maximum – Enter
4800
- Time – Enter
- Click OK.
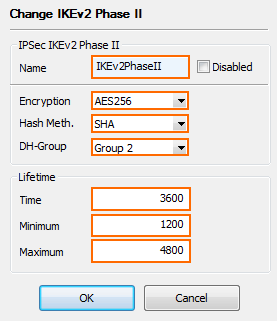
- Right-click in the IKEv2 Phase 2 table and select New IKEv2 Phase II. The IPsec IKEv2 Phase II windows opens.
- Enter a Name.
- Configure the IPsec phase 2 encryption settings:
- Encryption – Select AES256.
- Hash Meth – Select SHA.
- DH-Group – Select Group 2.
- (optional) Set the IPsec Phase 2 Lifetime settings:
- Time – Enter
3600 - Minimum – Enter
1200 - Maximum – Enter
4800
- Time – Enter
- Click OK.
- Click Send Changes and Activate.
Step 5. Configure VPN Common Settings
- Go to CONFIGURATION > Configuration Tree > Box > Assigned Services > VPN-Service > Client to Site.
- Click Lock.
- Click the External CA tab.
- Click the Common sub-tab.
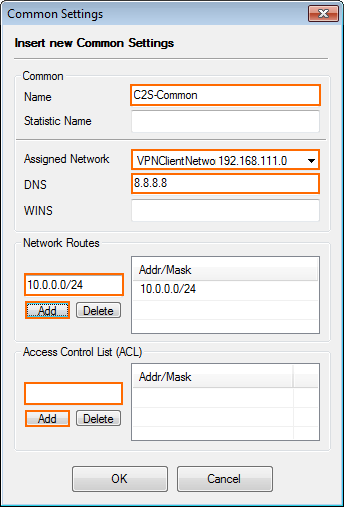
- Right-click the table and select New Common. The Common Settings window opens.
- Enter a Name.
- (optional) Enter a Statistic Name. For more information, see Statistics.
- From the Assigned Network drop-down list, select the VPN network created in Step 3.
- (optional) Enter the DNS server IP address.
- (optional) Enter the WINS server IP address.
- Enter the Network Routes that should be sent through the VPN tunnel and click Add. To send all traffic through the VPN tunnel, enter
0.0.0.0/0. - (optional) To limit the source from which VPN connections are accepted, add the IP addresses or subnets to the Access Control List (ACL).
- Click OK.
- Click Send Changes and Activate.
Step 6. Configure a VPN Group Policy
- Go to CONFIGURATION > Configuration Tree > Box > Assigned Services > VPN-Service > Client to Site.
- Click Lock.
- Click the External CA tab.
- Click the Policy sub-tab.
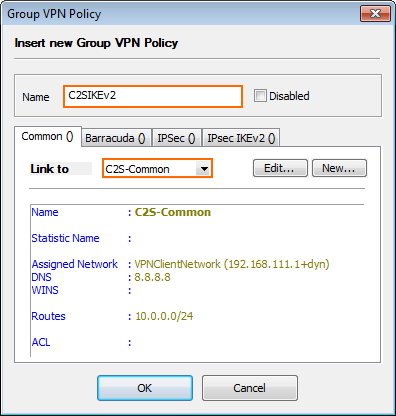
- Right-click in the table and select New Policy. The Group VPN Policy window opens.
- Enter a Name.
- In the Common tab, select the VPN common settings you created in Step 5 from the Link to drop-down list.
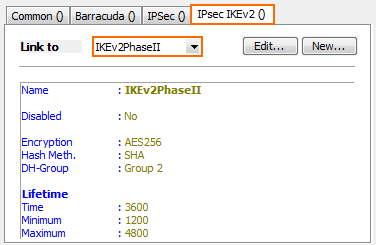
- Click the IPsecIKEv2 tab.
- Select the IPsec IKEv2 Phase 2 settings from the Link to drop-down list.
- Click OK.
- Click Send Changes and Activate.
Step 7. Configure VPN Rules
- Go to CONFIGURATION > Configuration Tree > Box > Assigned Services > VPN-Service > Client to Site.
- Click Lock.
- Click the External CA tab.
- Click the Rules sub-tab.
- Right-click in the table and select New Rule. The Group Policy Condition window opens.
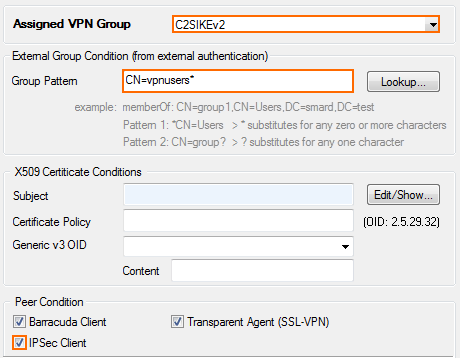
- From the Assigned VPN Group list, select the group VPN policy created in Step 6.
- (external authentication only) Enter a Group Pattern to define the groups that will be assigned the policy. E.g.:
CN=vpnusers* In the Peer Condition section, verify that the IPsec Client check box is selected.
- (optional) In the X509 Certificate Conditions section, enter matching conditions for the X.509 client certificates.
- Click OK.
- Click Send Changes and Activate.
Step 8. Configure Group VPN Settings
- Go to CONFIGURATION > Configuration Tree > Box > Assigned Services > VPN-Service > Client to Site.
- Click Lock.
- Click the External CA tab.
- Click the Click here for options link.

- From the Authentication Scheme drop-down list, select Default Authentication Scheme.
- From the Default Authentication Scheme drop-down list, select msad or radius.
- From the Server drop-down list, select the VPN server certificate uploaded in Step 2.
- From the Server Protocol Key drop-down list, select the service certificate created in Step 2.
- From the Used Root Certificates drop-down list, select the root certificate uploaded in Step 2.
- Click OK.
- Click Send Changes and Activate.
Step 9. Add Access Rules
Add an access rule to connect your client-to-site VPN to your network.
For more information, see How to Configure an Access Rule for a Client-to-Site VPN.
Monitoring VPN Connections
On the VPN > Client-to-Site page, you can monitor VPN connections. The page lists all available client-to-site VPN tunnels. In the Tunnel column, the color of the square indicates the status of the VPN:
- Blue – The client is currently connected.
- Green – The VPN tunnel is available, but currently not in use.
- Grey – The VPN tunnel is currently disabled. To enable the tunnel, right-click it and select Enable Tunnel.
For more information on the VPN > Client-to-Site page, see VPN Tab.
Troubleshooting
To troubleshoot VPN connections, see the srv_<SERVER_NAME>_<VPN_SERVICE_NAME>_IKEv2.log log file. For more information, see LOGS Tab.
Next Step
Configure the remote access clients to connect to the client-to-site VPN.
For more information, see Remote Access Clients.
