To manage a previously configured firewall and not lose its configuration, import the PAR file. After importing the PAR file, the Control Center automatically signs the box certificates. Deploy the PAR file to the firewall to finish adding the firewall to the Control Center.
Before You Begin
Service names must be unique. Verify that the name of the services on the firewall is not already used in the cluster.
Step 1. Transfer Certificates from the Certificate Store on the Stand-Alone Firewall to the Certificate Store on the Control Center
- Log into the firewall.
- Go to CONFIGURATION > Configuration Tree > Advanced Configuration > Certificate Store.
- For each certificate in the certificate store:
- Right-click each certificate in the list.

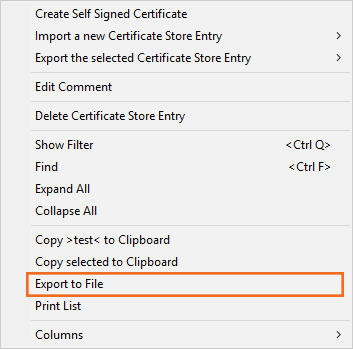
- Click Export to File to save the certificate.
- Right-click each certificate in the list.
- Log into the Control Center.
- Go to CONFIGURATION > Configuration Tree > Range Settings / Cluster Settings > Certificate Store.
- Click Lock.
- For each certificate that has been exported before:
- Click +. The import menu is displayed.
- Click Import new Certificate Store Entry from File.

- Click Send Changes.
- Click Activate.
Step 2. Export the PAR File on the CloudGen Firewall
Create a PAR file on the firewall. This file contains all your configuration settings.
- Log into the firewall.
- Go to CONFIGURATION > Configuration Tree > Box.
- Right-click on the Box node and select Create PAR file.
- Choose the destination folder and click Save.
- Click OK.
Step 3. Import the PAR File on the Control Center
- Go to CONFIGURATION > Configuration Tree > Multi-Range > your range > your cluster .
- Right-click Boxes and select Import Box from PAR file.
- Select the PAR file created in Step 2.1 and click Open.
- Enter a Box Name. The name cannot be changed after importing the PAR file.
- Click Activate.
Step 4 (optional) Rename the Service Name
If a new box is created in the configuration tree, the default name of that box is set to 'newbox'. When creating a new service in that box, the default name of the service is the same as the name of the box.
By contrast, when importing a box from a PAR file, you can enter a new name for the box. In this case, however, the name of the service is not synchronized to the new name of the box. In such cases, you can subsequently rename the service with the following steps:
- Go to CONFIGURATION > Configuration Tree > Multi-Range > your range > your cluster > Boxes > your imported box > Assigned Services > your service.
- Right-click the service that you want to rename.
- In the list, select Lock.
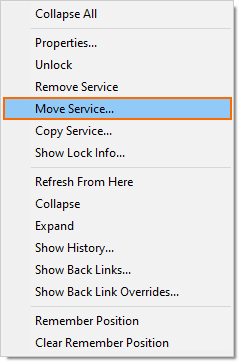
- In the list, select Move Service... .

- The Select Destination Window is displayed.
- In the list, ensure that the path of the service stays the same as before.
- In the edit field, enter the new name for the service.
- Click OK.
- Click Activate.
The name of your selected service is now renamed.
Step 5. Change Configuration to Use Certificates from the Control Center Certificate Store
After importing the PAR file on the Control Center, all certificates must be reassigned at their appropriate location of usage.
Step 6. (optional) Configure Remote Management Tunnel
If your firewall cannot directly access the Control Center, configure a remote management tunnel. For more information, see How to Configure a Remote Management Tunnel for a CloudGen Firewall.
Step 7. Enable the CloudGen Firewall
Imported firewalls are disabled per default. Disabled firewalls are represented by a gray status icon.
- Go to CONFIGURATION > Configuration Tree > Multi-Range > your range > your cluster > your CloudGen Firewall > Box Properties.
- In the left menu, select Operational.
- Set Disable Box to no.
- Click Send Changes and Activate.
The status of the firewall on the Status Map (CONTROL > Status Map) now changes from gray (offline) to red with dashes (unreachable).
Step 8. Deploy the PAR file to the CloudGen Firewall
Deploy the PAR file to the firewall.
Step 8.1 Create the PAR file on the Control Center
- Log into the Control Center.
- Expand the node for the firewall you imported in Step 3.
- Right-click on the box name and select Create PAR file for box.
- Choose the destination folder and click Save.
Step 8.2. Import the PAR on the CloudGen Firewall
- Log into your firewall.
- Go to CONFIGURATION > Configuration Tree > Box.
- Right-click on the Box node and select Restore from PAR file.
- Click OK.
- Select the PAR file created in Step 8.1 and click Open.
- Click Activate.
Step 8.3. Activate the Network Configuration
- Go to CONTROL > Box.
- In the left menu, expand the Network section and click Activate new network configuration.
- Select Failsafe.
Step 8.4. Restart the Firmware
- Go to CONTROL > Box.
- In the left menu, expand Operating Systems and click Firmware Restart.
- Click YES. The firmware of the firewall restarts.
The status of the firewall is now green, red, or yellow. It can take a couple of minutes for the firewall to create a management tunnel.
