

Configure dynamic DNS updates for the Barracuda CloudGen Firewall DHCP service. The DDNS update style is evaluated once after reading the dhcpd.conf file, not each time a client is assigned an IP address. As a result, the same DNS update style is used for all clients.
This article gives a general overview of configuring a setup that applies to the title of this article.
At the end of this article, there is a link to an article that illustrates how to do a certain setup based on a discrete practical use case.
Before You Begin
- Before configuring dynamic DNS, enable advanced pool configuration in the DHCP service setup. For more information, see How to Configure Advanced DHCP Settings.
- Make sure that a DNS service is created and configured on your firewall. For more information, see DNS.
Step 1. Configure the DNS Zones
Configure DNS zones for your clients. If a forward and a reverse lookup must be done, a valid zone must be configured where updates are allowed. A reverse zone is not required if only a forward lookup should be done.
For more information, see How to Configure a Zone.
Step 2. Create a DHCP Subnet
Create a DHCP subnet for the clients that should receive DDNS updates. For more information, see How to Configure DHCP Subnets and Address Pools.
Step 3. Create a Parameter Template
Create a DHCP parameter template for the subnet the clients reside in:
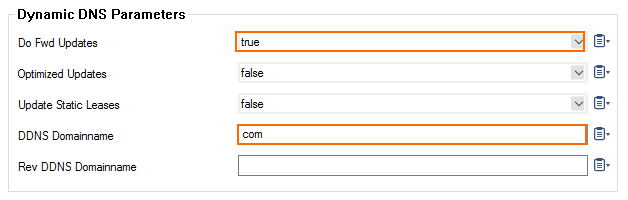
- In the Dynamic DNS Parameters settings, set Do Fwd Updates to true.
- For dynamic DNS to work, you must also enter the DDNS Domainname.
For more information, see How to Configure DHCP Parameter Templates .
Step 4. Configure Dynamic DNS
- Go to CONFIGURATION > Configuration Tree >Box > Assigned Services > DHCP > DHCP Enterprise Configuration .
- In the left menu, expand the Configuration Mode section and click Advanced View.
- In the left menu, select Dynamic DNS.
- Click Lock.
- Select whether to use a DNS Update Scheme.
When selecting interim, choose an option from the Client Updates list.
- (optional) In the Zone Keys table, click + and add the HMAC-MD5 keys for the DNS zones.
- In the DNS Zones table, click + and add the DNS zones.
- Specify the Zone Type. You can select:
- Forward – (default) The hostname is looked up.
- Enter the network of the forward lookup in the Forward Zone Name field.
- Reverse – The IP address is looked up.
- Enter the network of the reverse lookup in the Reverse Lookup Net/Netmask fields.
- Both – IP address and hostname are looked up.
- Enter the network of the forward and reverse lookup in the Forward Zone Name and Reverse Lookup Net/Netmask fields.
- Forward – (default) The hostname is looked up.
- Enter the DNS Server IP address.
- Select the Authentication Key for the zone that was entered in the Zone Keys table.
- (optional) Click + and add additional DNS zones.
- Click OK.
- Click Send Changes and Activate.
If you want to configure DHCP with dynamic DNS based on a discrete use case, see Example - How to Configure DHCP with Dynamic DNS.