To deploy a Secure Connector, configure the Secure Connector device via the SCA Editor in the Control Center, or add a Secure Connector Configuration using a configuration template. Configuration settings configured via a template are automatically used and cannot be configured on a per-device basis. For more information, see Configure a Secure Connector via Templates. To configure a Secure Connector via the SCA Editor, perform the following steps.
Step 1. Add a Secure Connector Configuration
- Go to your cluster > Cluster Settings > Secure Connector Editor.
- Click Lock.
- Click Add SC.
(optional) Select a template.
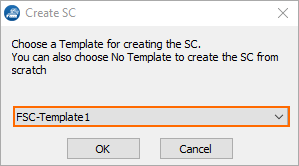
- Click OK. The Create SC window opens.
Step 2. Configure the Settings for the Secure Connector
Configure Identification Settings
- Enter a Unique Appliance Name for the Secure Connector. The name is final and cannot be changed later.
The Unique Identifier is a string containing the range, cluster, and unique appliance name. - (optional) Enter a description for the Secure Connector.
- From the Secure Connector Model drop-down list, select the hardware version. E.g., FSC2.
- From The Secure Connector Submodel drop-down list, select the applicable submodel. E.g., FSC2.4/2.6 4G.
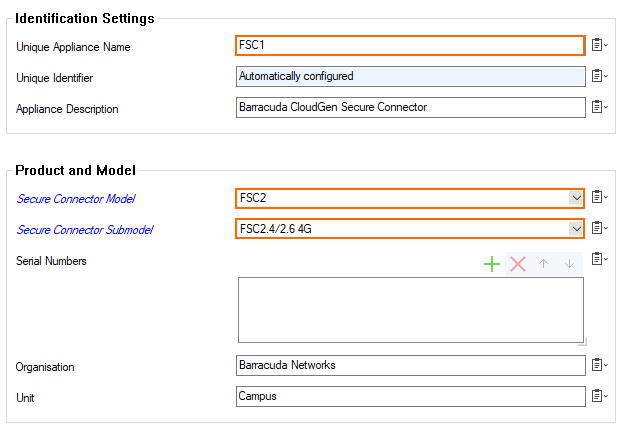
- Click + to add the serial number of the Secure Connectors allowed to connect with this configuration.
- (optional) Enter your company details and specify the location and time zone of the Secure Connector unit.
Configure Administrative Settings
- In the left menu, click Administrative Settings.
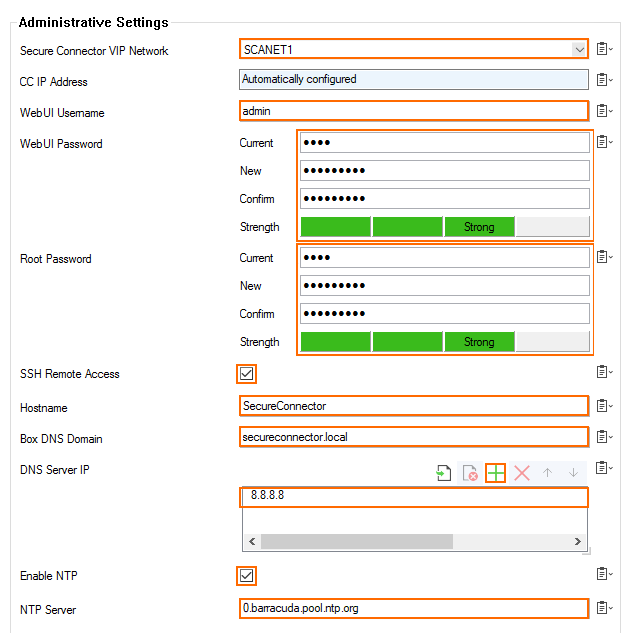
- Select the Secure Connector data network from the Secure Connector VIP Network drop-down list. The Secure Connector is automatically assigned to the Access Controller associated with the Secure Connector network.
- Set the WebUI Username/Password for the web interface of the Secure Connector.
Enter the Root Password for the Secure Connector. The default root password is:
ngf1r3wall- Select the SSH Remote Access check box to enable SSH. You must also create an Secure Connector management rule to be able to log in via SSH. For more information, see How to Create Secure Connector Firewall Management Rules.
- Enter the Hostname used for the Secure Connector. You can use the same hostname for all Secure Connectors.
- In the Box DNS Domain field, enter the domain for the Secure Connector.
- Next to DNS Server IP, click + to enter the IP addresses for the DNS servers.
- Select the Enable NTP check box to synchronize the time with an NTP server.
- Enter the FQDN or IP address for the NTP Server located near your location. Default:
0.pool.ntp.org
Configure WAN Settings
In the left menu, click WAN Settings.
- From the WAN Network Mode drop-down list, select Manual or DHCP Client.
Configure the WAN connection for the WAN port. For more information, see Secure Connector WAN Connections.
Configure LAN Settings
In the left menu, click LAN Settings.
Select the LAN Network Mode and assign networks to the LAN interface. For more information, see Secure Connector LAN Settings.
Configure Wi-Fi Settings (SC1, SC21, SC23, SC25, SC27)
In the left menu, click Wi-Fi Settings.
Select the Wi-Fi Mode:
Access Point Mapped – Manual Wi-Fi network configuration mapped to a Secure Connector data network assigned by the Control Center.
Access Point Manual – Manual Wi-Fi network configuration.
- Access Point Automatic – The Control Center automatically assigns a data network to the Wi-Fi network of the SC.
Wi-Fi Client – Select to use the Wi-Fi interface as a WAN interface.
For more information, see Secure Connector Wi-Fi Access Point or Secure Connector WAN Connections.
Configure Wireless WAN Settings (SC22, SC23, SC24, SC25, SC26, SC27)
In the left menu, click Wireless WAN Settings.
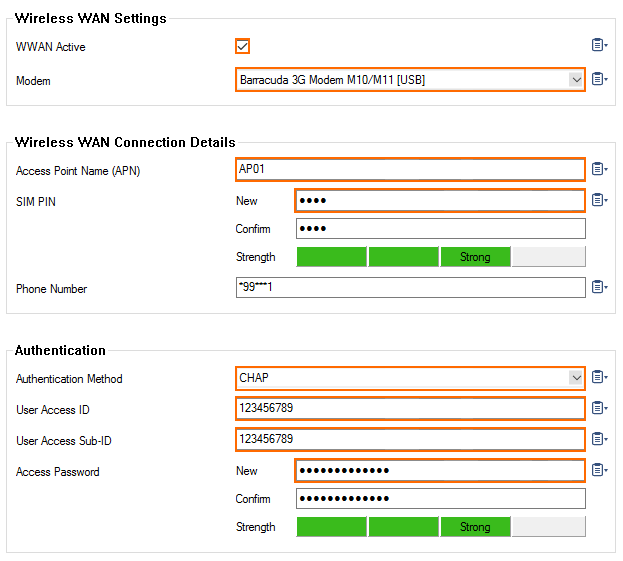
- Select the WWAN Active check box.
- Select the Modem.
- Enter the name of the WWAN access point you wish to connect to.
- If applicable, enter the unlocking PIN code for your SIM card.
- Enter the Phone Number number without the trailing hash (#).
- Select the Authentication Method.
- Enter the User Access ID assigned by your WWAN service provider.
- (optional) Enter the User Access Sub-ID assigned by your WWAN service provider.
Enter the Access Password assigned by your WWAN service provider.
Configure VPN Settings
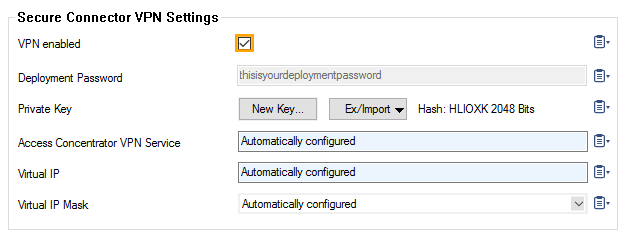
- In the left menu, click VPN Settings.
- Select the VPN enabled check box.
- Click New Key and select the Key Length to generate the private certificate.
- Click Edit and fill in the certificate information.
- (Manual network only) – Enter the VIP IP address in the Virtual IP field. If automatically assigned, this is the first IP address in the Secure Connector subnet assigned to the unit.
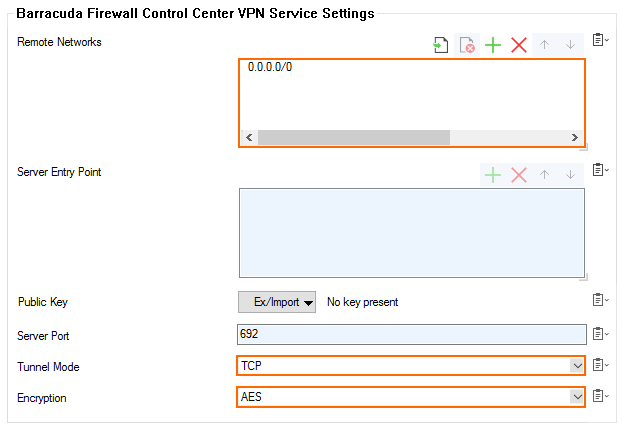
- Next to Remote Networks, click + to add the networks routed through the VPN tunnel. To send everything through the tunnel and to offer Internet access, enter
0.0.0.0/0.
The Server Port is the Entry Port configured for the Access Controller. The VPN Access Controller Public Key is automatically filled in when the configuration is saved. - From the Tunnel Mode drop-down list, select the transport protocol. Select TCP (default) for more reliability and UDP for high performance.
- Select the Encryption algorithm used.
Configure Routing Settings
- In the left menu, click Routing Settings.
Click + to add System Routes. For more information, see Secure Connector Routing.
Configure Firewall Settings
In the left menu, click Firewall Settings.
Configure the Firewall Settings. For more information, see Secure Connector Firewall.
Configure Container Settings
- In the left menu, click Container Settings.
Select the Container enabled check box.
- Enter the Root Password for container support on the Secure Connector.
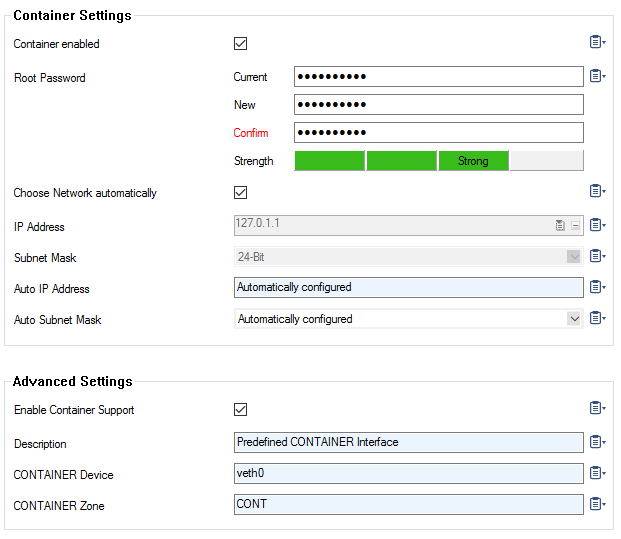
For more information, see Secure Connector Container.
Configure Advanced Settings
In the left menu, click Advanced:
Configure Logging. For more information, see Secure Connector Logging.
Select USB Mass Storage support to use the Secure Connector as a mass storage device on your desktop computer. This allows you to copy configuration files directly to the Secure Connector.

- To configure syslog streaming, see Secure Connector Logging.
Click OK.
Click Activate.
Configure Custom Script
In some cases, you may want to trigger the execution of a script during network activation. This can be done by adding the script text into an edit field and enabling the execution.
- In the left menu, click Advanced.
- Click Enable Custom Script to enable execution of the script.
- For Add Custom Script, add your script code into the edit field.
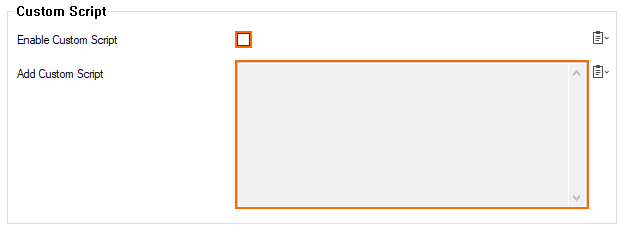
Click Send Changes.
Click Activate.
