

On the Barracuda CloudGen Firewall F-Series, you can enable hardware monitoring and specify the watermark settings for disk monitoring. To monitor the CPU load of the Barracuda CloudGen Firewall F-Series, you can set a limit on the number of processes that may simultaneously wait for execution (in either inbound or outbound direction) within an average of 1, 5, and 15 minutes before the High System Load [30] and Excessive System Load [31] events are generated.
Configure CPU Load Monitoring
- Go to CONFIGURATION > Full Configuration > Box > Infrastructure Services > Control.
- In the left menu, select CPU Load Monitoring.
- Click Lock.
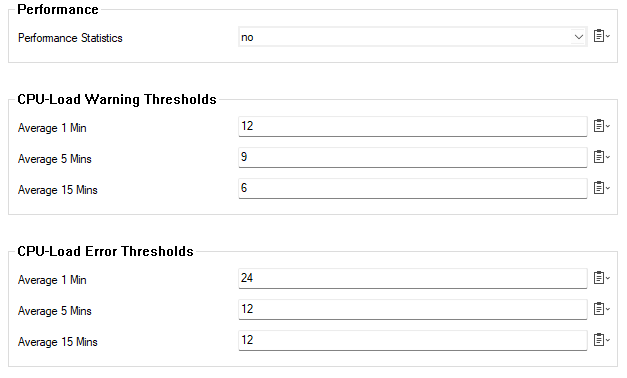
- Enable Performance Statistics to collect system performance data.
- In the following sections, specify the CPU load thresholds before event notifications are generated:
- CPU-Load Warning Thresholds – The maximum number of waiting processes that are allowed within an average of 1, 5, and 15 minutes before the High System Load [30] event is generated.
- CPU-Load Error Thresholds – The maximum number of waiting processes that are allowed within an average of 1, 5, and 15 minutes before the Excessive System Load [31] event is generated. For example, if you enter 24 in the Critical 1 Min. Average field of the CPU Load Error Thresholds section, the Excessive System Load [31] event is created when there are at least 24 waiting processes within an average of 1 minute.
- Click Send Changes and Activate.
Configure Hardware Monitoring
- Go to CONFIGURATION > Full Configuration > Box > Infrastructure Services > Control.
- In the left menu, select Hardware Monitoring.
- Click Lock.
- Edit the following settings:
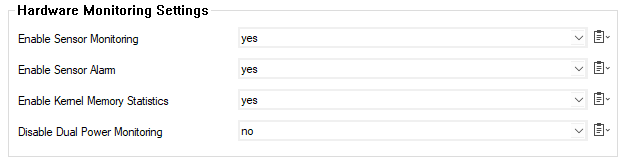
- Enable Sensor Monitoring – To enable the hardware sensor monitor (e.g. for fan speeds or CPU temperature), select yes.
- Enable Sensor Alarm – To be notified when system resources reach red status or a critical system condition event is generated, select yes.
- Enable Kernel Memory Statistics – To gather statistics about kernel memory usage, select yes.
- Disable Dual Power Monitoring – To monitor dual-power supplies of an appliance (if present), select no.
- Click Send Changes and Activate.
Configure Disk Monitoring
- Go to CONFIGURATION > Full Configuration > Box > Infrastructure Services > Control.
- In the left menu, select Disk Monitoring.
- Click Lock.
- In the Disk Watermarks table, add an entry for each disk that must be monitored. Specify the following settings for each entry:
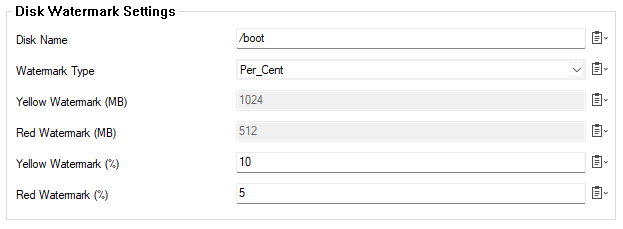
- Disk Name – The name of the disk to be monitored.
- Watermark Type – The watermark measurement. You can select one of the following:
- Per_Cent – To specify watermark limits by ratio.
- Absolute – To specify watermark limits in megabytes.
- Yellow Watermark – The limit after which the disk monitoring switches to yellow. Depending on the watermark type selected, enter this limit in megabytes or percentages.
- Red Watermark – The limit after which the disk monitoring switches to red. Depending on the watermark type selected, enter this limit in megabytes or percentages.
- Click OK to confirm your settings.
- Click Send Changes and Activate.
Configure Memory Monitoring
- Go to CONFIGURATION > Full Configuration > Box > Infrastructure Services > Control.
- In the left menu, select Memory Monitoring.
- Click Lock.
- In the Memory Monitoring Settings section, click the Set... button.
- The Memory Watermarks window is displayed.
- In the Memory Watermark Settings section, configure the following parameters:
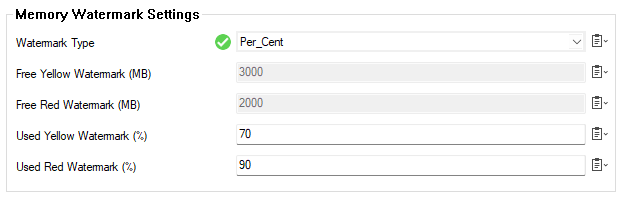
- Watermark Type – Select Per_Cent or Absolute for how the watermark shall be calculated.
- Per_Cent – The last two fields below will be used to configure the yellow and the red watermarks.
- Absolute – The first two fields below will be used to configure the yellow and the red watermarks.
- Free Yellow Watermark (MB) – The number sets the limit when the state changes to the yellow color. The default value is 3000 MB.
- Free Red Watermark (MB) – The number sets the limit when the state changes to the red color. The default value is 2000 MB.
- Used Yellow Watermark (%) – The number sets the limit when the state changes to the yellow color. The default value is 70%.
- Used Red Watermark (%) – The number sets the limit when the state changes to the red color. The default value is 90%.
- Watermark Type – Select Per_Cent or Absolute for how the watermark shall be calculated.
- Click OK to confirm your settings.
- Click Send Changes and Activate.