

Barracuda Firewall Admin
After updating a system, you must also download Firewall Admin with the same version. Firewall Admin is backward-compatible. That means you can manage 7.x and 8.x F-Series Firewalls and Control Centers with Firewall Admin 8.x.
Important Note for Users operating Firmware 7.2.5 or 7.2.6
Migration Path to 8.0.1
You can upgrade to firmware 8.0.1 from the following firmware versions:
Current Version | Target Version 8.0.1 |
|---|---|
| 7.0.0 - 7.0.4 | Yes |
| 7.1.0 EA - 7.1.5 | Yes |
| 7.2.0 - 7.2.4 | Yes |
| 8.0.0 | Yes |
Review Upgrade Requirements
Verify that your CloudGen Firewall or Control Center meets the upgrade requirements, and read the release notes for the firmware version.
Migrating vs. Clean Install
Firmware version 8.0.1 supports both migrating from 7.x to 8.0.1 and a clean install of 8.0.1.
Supported Models for Firmware Version 8.0.1
The following models will be capable running firmware version 8.0.1:
Barracuda CloudGen F-Series and Control Center Models | ||
|---|---|---|
Hardware Systems | F12 Rev A, F18 Rev A/B, F80 Rev A/B, F82 Rev A, F180 Rev A, F180R Rev A, F183, F183R Rev A, F280 Rev A/B, F380 Rev A, F400 Rev B (8/12 ports), F600 Rev C/D, F800 Rev B/C, F900 Rev A (only fresh install), F900 Rev B, F1000 Rev A | |
| Virtual Systems | VF10, VF25, VF100, VF250, VF500, VF1000, VF2000, VF4000, VF8000, VC400, VC610, VC820, ProxMox running with KVM images | |
| Public Cloud | AWS, Azure, Google Cloud | |
Standard Hardware Systems | ||
|---|---|---|
| Standard Hardware | A standard hardware system is a Barracuda CloudGen Firewall F-Series running on 3rd-party server hardware using an SF license. Consult the Barracuda Networks Technical Support to find out if your specific standard hardware is supported. | |
Disk Space Requirements
Upgrading to version 8.0.1 requires your disk partitions to have enough free disk space.
Firmware 8.0.1 will require the following partition spaces.
Disk Space Requirements FIREWALL:
| Hard Drive Partition | Disk Space Required |
|---|---|
| Swap | 2 GB |
| Boot | 1 GB |
| / | 8 GB |
| /phion0 | 4 GB |
| /art | 3 GB |
Disk Space Requirements CONTROL CENTER:
| Hard Drive Partition | Disk Space Required |
|---|---|
| Swap | 2 GB |
| Boot | 1 GB |
| / | 10 GB |
| /phion0 | 4 GB |
| /art | 10 GB |
Legacy Services with Release of Firmware 8.0.1
With firmware release 8.0.1 and higher, the following services are no longer available:
Replacement of Virtual Servers by a New 2-Layer Architecture
The former 3-layer server-service architecture has been replaced by a 2-layer architecture where services are now operated on top of the box layer. With firmware 8.0.1, services are subordinated to the Assigned Services node and allow a simpler administration of services and reduce error-prone issues by limiting services to run only on the box where they are initially created on.
If you are migrating from firmware versions < 8.0.1 to the new firmware 8.0.1, the old 3-layer architecture will still be active and you still can make changes to the respective server-service nodes.
However, if you want to create a new node for services, firmware 8.0.1 only supports the creation of the 2-layer based Assigned Services node.
For more information, see 8.0.1 Release Notes, Assigned Services and Understanding Assigned Services.
Naming of Bridges
The name of bridge devices phbr-<name> has been replaced by the new name br.<name>.
Migration Instructions for 8.0.1
When upgrading according to the migration path above, you must complete the migration steps listed below:
Step 1. Replace Legacy Services (Where Applicable)
Legacy services that provided antivirus integration can be substituted to preserve the level of security. The substitutions for the following services can be configured by following these links:
| Legacy Service | Substitutions, e.g. Firmware Release 7.2 |
|---|---|
| Mail Gateway | |
| FTP Gateway |
After substituting it is safe to remove the respective legacy services.
Step 2. Remove All Legacy Services from the Virtual Server
The following steps must be executed for all legacy services listed at the beginning of this parapraph if they are running on top of your virtual server.
- Go to CONFIGURATION > Configuration Tree > Box > Virtual Servers > your virtual server > Assigned Services.
- Right-click the legacy service.
- In the list, select Lock.
- Right-click the legacy service.
- In the list, select Remove Service.
- In the notification window, click Yes to remove the service.
- Click Activate.
Step 3. (optional) Disconnect Your CloudGen Firewall from Azure OMS Log Analytics Workspace
This step is necessary only for CloudGen Firewalls that are connected to an Azure OMS Log Analytics workspace if you migrate from firmware 7.x to 8.0.1.
- Log into the Azure portal: https://portal.azure.com.
- In the left menu, click All services and go to Log Analytics workspaces.
- Select the workspace that your CloudGen Firewall is attached to.
- Click Virtual machines to show a list of all virtual machines.
- Click on the entry of the virtual machine of your CloudGen Firewall.
- Click Disconnect to disconnect the CloudGen Firewall from the Log Analytics workspace.
- To confirm that you want to disconnect the virtual machine, click the Yes button.
- Wait until you are informed that it is successfully disconnected.
After the update, you must reconnect your Log Analytics workspace again.
VPN IPsec Tunnels with IKEv2 DH-Groups for Phase 1 & 2
Some DH-groups with a smaller length are not suited any more to provide state of the art security for IKEv2 in phase 1 and phase 2.
To check the settings, use Firewall Admin for a CloudGen firmware version <= 8.0:
- Go to CONFIGURATION > Configuration Tree > Box > Virtual Servers > your virtual server > Assigned Services > VPN > Site to Site > IPsec IKEv2 Tunnels > your IPsec IKEv2 Tunnel, section Phase 1, DH Group.
If you have configured a red marked DH-Group 25, 26, 27, 28, 29 or 30 for Phase 1 & 2, replace this value by
a DH-Group marked as green in the following table:Keyword DH Group Modulus ecp256 19 256 bits ecp384 20 384 bits ecp512 21 512 bits ecp192 25 192 bits ecp224 26 224 bits ecp224bp 27 224 bits ecp256bp 28 256 bits ecp384bp 29 384 bits ecp512bp 30 512 bits
After this point it is safe to use Firewall Admin for firmware release 8.0.1.
DNS
Firmware 8.0.1 includes a new DNS implementation that provides a redesigned user interface to provide a better user experience. If you are running a DNS server, all DNS zones and records will be migrated to the 8.0.1 firmware version.
Known Issues for DNS
Zones
Zones will be migrated depending on their zone type:
| Zone Type of DNS < 8.0.1 | Migration | Target Zone Type of DNS 8.0.1 |
|---|---|---|
| Master zone | Yes | Master zone |
| Master zone that contains in-addr.arpa / ipv6.arpa | Yes | Reverse zone |
| Slave zone | Yes | Slave zone |
| Forward zone | No | - |
| Hint zone | No | - |
Record Types
All records will be migrated. However, there will be a differentiation:
- Standardized record types will be migrated to standardized record types, e.g., A, AAAA, NS, MX
- Non-standardized record types will be migrated to OTHER record type
DNS Configuration Options
| Configuration value | Where to find in old DNS < 8.0.1 | Where to find in new DNS 8.0.1 |
|---|---|---|
| forwarders | DNS Configuration > right click on root node → Properties... | DNS Forwarders |
| masters | DNS Configuration > right click on zone node → Properties... > type "Slave" > Masters | Master DNS Servers |
| allow-transfer | DNS Configuration > right click on zone node → Properties... > advanced... | Zone Transfer ACL |
| TTL of the SOA record | DNS Configuration > right click on zone node → Properties... > Start of authority (SOA) > Expire (TTL) | Edit Hosted Zone > TTL |
| SOA MNAME | DNS Configuration > right click on zone node → Properties... > Start of authority (SOA) > Primary Server | Edit Hosted Zone > Primary Master Name Server |
| SOA RNAME | DNS Configuration > right click on zone node → Properties... > Start of authority (SOA) > Responsible person | Edit Hosted Zone > Responsible Person Email |
| $TTL | DNS Configuration > right click on zone node → Properties... > Start of authority (SOA) > Standard TTL | Edit Hosted Zone > TTL |
Usage of DNS Command Line Tool 'dig'
Because the new DNS implementation in the firmware release 8.0.1 is based on BIND V9.11, the usage of DNS cookies is now allowed as a default. DNS cookies increase the security during the communication between a BIND-based DNS server and a BIND-based client, e.g., a CloudGen firewall acting as a client and sending resolving requests to another CloudGen firewall running as a DNS master.
The BIND V9.11 command line tool 'dig' uses DNS cookies when queries are sent. However, this can lead to problems if a resolving query with a DNS cookie is received by a Microsoft DNS server because cookies are not handled there. User scripts that are executing the command 'dig' will therefore fail in case the answering DNS server is from Microsoft.
To avoid problems, you must modify your scripts that use the 'dig' command so that DNS cookies are not used when the command 'dig' is executed. For this, add the option '+nocookie' to the end of the line, e.g., dig ....... +nocookie.
For more information about how to use 'dig', login to the shell and type 'man dig'.
First-Generation ATP to Second-Generation Barracuda ATP Cloud Migration
As of January 31, 2019, the first-generation ATP cloud services used by default with firmware versions 7.0.x, 7.1.0, 7.1.1, and 7.2.0 will be discontinued. Firewalls using ATP must switch to the second-generation ATP cloud service, which is known as Barracuda Advanced Threat Protection (BATP).
The following table gives an overview of the options you have when you run a special firmware version:
| Product | Your Current Firmware Version | Migrating Option |
|---|---|---|
| Stand-alone Box | 7.1.0, 7.1.1, 7.2.0 | Update to the latest 7.1.x or 7.2.x releases, which are using BATP, without the need for further changes. If you cannot update your standalone box(es) to the latest releases, you can also migrate manually. |
Control Center | CC: 7.1.0, 7.1.1, 7.2.0 and Box: 7.1.0, 7.1.1, 7.2.0 | Update your managed boxes via the Control Center to the latest firmware release. |
Control Center | CC: 7.1.2, 7.2.1 or newer and Box: 7.1.0, 7.1.1, 7.2.0 | If you cannot update your managed box(es) to the latest release, contact the Barracuda Networks Support Team. |
| Stand-alone Box Managed Box | 7.1.2 or newer 7.2.1 or newer | These firmware versions already support BATP. No changes are necessary. |
How to Migrate Box with 7.1.0, 7.1.1 and 7.2.0 to BATP
Step 1. Enable Expert Settings in Barracuda Firewall Admin
For more information, see Barracuda Firewall Admin Settings.
Step 2. Enable the BATP Cloud Service
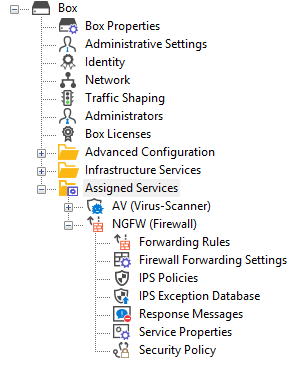
Enabling BATP cloud service disconnects your firewall from the first-generation ATP service and connects it to the second-generation Barracuda ATP Cloud.
- Log into your firewall.
- Go to CONFIGURATION > Configuration Tree > your virtual server > Assigned Services > AV (Virus Scanner) > Virus Scanner Settings.
- In the left menu, click ATP.
- Click Lock.
- In the ATP Cloud Communication section, select the check box Enable BATP Cloud.

- Click Send Changes.
- Click Activate.
Your firewall now is connected to the second-generation Barracuda ATP Cloud service.
SSL VPN
If you are upgrading from 7.x, you will need to enable the TOTP Service in order to continue allowing your users to Self Enrol in the Time-based One-Time Password authentication scheme.
Change to List of Available Ports for Barracuda Download Servers
Barracuda Networks download servers no longer provide downloads on port 8000. Instead, downloads are delivered only through ports 80 and 443.
For more information, see Best Practice - Hostname List for Barracuda Online Services.
Source-Based VPN Routing Table Entries
If you are using source-based VPN routing tables, you have the option of moving the entries to the main routing table. For this, you must set the switch Add VPN Routes to Main Routing Table (Single Routing Table) to yes in CONFIGURATION > Configuration Tree > your virtual server > VPN > VPN Settings > Server Settings.
Unlike before, entries with identical destination addresses in the main routing table are now aggregated regardless of their source address to save valuable memory for even more routing entries. You must be aware that when moving source-based VPN routing entries to the main routing table, the source address of a VPN routing entry will be ignored. Therefore, if you want to route VPN traffic based on a special source address, it is recommended not to use the option as described above.
Firewall Activity Log
When updating a box to 8.0.1, logging of the actions Drop/Remove is disabled by default.
In case the log policy Activity Log Data is set to Log-Info-Text, the setting needs to re-configured after the update to 8.0.1. The update will introduce the default value Log-Info-Code.
Update for SNMP, PHION-MIB.txt File
A new PHION-MIB.txt file is provided that solves an issue where throughput data now can exceed the limit of a 32-bit integer. If your CloudGen Firewall is also part of your SNMP, you should download this new file version. For more information, see PHION-MIB Field Descriptions.
Transfer and Reassign Certificates
In case you are running a standalone firewall and want to manage it in a Control Center, all certificates stored in the local Certificate Store must be saved on the standalone firewall, imported to the Certificate Store on the Control Center and reassigned at their appropriate location of usage. For more information, see How to Import an Existing CloudGen Firewall into a Control Center.
SSL VPN, NAC, and SSL VPN Authentication
SSL VPN authentication and NAC are automatically migrated into the default access control policy.
For more information see How to Configure Access Control Policies for Multi-Factor and Multi-Policy Authentication.
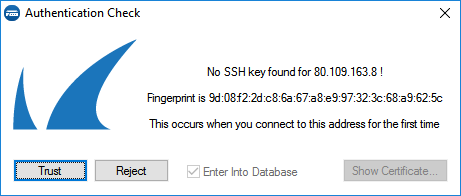
ECDSA SSH Key
Depending on the cipher preferred by the SSH client, you may be prompted to accept the new ECSDA key.
Initial Grace Period for Default Password
When licensing a hardware appliance or a virtual firewall, the initial default password must immediately be changed to a new password after logging in. The new password will be valid even after the license has expired.
How to Do a Fresh Install of Firmware 8.0.1
For a fresh install, it is recommended to first back up your firewall configuration. After installing the new firmware 8.0.1, the configuration must be restored.
- Create a backup of your firewall configuration. For more information, see How to Back Up and Restore Firewall, Secure Access Controller and Control Center Configurations.
- Install the new firmware 8.0.1. For more information, see How to Recover a CloudGen Firewall or Control Center Appliance with a USB Flash Drive.
- Restore the previously created backup of your firewall configuration. For more information, see How to Back Up and Restore Firewall, Secure Access Controller and Control Center Configurations.
How to Migrate to Version 8.0.1
Download the appropriate download file.
If You Migrate from Version 8.0 to 8.0.1
- Go to the download portal https://dlportal.barracudanetworks.com/#/packages/4816/patch.GWAY-8.0.1-0376.tgz.
- Download the patch package.
If You Migrate from Versions 7.x to 8.0.1
- Go to the download portal https://dlportal.barracudanetworks.com/#/packages/4834/update.GWAY-8.0.1-0383.tgz.
- Download the update package.
Start the Update
You can now update the CloudGen Firewall or Control Center.
For more information, see Updating CloudGen Firewalls and Control Centers.