The CloudGen Firewall provides a predefined list of URL categories that are available for blocklisting and allowlisting. The default action of a URL filtering policy can be either to block all and define exceptions that are allowed, or to allow all and define exceptions that are blocked. You can change the default action for all URL polices individually.

For information on how to customize default policy profiles, see How to Configure Policy Profiles.
Create a URL Filtering Policy Profile
Create an explicit URL filtering policy profile to match individual requirements.
- (On the Control Center) Go to CONFIGURATION > Configuration Tree > Multi-Range > Global Settings > Global Firewall Objects.
- Click Lock.
- In the left menu, expand Policy Profiles.
Select URL Filtering Policy.
- To add a new policy profile, click the plus icon (
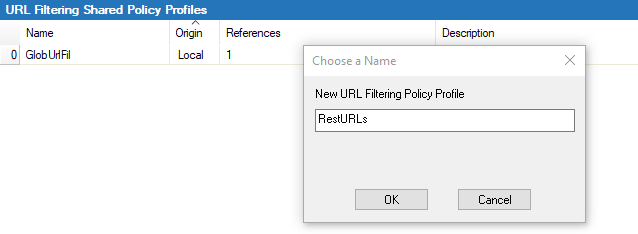
 ) at the top right of the window, enter a profile name, and click OK.

- Click Send Changes and Activate.
The policy profile now appears in the URL Filtering Shared Policy Profiles list, and you can create policies for it.
Create an Explicit URL Filtering Policy
- (On the Control Center) Go to CONFIGURATION > Configuration Tree > Multi-Range > Global Settings > Global Firewall Objects.
- (On a CloudGen Firewall) Go to CONFIGURATION > Configuration Tree > Box > Assigned Services > Firewall > Forwarding Rules.
- Click Lock.
- In the left menu, expand Policy Profiles.
Select URL Filtering Policy. The URL Filtering Policies window opens.
- Select the profile you wish to create the policy for. The policy list appears under the corresponding tab in the lower window.
- To add a new policy, click the plus icon (
 ) at the top right of the lower window. You can also right-click the list and select Add Policy.
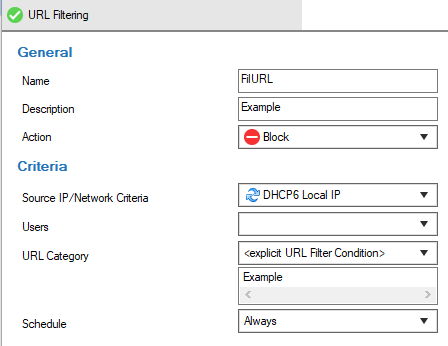
 - Specify values for the following:
- Name – Enter a descriptive name for the explicit policy.
- Description – Enter a description for the policy.
- Action – Select either Allow or Block.
- Source IP/Network Criteria – Select the source and destination network, or select <Explicit Network> and enter an IP address / network or a domain that gets resolved to an IP address for the matching.
- URL Category – Select the categories you want to allow or block.
- Schedule – Set a time schedule for the policy to apply. For more information, see Schedule Objects.

- Click OK.
- Click Send Changes and Activate.
The policy is now listed in the lower window and can be selected as Policy in your forwarding rules. For more information, see the last step in How to Configure Policy Profiles.
