

The Message Log serves as a comprehensive record, capturing both incoming and outgoing messages to and from your domain(s).
This log provides valuable insights into the operation of your current configurations and policy settings within Email Gateway Defense.
Utilize the data within the log to effectively fine tune your policy configurations.
Filter the Message Log
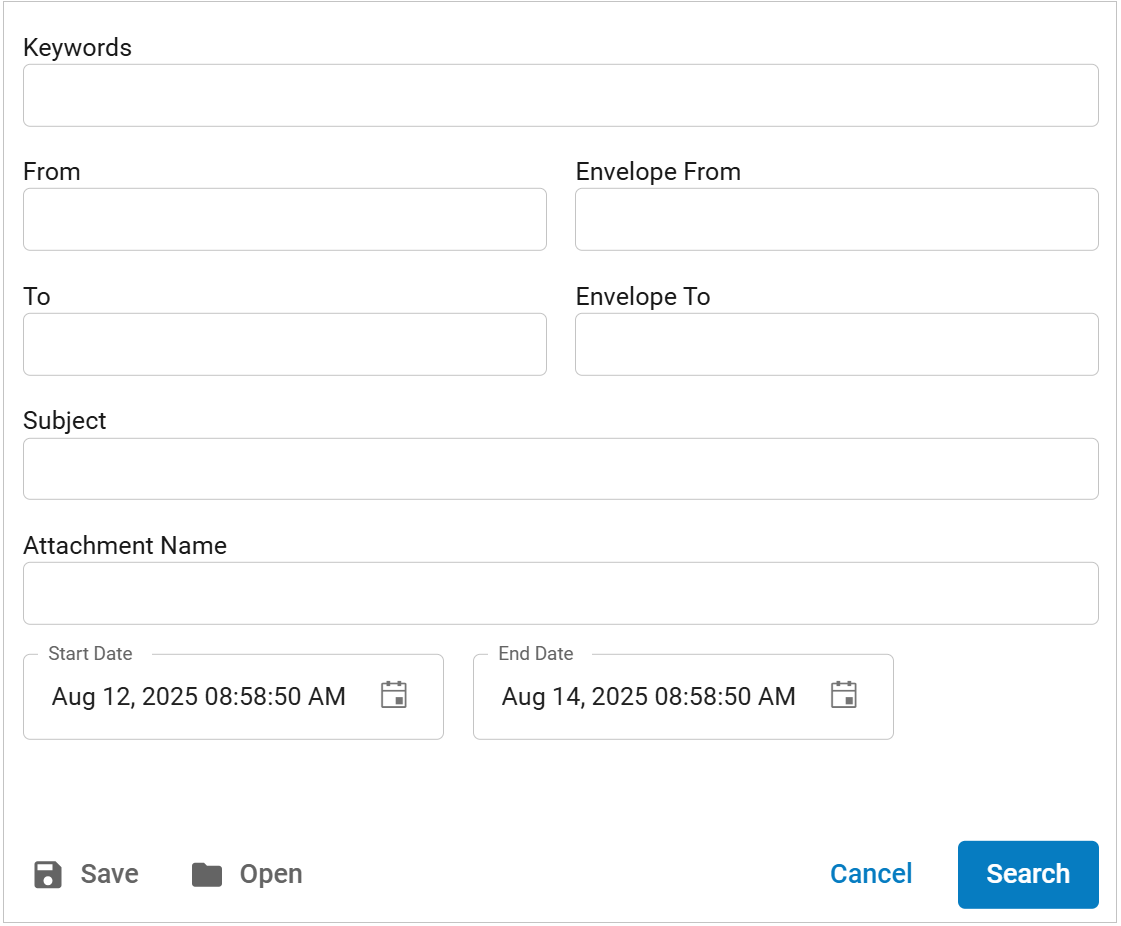
When viewing the global Message Log, you can choose to view only Inbound or only Outbound and filter by Date Presets, Action Taken, Delivery Status, and Reason. For details on each of these actions, see Message Actions. Filter messages using the Advanced Search feature to search by Keywords, From/Envelope From, To/Envelope To, Subject, Attachment Name, and Start/End Date.
The User Message Log is less comprehensive than the global, administrator's Message Log. For example, users cannot see outbound mail in their Message Log.
Create and Manage Saved Searches
To create a saved search:
Enter a search term in the Search box and press Enter.
Alternatively, click the Advanced Search button
 , enter one or more search terms, and then press Enter.
In the Advanced Search dialog box, click Save. In the provided field, type a name for your search and click Save again.
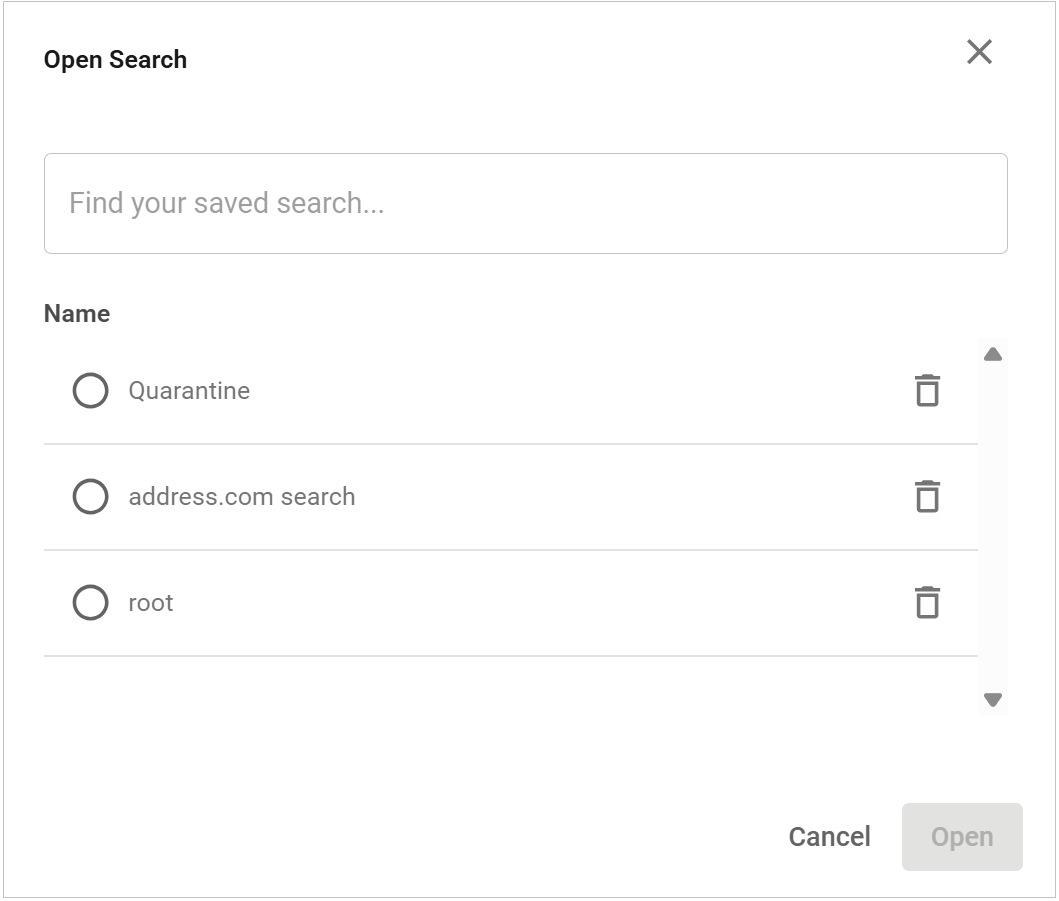
To run a saved search:
Open the Advanced Search dialog box and click Open.
Enter the name of your saved search, or select it from the list, and then click Open.
To delete a saved search:
Open the Advanced Search dialog box, and click the Trash icon next to the saved search you want to delete.
Incorrectly Blocked or Incorrectly Delivered Messages
Occasionally Email Gateway Defense might incorrectly block (or allow) an email, relative to the policies you have set. You can tune the Advanced Spam Detection Scoring levels on the Inbound Settings > Anti-spam Antivirus page by selecting Custom and adjusting the score for each category based on what type of mail you consider to be spam.
Occasionally, Email Gateway Defense might incorrectly block or allow a message based on Barracuda Networks settings. Reporting these messages helps improve spam detection. Use the following buttons on the Message Log page (both at the global level and the user account level) to mark a message and have it sent to the Barracuda Networks team for further review.
When you report a message as incorrectly blocked or incorrectly delivered, in addition to the submission confirmation, you will also be asked to provide additional details as to why you think that message was incorrectly delivered or incorrectly blocked. If you choose to provide these details, you will be redirected to a feedback response form to select a reason from a list of options or to type in a reason. Your feedback is extremely important to us. Providing additional details will help us improve our systems and allow better understanding of your email preferences.
Note that reporting this message does not automatically block or deliver all messages from this sender. To immediately allow or block certain email addresses or domains, you can create a sender policy on the Inbound Settings > Sender Policies page.
Report as Incorrectly Blocked – Message should have been delivered. This includes messages that are not spam.
Report as Incorrectly Delivered – Message should have been blocked. This includes spam messages.
Incident Response Users: Messages you mark as Incorrectly Delivered appear in the User-Reported Emails page, where they can be investigated and remediated if needed.
Deliver Messages to Recipient
You can click Deliver for one or more selected messages in the Message Log if you decide the message is valid.
If a message is successfully delivered, a new message entry appears in the Message Log with the Delivery Status of Delivered.
If a message cannot be delivered, you are notified by a message in your browser. A new message entry appears in the Message Log with the Delivery Status of Not Delivered.
If delivered messages are not making it to the recipient's mailbox, it may be due to a filter on your mail server or a service on your network catching the mail as spam. Check your local trash/spam folder to locate the mail.
Message Details
Click on a message in the table and its Action and Reason will display. Click the message header to view additional information including IP address, recipients, and delivery status. The administrator (or user, when viewing their own account) can then elect to View the entire message and take actions on the message. The words Includes Other Recipients in the Message Details link indicate that the message was sent to multiple recipients or distribution lists. The individual addresses are listed in the message details.
Message History
Each record in the message log represents a separate event. For example, if a message is not initially delivered, but is successfully delivered later, there are at least two events – one for the initial error and another for the delivery – and possibly additional events for retrying the delivery. It can be helpful to see all of the events related to a single record in one place.
The Show History button displays in the Reading pane. The Reading pane control is at the top of the Message Log. Select No Split, Horizontal Split, or Vertical Split to choose where you want the Reading pane to display.
To view all events associated with a single record:
Select a record.
In the Reading pane, click Show History.
The Message Log populates with all records related to the original record you selected.
If the record has no content, as described in the note above, Message has no content displays and Show History does not display.
If there are no related records, only the record that you selected appears in the Message Log.
Optionally, click Hide History to return to the Message Log.
Investigating and Remediating Emails
If you find a questionable email in the message log, you can move seamlessly from Email Gateway Defense to Incident Response to investigate it.
To find messages similar to the questionable email:
Log into Email Gateway Defense as an administrator.
In the Message Log, find the questionable email and click it to view its details.
Click Search for similar messages. The Incident Response wizard opens in a new browser tab.
Continue with the wizard, as described in Creating an Incident. Note that the fields in the wizard are pre-populated with the information from the email in the message log.
With Incident Response, you can find similar emails, then if needed, take action to remediate any issues, including removing emails from users' mailboxes and creating policies to block senders. Refer to Incident Response Overview for details.