

This is a guide for customers to perform an assessment against their own configurations to ensure best practices are being followed.
The Microsoft 365 deployment for Email Gateway Defense now includes steps on how to configure Microsoft’s Enhanced Filtering for Connectors, a feature that significantly improves the integration between third-party email security solutions and Exchange Online. For more information, see Update to Microsoft 365 Deployment for Email Gateway Defense.
Checklist
Read the Email Gateway Defense Best Practices Guide and cross reference your own settings.
Review the deployment guide. Ensure you have the proper configurations for your organization.
Verify your sender authentication configurations for your own domains.
Review sender policies.
Check for the presence of domain level settings.
Review post-delivery remediated threats via the Message Log.
Ensure the Outlook Add-In is being utilized and users are reporting messages.
Ensure Impersonation Protection is properly configured for remediation and notifications.
Review Email Gateway Defense Best Practices
Download and read the Email Gateway Defense Best Practices Guide. Use this as a resource to gain a deeper understanding of a capability and the best practice recommendations.
Review the Email Gateway Defense - Inbound Policy Best Practices document and compare your configuration to what's shown in the document.
Review the deployment guide. Ensure you have the proper configurations for your organization
There may have been updates to the deployment guide in the time since your solution was initially set up. Take a minute to step through the deployment guide and verify that your configurations match. For example, many customers may not have set up the Barracuda partner connector. The connector not only allows organizations to restrict access to their tenant, but it also serves purposes in mail routing. For instance, without a partner connector, you may experience issues with sender rewriting (SRS), resulting in mail delivery issues.
For instructions on how to set up Email Gateway Defense, see Step 2 - Configure Microsoft 365 for Inbound and Outbound Mail.
Verify your sender authentication configurations for your own domain(s)
Having proper sender authentication configured for your domain is critical to not only protect against spoofing and domain fraud, but also ensuring deliverability for your legitimate mail. It is imperative you take steps toward “p=reject”, which is the highest degree of enforcement for DMARC.
For information on domain fraud protection, see Domain Fraud Protection Background.
You should also be able to answer these questions:
Do you have a DMARC policy configured on your domain(s)? Is it in an enforcement mode?
Are you DKIM signing your outbound mail properly? Have you set up DKIM signing for your custom domain in Microsoft 365?
Do you have your SPF record in hard fail (-all) mode (if you don’t have DMARC enforced yet)?
Are you enforcing SPF hard fail and no PTR checks at the gateway? (Note the default is to block)
Review sender policies
Sender policies are usually the most problematic policy for customers. The Email Gateway Defense Best Practices Guide will dive deeper into sender policy best practices, but here are a few things to consider.
Do you have any sender policies configured for your own domain/users? Hint: In Email Gateway Defense, use Ctrl + F on the Sender Policies page and search for your own domain.
Are there any full domain exemptions on common services (i.e., DocuSign, SendGrid, etc.)?
Are you putting comments into your new entries? Hint: This is helpful when you need to review policies again in a few months.
How far back do your sender policies go? Hint: Sort the modified column in the user interface. Policies that are older than 90 days are typically not needed. Try to stay on top of keeping your list maintained.
Search for recently added sender exemptions in the Message Log. Why was the message blocked to begin with? Is there a different type of policy you could put in place?
Check for the presence of domain level settings
While domain level settings can be helpful when managing multiple clients under a single portal, it is often not needed for most. Domain level settings can be created a few different ways and is usually done unknowingly or unintentionally. Note that once a domain level setting is configured, it will take precedence over account level settings. This can become problematic when admins are unaware and create new policies at the account level, which will be ignored.
Domain level settings can be created by clicking Manage on a domain from the Domains tab and creating new policies OR by logging in as a domain admin or helpdesk user and making a new policy.
Once a domain policy is created, an orange flag will be shown next to the domain on the Domains page.

To identify policies that have been configured at the domain level, you can run a keyword search from your message log: reason_extra:domain. The emails returned in this search query have a domain level setting applied.
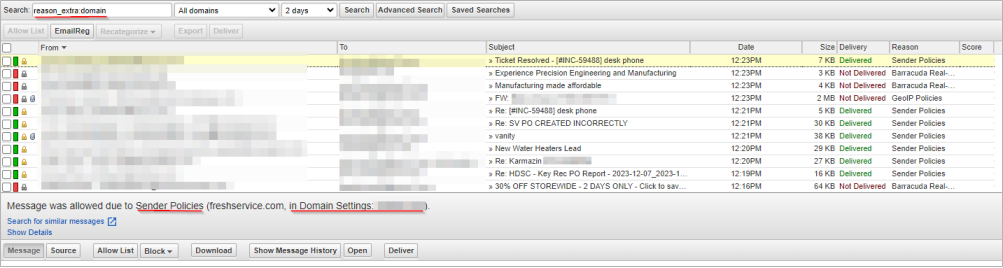
The account level settings will need to be updated to match the domain level setting if they are different. Once updated, click the orange flag, and select reset to account policies link. This will revert the configuration to read from the account level settings and not the domain level. If you have any issues with this, contact Barracuda Networks Technical Support.
For more information, see Understanding Global, Per-Domain, and Per-User Settings.
Review post-delivery remediated threats via the Message Log
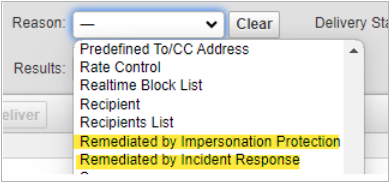
From the Message Log, run an advanced search using the Reason attribute. From the drop down list, select either Remediated by Impersonation Protection or Remediated by Incident Response.
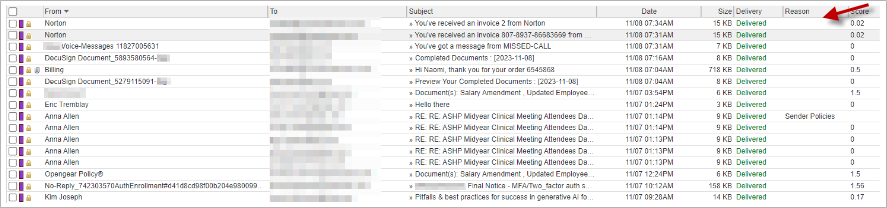
Emails that are remediated post-delivery either automatically via Impersonation Protection or through incident creation with Incident Response have their message color status updated to reflect the remediation.
Reviewing these messages will help identify areas within Email Gateway Defense that can be further tuned/updated to strengthen the perimeter defenses. An example would be to remove a sender policy that allowed an unwanted email through or adjust your spam scores because you see a lot of emails scoring within a certain range.
These types of changes are typically easy to do and would result in minimal false positives. By fine tuning your gateway policies based on real world examples, you can prevent more threats from being allowed into your email environment.
Here are some tips to look for while reviewing messages:
Do any of the emails show the reason why a message was or was not delivered? This could indicate that either the message was allowed through the gateway due to a custom policy or that the email was not delivered (i.e. SPF failure) and a user/admin manually released it. Hint: Use the Show message history button to view all events associated with a single record (i.e. looking at an undelivered email that was released).
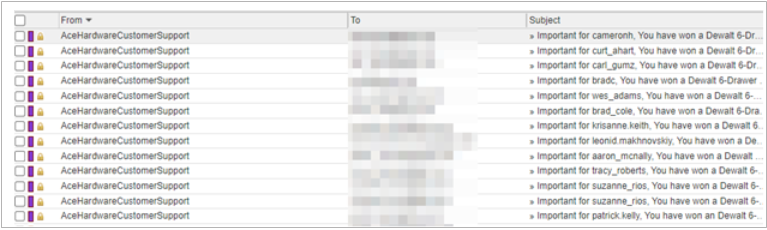
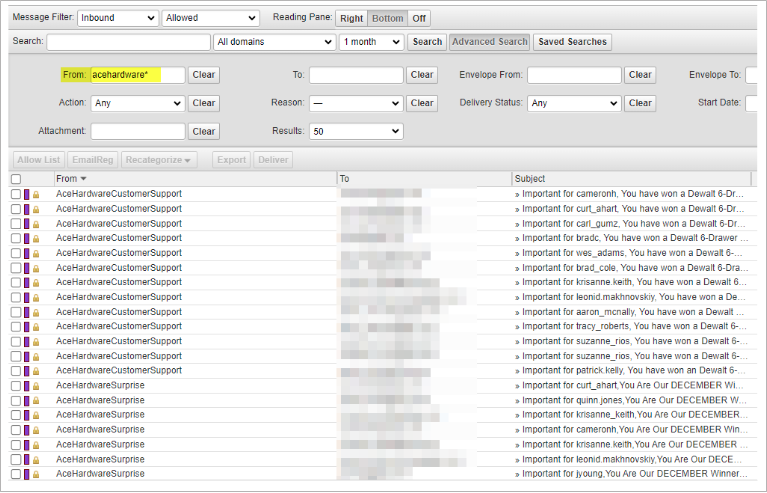
Do you notice any patterns in the From display name? Often, you may see reoccurring patterns. These patterns can be added as a content policy in Email Gateway Defense under Inbound Settings > Content Policies. For example, blocking acehardware would block the following emails going forward.
You can also search the Message Log ahead of time to verify the accuracy of the new policy.
For more information, see How to prevent display name spoofing.
What do the spam scores look like? If you are seeing many emails that have scores ranging between 2-3, you may consider implementing the spam score quarantine and set up end user digests. This will keep these emails out of the users inbox and instead, in their quarantine. Hint: See page 11 of the best practices guide for more information on spam scores.
Ensure the Outlook Add-In is being utilized and users are reporting messages
Ensure you have deployed the Outlook Add-In for all users and enabled them on the usage. For more information, see Barracuda Email Protection Add-In.
The Outlook Add-In serves the following purposes:
Report suspicious email messages.
Report mock phishing emails or campaigns.
Provide feedback to Barracuda Networks on reported messages.
Select email messages for encryption.
Ensure Impersonation Protection is properly configured for remediation and notifications
Ensure Impersonation Protection is set to move the email into the recipient's Junk email folder (at a minimum). Once you are comfortable with the detection efficacy, it is recommended to move your remediation to permanently delete the email from the recipient's account. For more information, see How to Specify Attack Response Options.
It is also important to double check that you have configured account takeover (ATO) alerts. Barracuda Networks recommends that you create a dedicated shared mailbox for ATO alerts so they are easily distinguished from other Impersonation Protection alerts.