

Barracuda VPN Control is the user interface of the VPN Client for Windows for configuring VPN profiles and Barracuda VPN adapter settings as well as for the management of certificates. You can launch the VPN Client by left-clicking the Barracuda Network Access system tray icon  . The Barracuda VPN Client is also accessible from the Windows Control panel. When started from the Windows Control panel, Barracuda VPN Control opens with the VPN profiles area.
Configure the Barracuda VPN Client for Windows
Use the Barracuda VPN Control panel to create your VPN profiles and configure VPN connection and adapter settings.
Launch the VPN Client for Windows using one of the following methods:
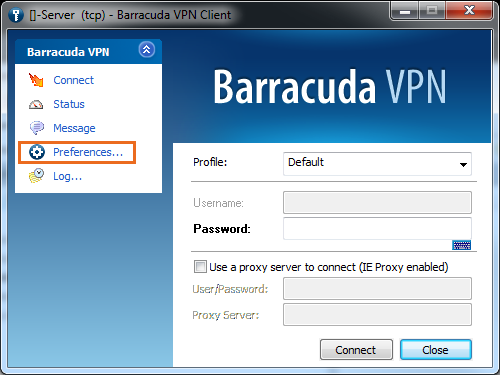
- Click Connect after left-clicking the icon in the system tray.
- Execute rvpn.exe. For more information, see How to Configure Remote VPN. Before using Remote VPN, a profile must be configured. For more information, see How to Create VPN Profiles.
- In the VPN Client window, click Preferences to open the Barracuda VPN Control panel.
Available VPN profiles are listed in the overview window sorted by the connection type they were configured with.
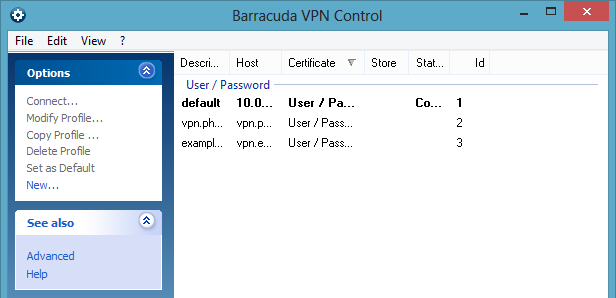
Connections are listed with the following attributes:
- Description – The name of the profile.
- Host – The configured VPN server to connect to.
- Certificate – The certificate and authentication type used to connect.
Store – The store into which the certificate was saved.
Status – The connection status. If you are not connected, you may click Connect… in the context menu in order to establish a connection. If you are already connected, you can click Disconnect in the context menu to terminate a connection.
ID – This is the profile ID.
Step 1. Create a VPN Profile
The default profile is displayed in bold letters in the overview window. To create a new VPN profile, follow the steps described in How to Create VPN Profiles. You can also modify, copy, or delete a selected VPN profile. Right-clicking and selecting Set as Default defines the selected profile as the new default profile.
The Barracuda VPN Client supports Barracuda Networks authentication, username/password, and X509 authentication. Click View and select Certification Authorities (CA) to open the Certification Authorties window. Here you can import, export, and manage certificates.

Step 2. Configure VPN Settings
Configure your VPN settings in the Advanced Settings section. To access the Advanced Settings window, click Advanced in the Preferences window.
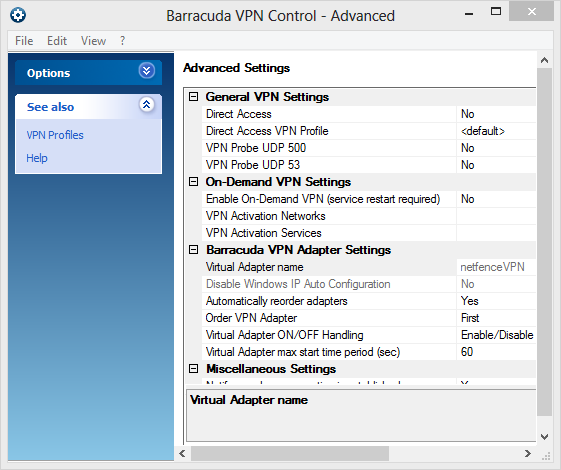
You can configure the following general VPN settings:
- Direct Access – The VPN client can be configured so that it automatically reconnects to different gateways, if available. In case of an unwanted disconnection, the VPN client tries to reconnect to the same gateway three times. If this fails, a path finder connection will be initiated that tries a variety of pre-defined gateways and finds the fastest one. This gives mobile users seamless access to corporate networks wherever they have Internet access. For more information, see How to Configure Direct Access for Mobile Users.
- Direct Access VPN Profile – The name of the VPN profile that is used for establishing Direct Access connections.
- VPN Probe UDP 500 – Upon establishing a connection, the client will check whether it is possible to build an IPsec tunnel via UDP port 500 if this is enabled.
- VPN Probe UDP 53 – Upon establishing a connection, the client will check whether it is possible to build an IPsec tunnel via UDP port 53 if this is enabled.
Configure on-demand VPN settings:
- Enable On-Demand VPN – When enabled, VPN connections will be automatically established on demand when users initiate network connections to specified targets. Targets can either be IP networks or IP protocols. This feature should be combined with the VPN profile setting Enable MS Logon in the VPN profile settings to provide single sign-on to users.
- VPN Activation Networks – Defines IP networks as target for On-Demand VPN connections.
- VPN Activation Services – Defines IP protocols and ports as target for On-Demand VPN connections.
Configure VPN adapter settings:
- Virtual Adapter Name – Read-only name of the virtual network adapter.
- Disable Windows IP Auto Configuration – Disable Windows built-in automatic IP address configuration of the adapter.
- Automatically reorder adapters – Place the VPN client's virtual adapter within the Windows adapter bindings right at the position that is configurable via Order VPN Adapter.
- Order VPN Adapter – The position of the VPN client's virtual adapter within the Windows adapter bindings. The sequence affects, for example, the DNS resolution of short DNS names and the function of Windows Remote Assistance.
- Virtual Adapter ON/OFF Handling
- Enable/Disable – Disables the virtual adapter as long as there is no active VPN connection. The adapter will be re-enabled as soon as a VPN connection is established.
Always on – The virtual adapter is alwas enabled.
- Connect/Disconnect – Disconnects the virtual adapter whenever there is no active VPN connection. The adapter will be re-connected as soon as a VPN connection is established. The adapter is not completely disabled, which results in a faster VPN initiation time. This mode is recommended for situations where fast VPN initiation timings are necessary.
- Enable/Disable – Disables the virtual adapter as long as there is no active VPN connection. The adapter will be re-enabled as soon as a VPN connection is established.
- Virtual Adapter max start time period (sec) – Waiting period in seconds for an enabled adapter (defaut: 60, recommended). You may increase this value on slow systems.
Configure miscellaneous settings:
Notify me when connection is established – Display a notifying pop-up as soon as a VPN connection has successfully been established.
Show icon in notification area – Display a status icon for the connection within the notification area of the task bar.
Allow automatic Service Recover – Restart the service automatically in case of service termination.
Use Single Sign-On Credential Provider – Enable or disable the pre-domain logon. This feature works only with username / password VPN authentication (preferably MSAD). Create a client-to-site VPN connection before the user is logged on to the domain. This enables users also to log on to the domain for the first time. It also lets users connect to the VPN and Windows domain using a single sign-on. On the Windows login screen, the user is presented with the option to use Barracuda single sign-on to establish a VPN connection for a selected VPN profile prior to logging into Windows.
This feature is especially designed to be used if the client-to-site VPN is integrated with Active Directory for authentication, ensuring that the Windows user credentials match the client-to-site VPN user credentials. The credential provider will automatically be installed by setting this to Yes.