

Use Security Awareness Training to train individuals in your organization about potential threats to help protect your business. You can incorporate training material into a campaign. Videos are available in the SCORM format, so you can also distribute them through your own LMS (Learning Management System).
Previewing Training Templates
Follow these steps to preview training content before sending it out to your end users as part of a campaign.
Note that if you have already imported a Training Template into your Security Awareness Training instance, then you can go straight to next step, Creating and Running a Training Campaign.
To preview training templates:
- Log into your Security Awareness Training instance.
- Navigate to Campaigns > Content Center. Then click Training.
- In the left Filter panel, specify search criteria, if desired. Then click the Refresh icon
 in the Filters section or Refresh in the main panel.
For example, in the Spoken Language menu, select the language of your choice. Or select only modules that include a quiz.
If the a certain filter menu is not present, click Edit Filter List and add the filter. Click Save, then perform this step.
Select other filters, if desired.
- Locate the training you want to preview and click the View
 button.
 - Click Import Now.
If you have already imported this template, click Edit Now and skip ahead to step 7. - Click Edit New Training Template.
- Click the link to preview the training in your browser.
Next steps:
- If you decide you want to proceed with this training, continue with the process below, Working with Training Templates, beginning at Step 3.
- To choose a different template, click and hold your browser's Back button and navigate to the Content Center: Training Templates.
Working with Training Templates
To customize and deploy training content:
Navigate to one of the following:
Education > Training Content, then click Visit Content Center.
Campaigns > Content Center.
- Locate and click on the desired training template. In the Content Action dialog, click Import Now. This action imports the template so it is available in Education > Training Content.
- In the next dialog, click one of the following:
- Edit the New Template – Proceed with the next step to customize the template.
- Return to Content Center – Return to the Content Center where you can browse and import additional templates. Proceed to the next step when you are ready.
Enter the following information:
General Settings- Training Template Type – (Available only for New training materials that you create. Not used for existing templates.)
- Training Template Name – Enter a familiar, unique name for this template.
- Written Language – Select the language in which the content is written.
- Spoken Language – Select the language in which audio content, if present, is spoken.
- Content Source – Select the originating source of the training content.
- Description – Optional. Enter text to describe the training template.
- Category – Optional. This value is filled in automatically if you are using an existing template. You can change the value if you choose.
Active – Select to enable this training template to be used.
- Start Date – Select the date when you want the training material to become available to those invited to view it. If you are using the training as part of a campaign, the training start date usually coincides with the campaign start date, but that is not required.
- End Date – Optional. Select the date when you want the training material to no longer be available to those invited to view it (to expire). This value can be up to one year after the Start Date. If you are using the training as part of a campaign, you might choose to extend the training end date past the campaign end date, because users might take the training more than once, or might put off taking the training course.
<Training Content URL> – Click this live link to view the Training Content.
Registration Form – Complete this section only if you require users to register when using the Training Content.
Registration Page Label – Specify the label for the registration page that appears on the web browser tab.
- Registration Instructions – Specify registration directions for the user to follow.
- Registration Information Required – Select this option to require users to register to access the Training Content.
- Registration Submit Button Label – Specify a label for the button used to submit registration information.
You can use the following five pairs of fields as is, or you can choose to gather different information during registration. For example, instead of email, you might choose to use phone. Remember that changing the labels on the fields here does not change the fields in the results analysis. - Registration Code Enabled – Specify whether you want to include this information in the registration form.
- Registration Code Label – Specify a label for the Registration Code field on the registration form.
- Name Enabled – Specify whether you want to include this information in the registration form.
- Name Label – Specify a label for the Name field on the registration form.
- Organization Enabled – Specify whether you want to include this information in the registration form.
- Organization Label – Specify a label for the Organization field on the registration form.
- Email Enabled – Specify whether you want to include this information in the registration form.
- Email Label – Specify a label for the Email field on the registration form.
- Other Information Enabled – Specify whether you want to include this information in the registration form.
- Other Information Label – Specify a label for the Other Information field on the registration form.
- Disable LMS Session Check – [No longer used.] The Learning Management System (LMS) checks that each user is signed into the training with only one session at a time. This helps to keep track of training results if, for example, the user received multiple training invitations. If you select this option, the LMS check is disabled, so the system does not check that the user is only signed into the training with one session at a time.
- LMS Loading Message – Message displayed while training is loading. You can choose to include a link for users to follow if there is a problem with automatic loading of the page.
- Preview Image – If an image is not already selected, optionally select an image to associate with this training in the Content Center. End users do not see this image.
- Click Save.
This Training Content is available under Education > Training Content and Campaign > Content Center. You can now create a training campaign and use the template you just customized.
Create the Campaign
To use this template in a campaign, continue with the next step, Creating and Running a Training Campaign.
Training Content Page
On the Training Content page, under Education > Training Content, you can view all of the training templates you imported, using the process above.
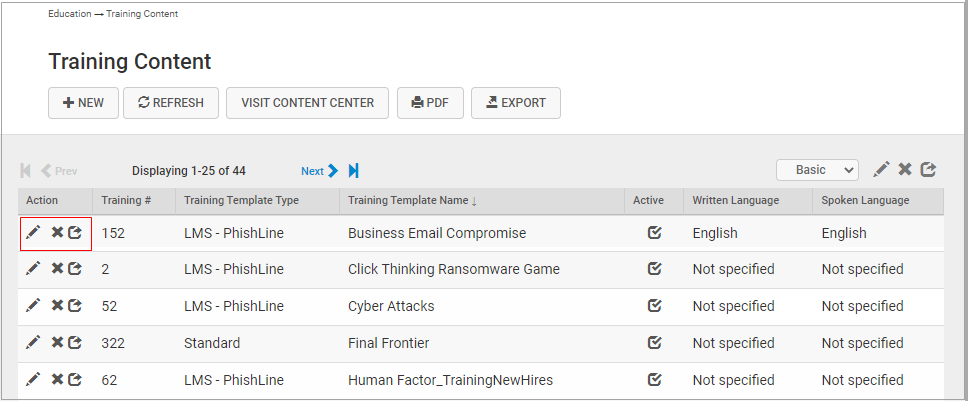
For each template, you can:
- Take an action
- Edit
 – Change the information associated with the template, as described above.
 - Delete
 – Remove the template from this page, but not from the Content Center.
 - Copy
 – Clone the template so you can make minor changes to it.
- Edit
- Visit or Share the URL
After you click Edit :- Click the URL to view the training material.
- Copy the URL to share with others, including sending it in an email or posting it on a website for your users.
Using SCORM Files with Your Own LMS
If want to use Barracuda Networks' training content with your own Learning Management System (LMS), contact Barracuda Networks Technical Support with the following information:
- Your instance name. Your instance name appears in the address bar of your browser when you are logged into Security Awareness Training. Instance names are usually of the format phishline_<yourOrganizationName>.
- Names of the specific modules you want to use
- Language for the modules
- Whether you want to include a quiz with the modules
Your requested files will be uploaded to the Files library on your instance.
Note that Barracuda supports SCORM Cloud 1.2 format.
Content Language
Refer to Language Support for details.