Barracuda SecureEdge allows administrators to enroll Barracuda CloudGen Firewall (CGF) units with the cloud service.
Requirements
Barracuda SecureEdge will not install policies on CloudGen Firewall devices unless the firewall service operates in Policy mode.
During this setup, VPN configuration (connectivity) and Remote Access policies are applied. Web Filter policies must be configured on the CloudGen Firewall.
For HA pairs, enter the token only in the primary box. The secondary box does not require any additional configuration.
On CloudGen Firewall boxes, Barracuda SecureEdge requires the Caching DNS to be enabled. For more information, see How to Configure a Caching DNS Service.
On CloudGen Firewall boxes, you must enable the VPN service. For more information, see How to Assign Services.
To connect a CloudGen Firewall to an Edge Service, install HF1155 on SecureEdge firmware version 10.0.1.
Step 1. Retrieve the Registration Token from SecureEdge
The token is valid for 30 minutes only, and you need a separate token for each CloudGen Firewall appliance you want to enroll.
Go to https://se.barracudanetworks.com and log in with your existing Barracuda Cloud Control account.
The chosen Tenant/Workspace is displayed in the top menu bar.
From the drop-down menu, select the workspace your appliance should be assigned to.
In the left menu, click the Integration icon, and select CloudGen Firewall.
The CloudGen Firewall page opens. In the top-right corner of the window, click Registration Token.

The Generate Registration token window opens.
Click on the clipboard icon to copy the token to your clipboard.

Paste the token into a text file.
Step 2. Log into the Barracuda CloudGen Firewall
Connect to your firewall using Barracuda Firewall Admin.
On the Firewall Admin Dashboard page, the appliance details are displayed and can be noted. For example, host name and serial number.

Click the SecureEdge icon.
In the Connect to SecureEdge window, enter the registration token that you retrieved in Step 1.
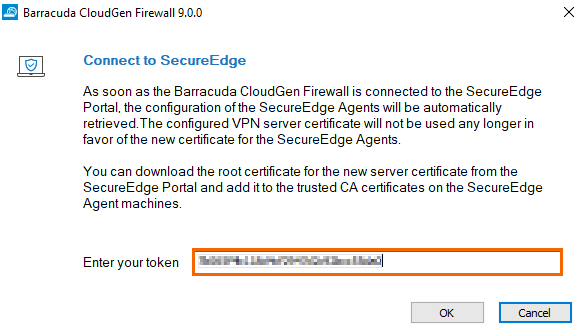
Click OK.
Go back to the Barracuda SecureEdge configuration, and click OK.
After the configuration is finished, the appliance automatically appears in the SecureEdge Cloud UI. You can see the new appliance with host name and serial number enrolled on the CloudGen Firewall page and that the connection is established between the CloudGen Firewall and Barracuda SecureEdge.

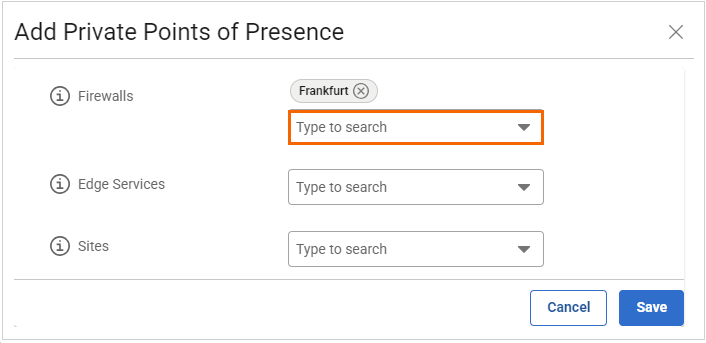
(Optional) Use a CGF as Private Point of Presence (PoE)
To add a CGF as a private Point of Presence, select the firewall from the drop-down list in the Add Private Points of Presence window. For more information, see How to Configure Private Points of Presence (PoE).
If you are using a CGF as a PoE, you must install a new CGF root certificate in the certificate store of the machine running the NAC client. You can download the CloudGen Firewall client certificate from the SecureEdge Manager. Install this root certificate on all clients by going to Infrastructure > Settings, selecting Access Agent Network and then downloading the certificate. This ensures parallel operations with CloudGen Firewall client-to-site setups and the SecureEdge Access Agent. For more information, see How to Configure a SecureEdge Access Agent Network.
(Optional) Connect a CGF to an Edge Service
You can enable CGF appliances to connect to an Edge Service after configuring a suitable WAN interface on the CGF. This feature allows CGF appliances to establish secure site-to-site VPN connections to Edge Services via TINA VPN tunnels with BGP routing. It also enables CGFs to join the SecureEdge network infrastructure with full routing capabilities. Key features of site-to-site VPN tunnels on SecureEdge-integrated CGFs include the following:
SecureEdge-integrated CGFs connect to the Edge Service using site-to-site TINA tunnels, with BGP sessions established over these VPN tunnels.
Setting the Provider Class to None on the CGF creates a VPN tunnel with the Provider Class set to Bulk.
You can configure any Edge Service type for a registered CGF and modify existing ones.
You cannot delete an Edge Service configured as upstream for a CGF
You can remove and reconfigure an Edge Service from a CGF.
To associate a CGF registered with SecureEdge to an Edge Service:
Select the workspace containing your appliance.
Go to Integration > CloudGen Firewall. This displays your CGF appliance.
The Edge Service column lists all available Edge Services for connection.
Select the Edge Service you want to connect to from the drop-down menu. Note: You can select any Edge Service type for a registered CGF.
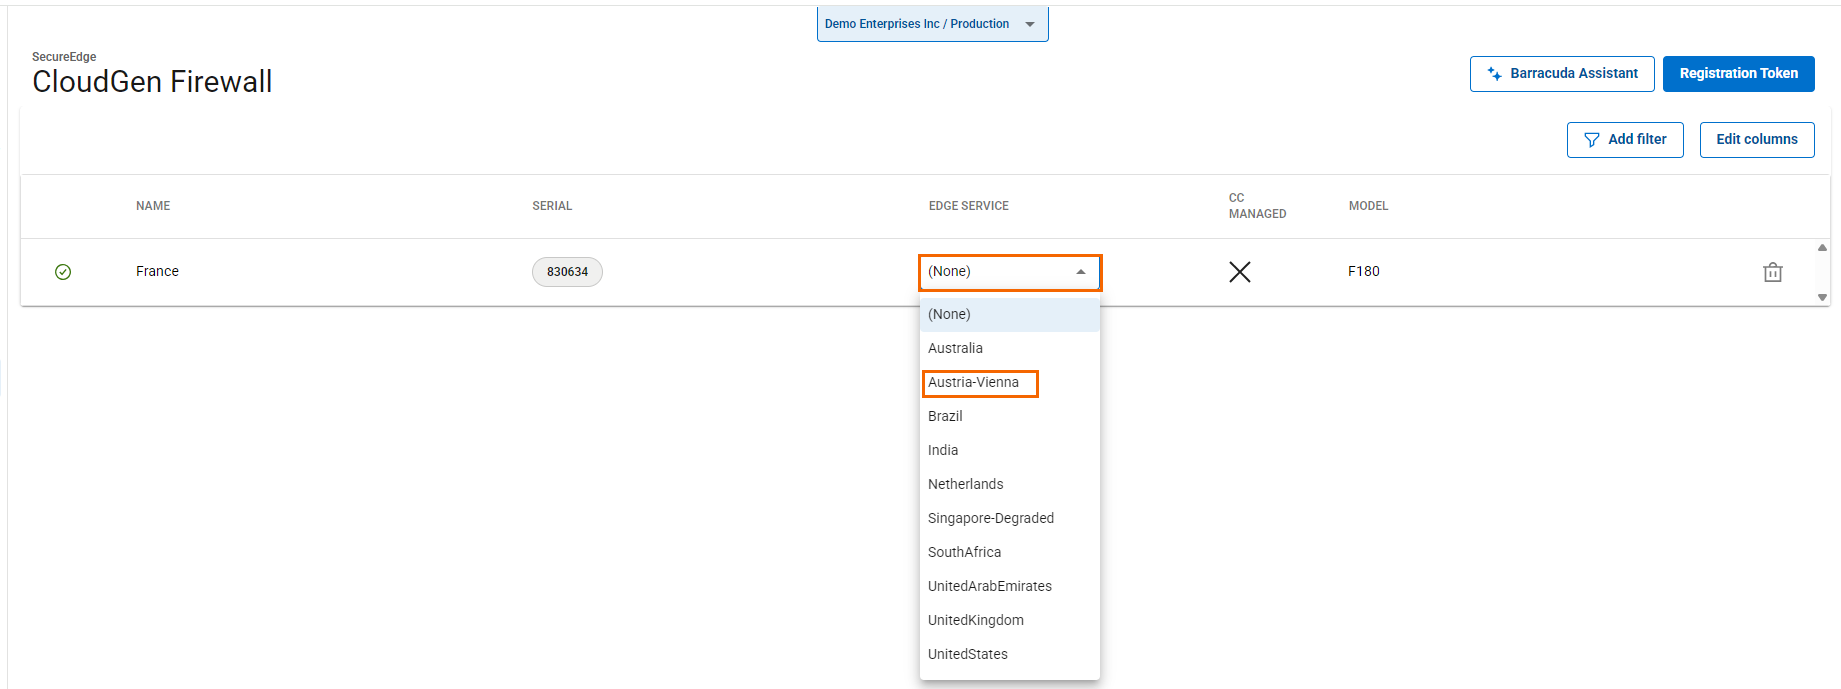
The CGF receives the configured Edge Service, and the Edge Service includes the CGF as a Site in its configuration. The tunnel establishes successfully between the CGF and Edge Service.
After configuration is complete, the CGF is linked to the Edge Service within the Cloud UI, where VPN tunnels are set up between the CGF and the Edge Service, allowing BGP sessions to operate over these tunnels. Routes are shared between CGF and the Edge Service, facilitating traffic flow through the VPN tunnels. In addition, any changes to interfaces are automatically reflected in the Edge Service. Note that you must configure the network interfaces used to create a transport to the Edge Service in the Network settings. For more information, see How to Prepare a CloudGen Firewall for Establishing a Connection to a SecureEdge Service via a TINA Transport.
(Optional) Verify that the Barracuda CloudGen Firewall Appliance Is Enrolled
Go to https://se.barracudanetworks.com and log in with your existing Barracuda Cloud Control account.
Select the workspace containing your appliance.
In the left menu, click the Integration icon, and select CloudGen Firewall.
All appliances enrolled in the selected workspace are displayed.
Remove Existing Enrolled Appliances
If you want to remove an existing enrolled appliance,
Go to https://se.barracudanetworks.com and log in with your existing Barracuda Cloud Control account.
Select the workspace containing your appliance.
In the left menu, click the Integration icon, and select CloudGen Firewall.
Click on the trash can icon next to the enrolled appliance you want to remove.

The Disconnect CloudGen Firewall < Name of Your CloudGen Firewall> window opens.
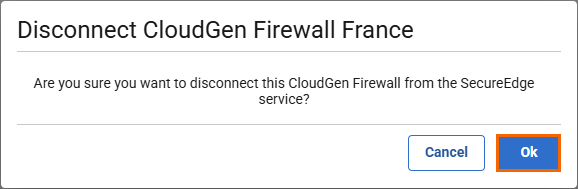
Click OK to confirm.
Click Save.
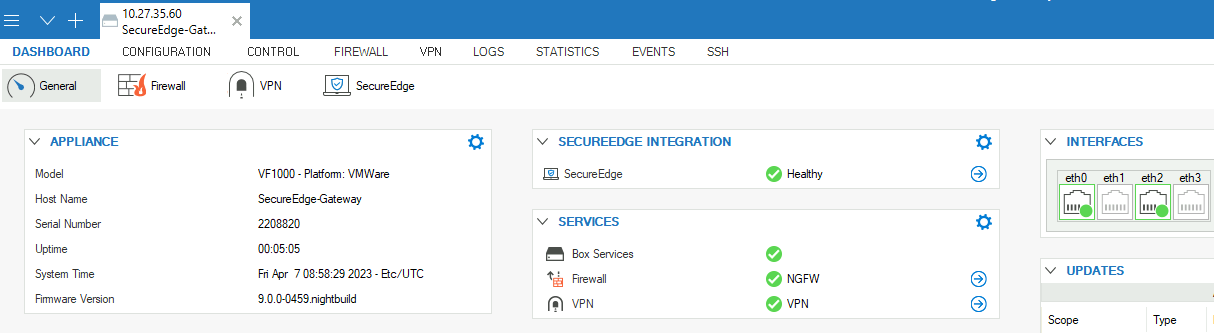
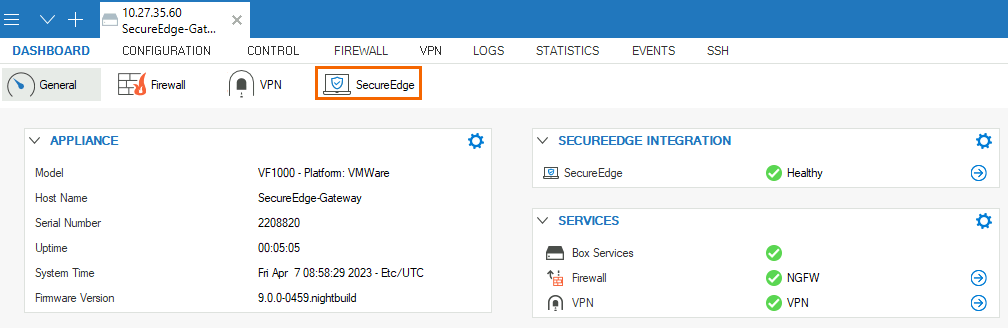
Verify the Status of Barracuda SecureEdge in Barracuda Firewall Admin
Log into the CloudGen Firewall using Barracuda Firewall Admin.
The Barracuda Firewall Admin page opens.
Click the Barracuda SecureEdge icon and verify the status.
Monitor ZTNA Access Rules and RAC Policies in the Firewall
On a Barracuda CloudGen Firewall, ZTNA access rules are auto-generated and cannot be moved. However, if you introduce the section separators PRE-BEGIN and PRE-END and place your own rule in between, this rule is placed before the ZTNA auto-generated rules.

To view ZTNA access rules and RAC policies deployed via Cloud UI in Firewall Admin:
Log into the CloudGen Firewall using Barracuda Firewall Admin.
Go to FIREWALL > Forwarding Rules.
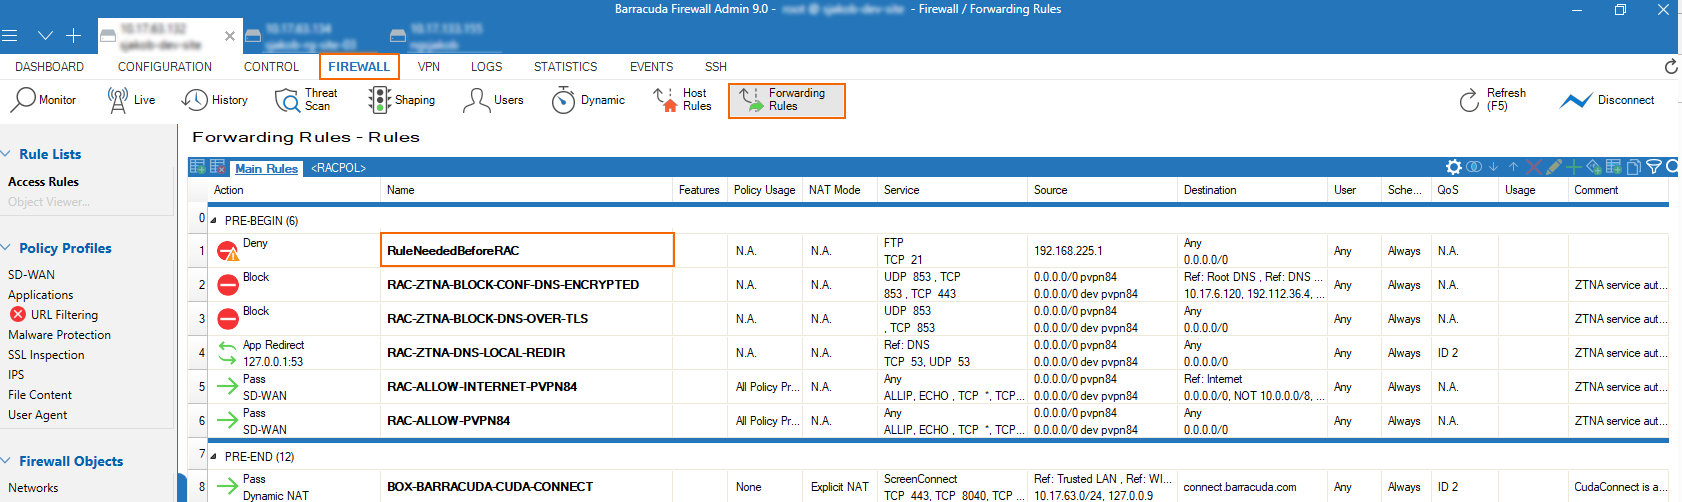
Next to the Main Rules tab, a new tab <RACPOL> has been introduced (if applicable).
The <RACPOL> tab shows the policies the administrator has configured in the cloud service as Zero Trust Access rules.
Enable Security Inspection for Connected Firewalls
On Barracuda CloudGen Firewall version 9.0.1, the forwarding ruleset blocks UDP port 443 per default via rule BOX-BLOCK-UDP443. However, for security inspection to work on CloudGen Firewalls used as SecureEdge Point of Entry, QUIC traffic must be denied manually. To block the QUIC protocol on UDP 443, you must create a new rule and place it on top of the cloud-maintained/autogenerated rules. For more information, see: How to Block UDP Port 443 on CloudGen Firewalls.
Additional Information
On a CloudGen Firewall box, enabling SecureEdge will replace the original VPN server certificate. The new root certificate can be downloaded via the Cloud UI, if needed (i.e., to import it into Trusted Root Cert stores on computers running NAC/VPN Client).
When enabling SecureEdge on a box with an existing X.509-based C2S-VPN configuration, the VPN server will always try to extract the username from the Common Name (CN) field.
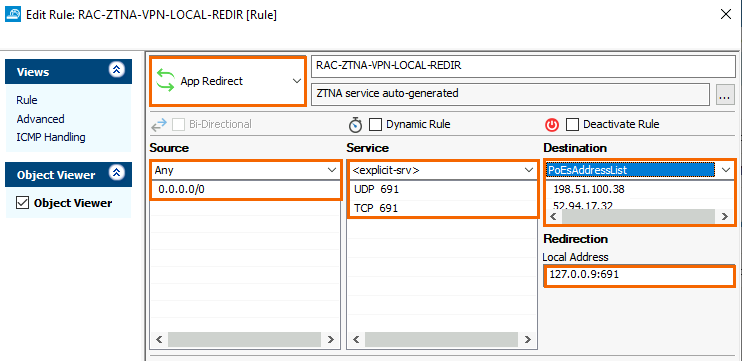
When you are using a CloudGen Firewall as a point of entry for SecureEdge Access and want to keep the traffic from going out to the public internet and back, you must define an additional access rule on your CloudGen Firewall. To add a rule, follow the instructions below:
To ensure that VPN clients behind CloudGen Firewall sites do not connect to a SecureEdge Cloud Service, you must manually configure a local redirect rule for VPN port
691on the firewall.The redirect rule for VPN on Point of Entry(PoE) is needed so that a SecureEdge Access VPN connection is terminated on the nearest PoE. Note that if not configured with a CloudGen Firewall as PoE, SecureEdge Access connects to any existing SecureEdge Cloud service by ignoring the nearby CloudGen Firewall as PoE.
For example, to create an access rule on the CloudGen Firewall, go to FIREWALL > Forwarding Rules and specify the following settings:
Select App Redirect as the action.
Enter a Name for the rule, e.g.:
RAC-ZTNA-VPN-LOCAL-REDIRSource – Select Any
Service – Select <explicit> and create or select the service object for TCP/UDP 691 as shown below. For more information, see How to Create Service Objects in the CloudGen Firewall documentation.
Destination – Instead of using “Any” as a destination, you may create a network object containing all the Edge Service (PoE) IPs, e.g.,
PoEsAddressListthat contain a list of all IP addresses with respect to the PoEs that are available on the SecureEdge Manager, or you can add the PoE IPs explicitly. To obtain a PoE address list, go to the Zero Trust Access > Point of entry table and note down the IP addresses under the field name Public IPs. For more information, see How to Configure Points of Entry. For CloudGen Firewalls, the Edge Service's public IP can be found on the Infrastructure > Edge Services <Name of Your Edge Service> dashboard page. For more information, see the section Accessing Information on the Edge Services Dashboard. Note: As soon as you remove the CloudGen Firewall as a point of entry, you must manually remove the existing local redirect rule for the VPN that you have created.