

Perform the following steps to enable IPv6 in the Barracuda Web Application Firewall instance on AWS:
- Go to the Your VPCs page and select the VPC for which you want to enable IPv6.
- From the Actions drop-down list select Edit CIDRs.
- On the Edit CIDRs page, click Add new IPv6 CIDR.
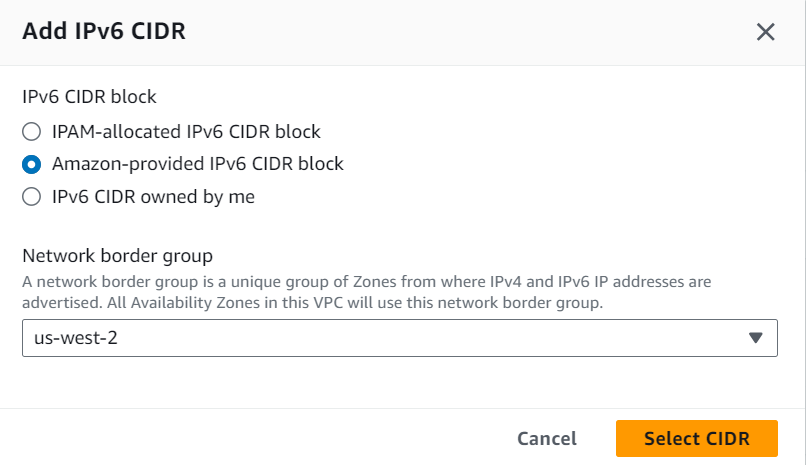
- On the Add IPv6 CIDR page, select the Amazon-provided IPv6 CIDR block option and click Select CIDR.
- After associating the IPv6 CIDR with the VPC, go to the Subnets page.
- On the Subnets page:
- Select the subnet to which you want to associate the CIDR block.
- Select Edit IPv6 CIDRs from the Actions drop-down list.
- On the Edit IPv6 CIDRs page:
- Click Add IPv6 CIDR.
- Set the subnet size to /64 and click Save.

- Select Edit Subnet Settings from the Actions drop-down list.
- On the Edit subnet settings page, select the Enable auto-assign IPv6 address checkbox and click Save.

- On the Edit subnet settings page, select the Enable auto-assign IPv6 address checkbox and click Save.
- Launch a new instance using the subnet you created. To deploy the instance on AWS, refer to Step 3. Deploy the Barracuda Web Application Firewall on Amazon Web Services section in the Barracuda Web Application Firewall Deployment and Quick Start Guide for Amazon Web Services article.
The Barracuda Web Application Firewall instance boots up with the IPv6 on System IP. You can now create services using the IPv6 IP address that is configured as the System IP.