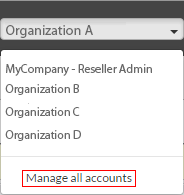
Use the web interface to set up and administer your Barracuda Backup appliance.
Barracuda Cloud Control
Your Barracuda Cloud Control account gives you access to Barracuda Backup, Barracuda Networks services to which you have a subscription, and any devices added through Barracuda Appliance Control. As long as you are logged in as an administrator, you can add users and assign roles. Each user uses their own user name to log in.
Table 1. Manage Your Account
| Feature | Details |
|---|---|
| Select Account Options | Click the Home link in the left pane to perform these account-related tasks:
Click Backup in the left pane to go to the Barracuda Backup web interface. |
| Community | Click Community at the top right of the web interface to access product forums and add your own feedback. Use forums to discuss and view feature requests. |
| Your Account Profile | Click My Profile to perform the following tasks:
|
| Support | Click Support at the top right of the web interface to perform the following tasks:
|
Users
Administer user access to the Barracuda Backup from the Admin > Users page. Click Add & Remove Users to add or remove users, or click Edit to the right of the user to modify the user's access rights. You can specify the following user options, all of which are specific to Barracuda Backup:
- Receive emails with backup reports, error condition alerts, or Barracuda Backup Server software update notices.
- Restrict access to the Barracuda Backup web interface to one or more IP addresses.
- Designate the user role.
Use the following steps to add Barracuda Backup entitlements when you add a user to your Barracuda Cloud Control account.
- Log in to Barracuda Cloud Control as the administrator, click Home in the left pane, and go to the Admin > Users page.
- Click Add User; the new User Details displays.
- Enter the new user's first and last name in the Name field, and enter their Email address; the user email address will serve as their username.
- Select the Starting Page for this user upon log in from the following options:
- Default
- Community/Forum
- Account
- Support
- If you are using Multi-Factor Authentication, complete this section.
- In the Privileges section, select from the following options:
- User Management – Specify whether the user can add, remove, and edit users.
- Billing Administration – Specify whether the user can update billing information for this account.
In the Product Entitlements section, click Backup (Admin).
- Click Save User at the top of the page to add the user to Barracuda Backup; an email is then sent to the user prompting them to set their password.
- Click on the username in the Users list; the User Details section displays in the right pane. In the Product Entitlements section under Backup (Admin), click Configure Permissions.
- In the configuration page, configure Email Notifications:
- Backup Summary Reports – When selected, a summary report is sent to this user for each appliance daily.
- Backup Detailed Reports – When selected, a detailed report each time a backup job completes, including a list of all backed up items.
- Alerts – When selected, an alert is sent to this user if an error occurs during a backup job or if a Barracuda Backup appliance goes offline.
- Notices – When selected, a notice is sent to this user when the Barracuda Backup appliance software is updated.
- If you have multiple appliances on an account, you can selectively limit visibility. To restrict the IP address that this user is allowed to log in from:
- In the IP login restrictions field, enter an IP block in single 192.168.1.100 notation, CIDR net block 192.168.1.0/24 notation or a range in 192.168.0.0-192.168.0.128 notation to specify the IP addresses from which this user is allowed to log into Barracuda Backup.
- Separate multiple IP blocks or ranges with a comma.
- From the User role drop-down menu, select permissions for this user:
- Account Administrator – User has full access to all Barracuda Backup appliances within the account.
- Barracuda Backup Appliance Administrator – User has full access to all selected Barracuda Backup appliances; user does not have edit or view user accounts access. When selected, the Grant access to section displays:
- Select All Backup Appliances –When selected, user has full access to all Barracuda Backup appliances within the account. When cleared, a list of all connected Barracuda Backup appliances displays. Turn on the Barracuda Backup appliances to which this user is to have access.
- Operators – User access is limited to viewing statistics and modifying backup configuration for selected Barracuda Backup appliances. Operators cannot restore data or edit user accounts.
- Select All Backup Appliances – When selected, user has Operator access privileges to all Barracuda Backup appliances within the account. When cleared, a list of all connected Barracuda Backup appliances displays. Turn on the Barracuda Backup appliances to which this user is to have Operator access.
- Helpdesk – User access is limited to the Dashboard page, the restore browser and restore reports on Barracuda Backup Appliances. Helpdesk users can restore data and stop running restores.
Select All Backup Appliances – When selected, user has Help Desk access privileges to all Barracuda Backup appliances within the account. When cleared, a list of all connected Barracuda Backup appliances displays. Turn on the Barracuda Backup appliances to which this user is to have Helpdesk access.
- Status – User access is limited to viewing the Dashboard page for Barracuda Backup appliances to which they have access.
Select All Backup Appliances – When selected, user has Status access privileges to all Barracuda Backup appliances within the account. When cleared, a list of all connected Barracuda Backup appliances displays. Turn on the Barracuda Backup appliances to which this user is to have Status access.
- Click Save at the top of the page to save the Backup configuration settings for the selected user.
Email Notifications
Specify the type of email notification for each user on the account, or users not associated with your account (non-users):
- Backup Summary Reports – Sends a daily report for each appliance, including information about the last run of each schedule the previous day, is sent
- Backup Detailed Reports – Sends a detailed report each time a backup job completes, including a list of all items backed up
- Alerts – Sends a notification for conditions such as:
- A Barracuda Backup appliance is offline or has come online
- A Barracuda Backup appliance has not been able to communicate with a Barracuda replication target, that is, another Barracuda Backup appliance or Barracuda Cloud Storage (check for Internet problems)
- A Barracuda Backup appliance, such as a RAID volume or HD hardware, fails
- An error has occurred in a backup
- An error situation returned to normal and no (further) action is required
- You have reached the limit on your Barracuda Cloud Storage subscription plan size
- A backup job has exceeded 24 hours
- Notices – Sends a notification when the your Barracuda Backup appliance software is updated
To specify email notifications for a user on the account:
- Go to the Admin > Users page, and click Edit to the right of the user name.
- Select the desired notifications in the Email notifications section, and click Save.
To specify email notifications for users not associated with your account (non-users such as your reseller):
- Go to the Admin > Email Notifications page, and enter an address in the Email Address field.
- Select the notifications you want the user to receive, and click Add. The email address is added to the Recipients table.
If a backup job exceeds 24 hours, and you have configured Alerts on the Admin > Email Notifications page, an email notification is sent to the Barracuda Backup administrator. For example:
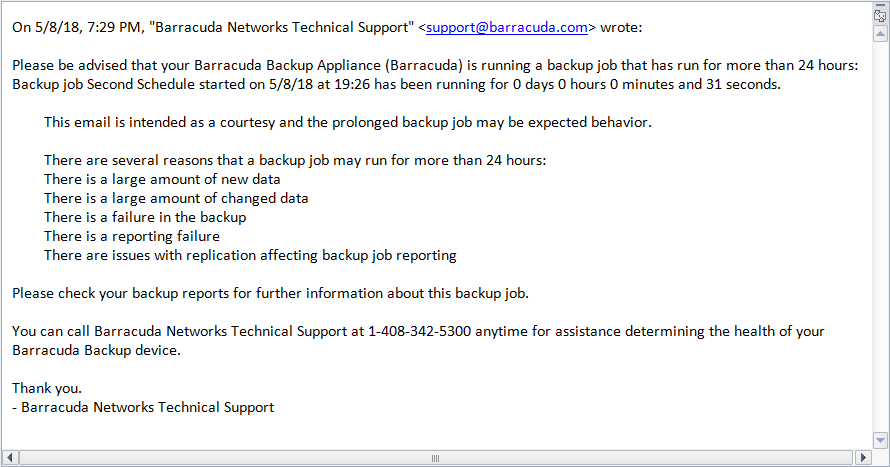
To resolve, determine whether:
- There is a large amount of new or changed data; see the Dashboards
- There is a failure in the backup or a reporting failure; see the Reports Page
- There are issues with replication affecting backup job reporting; see the Replication Page
Display Groups
Display groups allow you to manage multiple Barracuda Backup appliances.
Use the following steps to set up display groups:
- Log into Barracuda Backup, and go to the Admin > Display Groups page.
- All display groups active on your account display in the Current Display Groups section.
- To add a new display group, enter a name for the group of devices in the Display Group field, and then click Add. For example, if you want to group all Barracuda Backup by location, you might create groups by geographic location: Engineering - Asia, Engineering - US, Engineering - Europe.
- The display group name appears in the Current Display Groups section.
To remove a display group, click Remove following the name of the group you want to remove; click OK to confirm you want to remove the group.
Once you create display groups, you can add a Barracuda Backup appliance to the group using the following steps:
- In the left pane, select the appropriate Barracuda Backup, and go to the System > Barracuda Backup Appliance Settings page.
- In the Backup Appliance Display Group section, choose from the Current Display Group drop-down list, select the display group name.
- To add or remove display groups, click Manage your display groups to go to the Admin > Display Groups page.
- Click Save.
Activate Barracuda Backup
Use the Admin > Activate Barracuda Backup page to set up your Barracuda Backup appliance. The Barracuda Backup appliance must be linked online before backups can be initiated. See the following sections for details on linking and unlinking a Barracuda Backup appliance:
- Deploy a Barracuda Backup Appliance
- Activate a Barracuda Backup Device as a Reseller
- Activate a New Reseller Device
Firmware Settings, Notifications, and Updates
Manage firmware updates and view release notes on the System > Firmware Updates page.
Use the System > Firmware Settings page to select the firmware upgrade policy:
- Current Installed Version – Displays the currently installed firmware version
- Firmware Upgrade Policy – Select the release stage you want to update to the latest firmware:
- Legacy Release – Access a previously installed version of the firmware; do not select this option unless directed to do so by Barracuda Networks Technical Support.
- General Release – The latest generally available version of the firmware available for use on Barracuda Backup.
- Early Release – The newest firmware versions available for early access to Barracuda Backup.
- Firmware Available – Specifies the latest firmware version available based on the selected Upgrade Policy
- Upgrade Now – If a newer version of firmware is available, click Upgrade Now to upgrade the firmware
- View release notes – Review the release notes to see new features and resolved issues
Firmware Notification
If a newer version of firmware is available, once you log into Barracuda Backup, the Dashboard page displays a notification banner across the top of the page. Click Upgrade Now to immediately begin the firmware upgrade, or click Dismiss to hide the banner until the next time you log into the web interface.
Local Control Appliance Firmware Update
When managing your Barracuda Backup appliance independently of Barracuda Networks Cloud through Local Control, update firmware on the System > Firmware Settings page.
Firmware Upgrade Policy
Barracuda Backup enables administrators to perform manual upgrades at a time that is convenient, however, Barracuda performs automatic upgrades for Barracuda Backup devices with an active Energize Update subscription if they are running unsupported firmware versions.
Energize Updates
Barracuda Backup requires an Energize Updates subscription for firmware upgrades and Technical Support. Energize Updates are also required to maintain compatibility with the Barracuda Backup Cloud (accessed through login.barracuda.com). Barracuda Backup performs updates to the cloud to maintain compatibility with the latest legacy, general, or early release firmware versions. Barracuda Backup devices with expired Energize Updates running unsupported firmware versions may experience difficulties using the Barracuda Backup Cloud for management as well as services such as data replication.
This does not apply to the local web-based management interface which is accessible for restores or the Local Control management option.
If your Energize Updates Subscription expires, contact Barracuda Networks Sales to renew your subscriptions.
Automatic Firmware Upgrades
After a major firmware version has completed the rollout phase, Barracuda sends an upgrade notification, providing 30-day's notice before the upgrade takes place. This notification includes information on new features, bug fixes, and end-of-life announcements. You must subscribe to email notices to receive the upgrade notifications.
For more information, refer to Firmware Upgrade Policy and Supported Versions.
Appliance Settings
Use the System > Barracuda Backup Appliance Settings page to view or modify the Barracuda Backup appliance details including name, time zone, physical location, and display group:
- Barracuda Backup Appliance Name – Name used to identify the currently selected Barracuda Backup appliance in the web interface
- Backup Appliance Time Zone – The time zone where the currently selected Barracuda Backup appliance is located
- Barracuda Backup Appliance Location – The physical location of the Barracuda Backup appliance including city, state, and country
- Barracuda Backup Appliance Display Group – The display group in which the Barracuda Backup appliance resides
- Manage your display groups – Click to add or remove a display group in the Admin > Display Groups page
- Backup Export Tool Settings – Set up the Backup Export Tool
Software Downloads
Go to the System > Software Downloads page to download tools for use with Barracuda Backup including:
- Barracuda Bare Metal Live CD
- Barracuda Backup Agent (Windows)
- Barracuda Backup Agent (Linux)
- Barracuda Backup Agent (Mac)
- Barracuda GroupWise Trusted Application Key Generator
- Backup Export Tool
- Kroll Ontrack
Open a Support Tunnel
When Barracuda Networks Technical Support needs to troubleshoot a Barracuda Backup appliance linked through Cloud Control, the technician uses the VPN tunnel between the appliance and the Barracuda Cloud Servers. However, there are some conditions where the VPN tunnel is prevented from connecting. For example, if a Barracuda Backup appliance is linked through Local Control, a support tunnel must be manually opened for remote diagnostics and technical support services over TCP port 22 outbound in contrast with the default VPN connection over port 1194.
For more information, go to Technical Support and Required Outbound Connections for Barracuda Appliances.
Open a Support Tunnel through the Web Interface
Use the following steps to open a support tunnel through the Barracuda Backup web interface:
- Log in to https://login.barracuda.com/, and select the appliance in the left pane.
- Go to System > Troubleshooting, and click the link to toggle the Support Tunnel Open.
- Once troubleshooting is complete, click the link once again to toggle the Support Tunnel Closed to disable the support tunnel.
Open a Support Tunnel Using the Console
You can use the Console screen to open a support tunnel.
Use the following steps to open a Support Tunnel using the Console:
- Connect the VGA monitor and keyboard to the Barracuda Backup appliance.
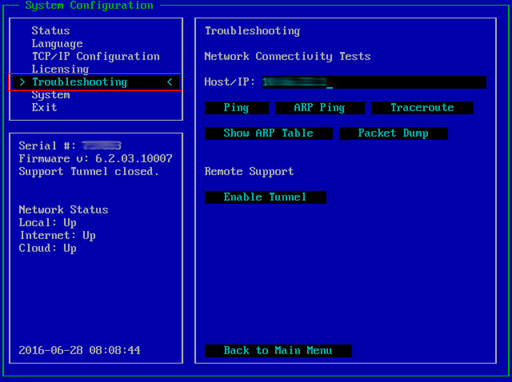
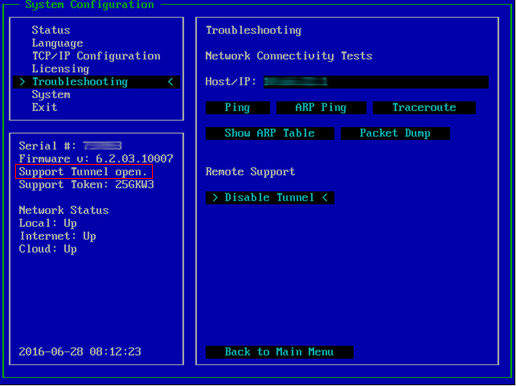
- Use the keyboard arrows to highlight Troubleshooting, and press either Enter or the right arrow key on your keyboard to move the cursor to the Troubleshooting menu:
- Use the arrow keys on your keyboard to move the cursor to Enable Tunnel in the Remote Support section:
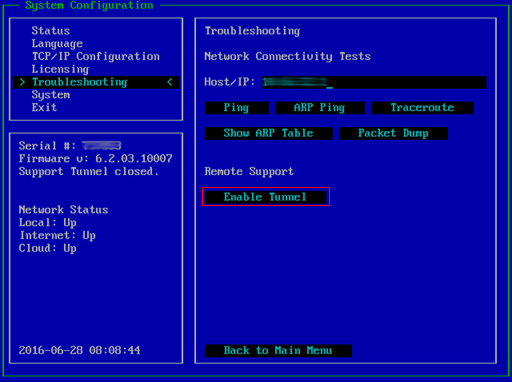
- Press Enter to open a support tunnel. Verify the support tunnel is open:
- Once troubleshooting is complete, repeat steps 1-4 to Disable the support tunnel.
Open a Support Tunnel from Local Control
Use the following steps to log into the local interface and open a support tunnel for remote diagnostics and technical support services over TCP port 22 outbound:
- In a browser window, enter the Barracuda Backup appliance IP address.
- Log in using your Barracuda Cloud Control credentials.
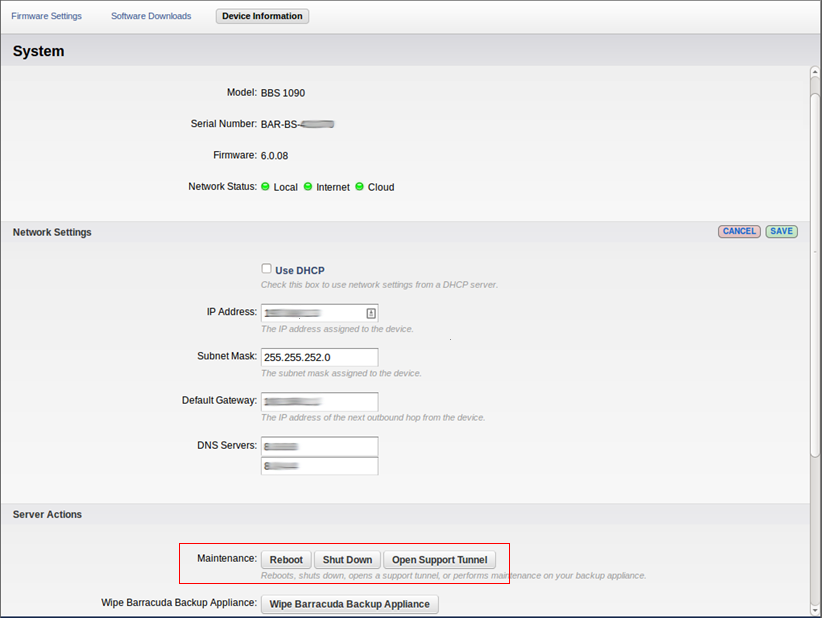
- Go to the System > Device Information page, and in the Server Actions section, click Open Support Tunnel:

- The button changes to Close Support Tunnel, and a message displays indicating that the tunnel is open.
- Once troubleshooting is complete, click Close Support Tunnel.
Shut Down a Barracuda Backup Appliance
You can remotely reboot or shut down a Barracuda Backup appliance by logging in to its local web interface. Type the Barracuda Backup IP address in a web browser, log in using your Barracuda Networks account, and go to the System > Device Information page:
You can also perform a safe shutdown of a Barracuda Backup appliance by pressing the POWER button on the front of the device. This issues a shutdown command to all system and service processes before the device powers down.
Wipe a Barracuda Backup Appliance
Wiping a Barracuda Backup Server unlinks it from your account and puts all data and configuration information into a queue to be purged from Barracuda Cloud Storage. The wipe feature also deletes the contents of the local databases on the Barracuda Backup appliance, moves the binary data on the Barracuda Backup appliance into a temporary storage location on the system, and then shuts it down. The next time the Barracuda Backup appliance is booted, the binary data that has been moved is deleted.
Use the following steps to wipe a Barracuda Backup Server to unlilnk it from your account:
- Enter the Barracuda Backup IP address to log into the local web interface.
- Go to the System > Device Information page, and in the Server Actions section, click Wipe Barracuda Backup Appliance:

- The message Wipe Started Successfully displays in the web interface; a warning message displays:
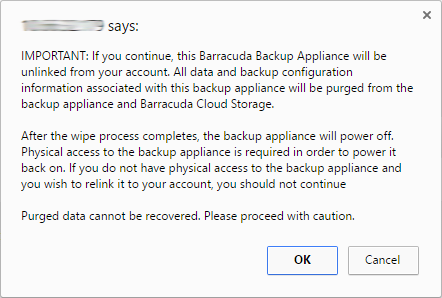
- Click OK to complete the unlinking process. Once the Barracuda Backup appliance is unlinked from the account, the Backup Server Wipe Successful page displays, including the Serial Number and Linking Code.
- Make note of the serial number and linking code. You can now link the Barracuda Backup appliance to a new account. For details, see Administration for Resellers.

